HOW TO: Install WOT Box In LE5
 09-13-2008, 06:29 PM
#1

HOW TO: Install WOT Box In LE5 *video*
What you will need for installation:
-WOT box
-coat hanger
-side cuts
-wire strippers
-electrical tape
-soldering gun and solder
-extra zip ties (depending on how crazy you like to get, we used at least 20)
-wire loom for a more professional/ factory install
-grab a friend if possible, definitely helpful
-option double sided foam tape/Velcro
Instructions:
-It is strongly recommended that you disconnect the negative battery terminal while tampering with electrical components on your car, especially ECU wires.
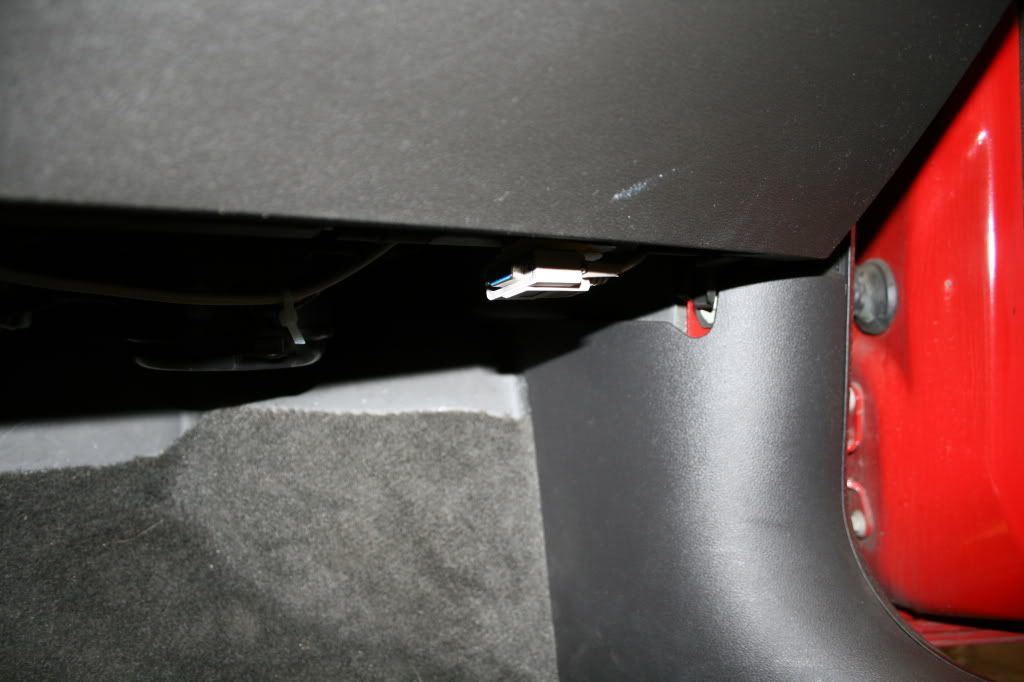
-Start by passing a metal coat hanger through the rubber grommet on the firewall located next to the steering shaft. We found it much easier to do this while starting from the inside of the car.

-Proceed to make a small hook in the coat hanger on the end inside he car. Take the WOT box wires and wrap them around the hook you just made. Leave the small individual BLACK wire inside the passenger compartment. The solidly wrap them up in electrical tape.

-This is where a friend comes in handy. One of you need to slowly pull the coat hanger from the engine compartment as the other person helps to feeds the wires through the rubber grommet from the passenger compartment. Be sure to leave enough wire inside the car to place the box in the desired location.
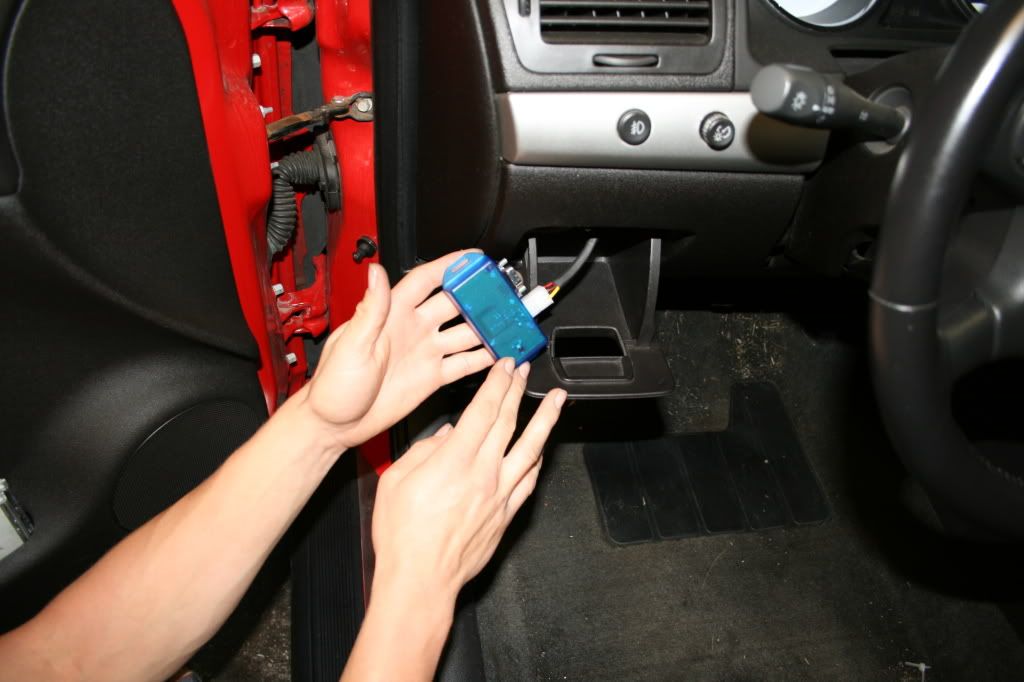
-This is where you can route the wire towards where you'd like the box mounted. We chose to wrap the wires in loom due to moving steering components and sharp metal brackets. Better to be safe then sorry. Our mounting location for the box was in the pull down compartment located to the left of the steering wheel.
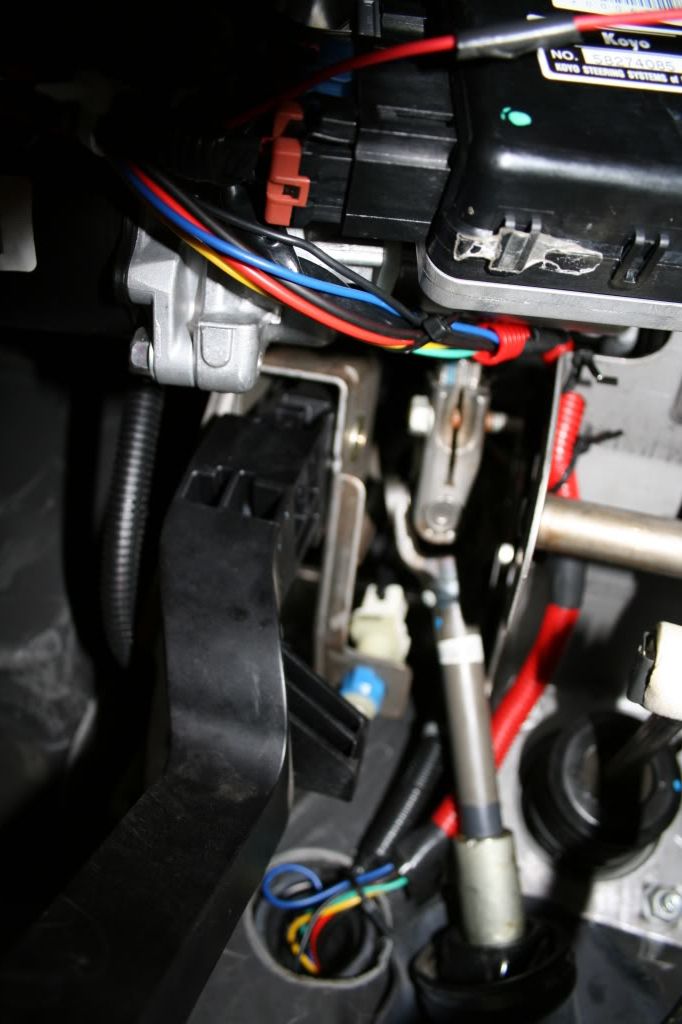
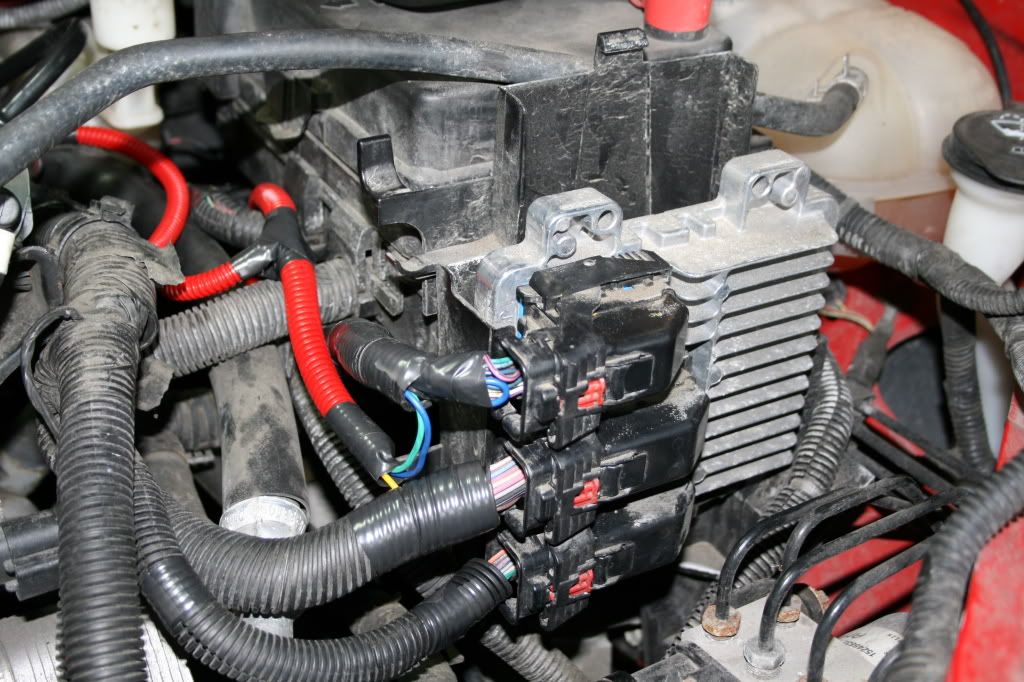
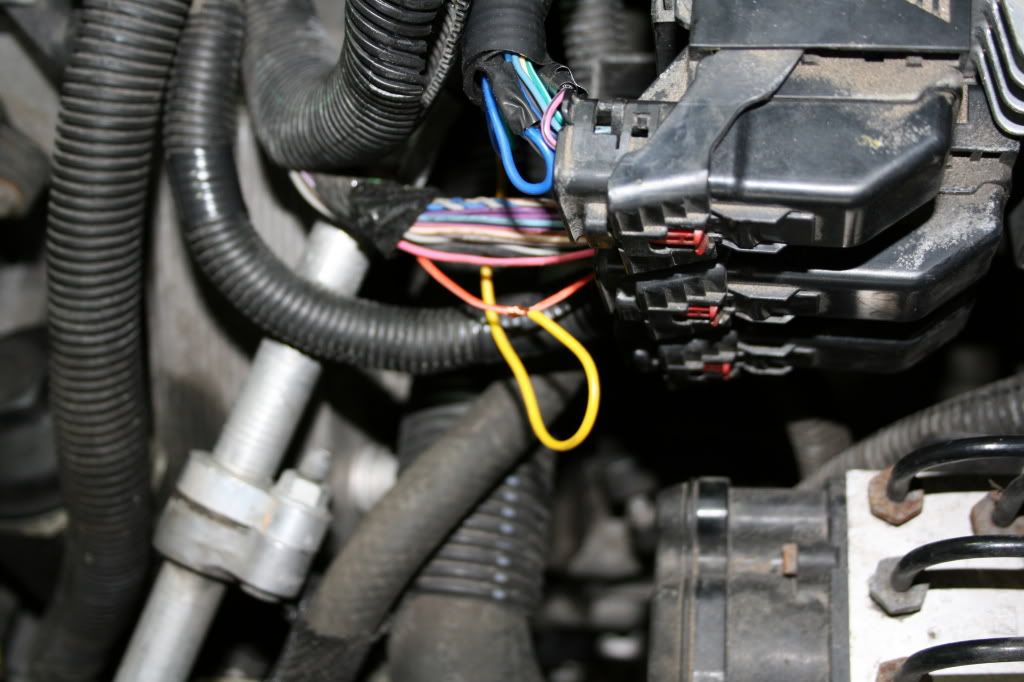
-Now its time to move under the hood. begin routing the wires up toward the 3 ECU connectors. We chose to wrap the wires in loom once again to protect against heat and also provide a cleaner looking install. (It was a late night install and all we had laying around was red loom. It does the job and for the sake of this write up will probably help a few people clarify what we"re talking about.)
*This is an after install picture*
-We chose to completely remove connector 1 (top) from the ECU to make it easier to locate wires and eliminate the guess work. Once the connector is removed take the front plastic shield off of it so you can see which wire corresponds with each pin. GM has actually been helpful enough to label the beginning wires in each row of the connector so that you can easily figure out how to count the pins.
-On the first ECU connector there are 2 wires that will need to be tapped into. Start by unwrapping the tape and pulling back the factory wire loom leading into the connector. This gives you the room needed to splice into the wires. The first wire that you're going to want to look for is the BROWN/WHITE wire. The is the CPP switch signal which is pin #6. Carefully strip back the insulation while taking extra care NOT to cut through the wire. Now solder the GREEN wire from the WOT box to the BROWN/WHITE wire that you just stripped. Now wrap the connection securely in electrical tape.
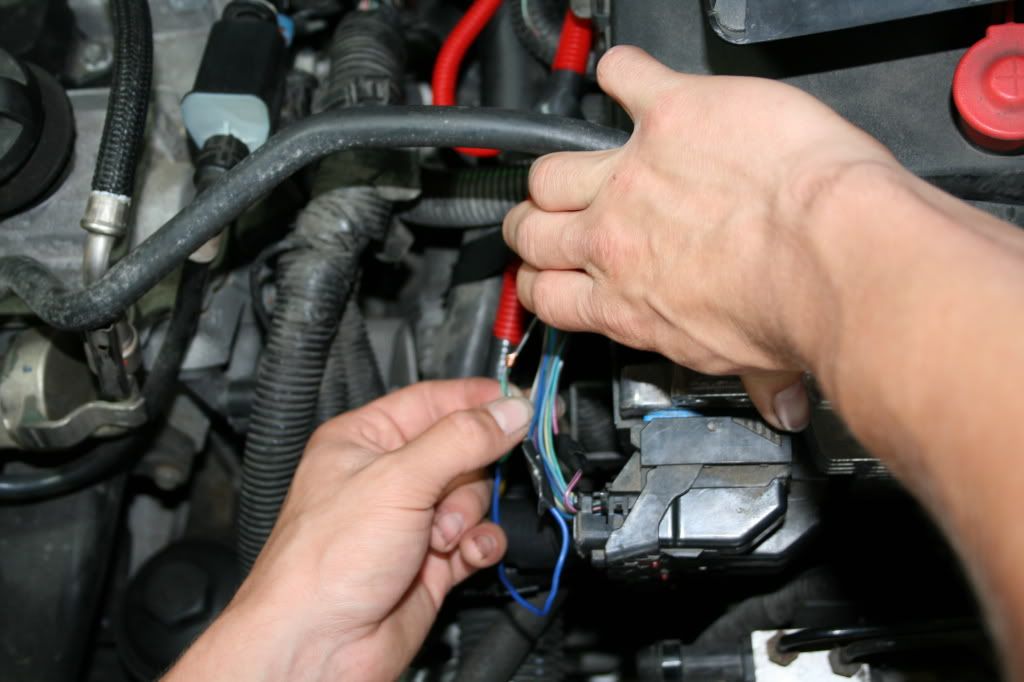
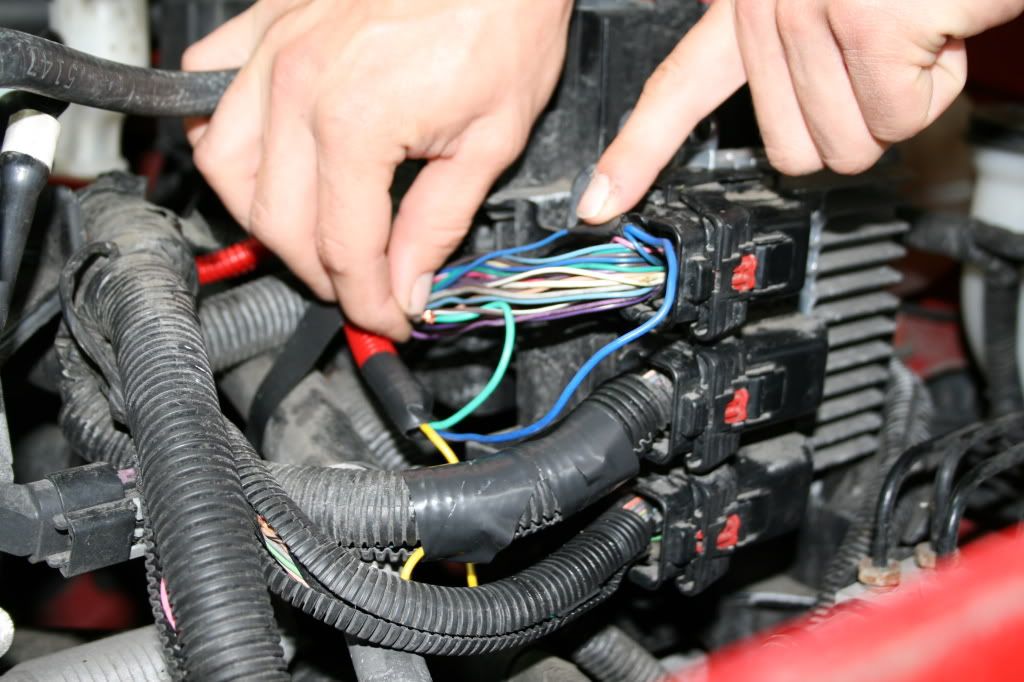
-The second wire in this connector that you'll need to tap into is the DARK BLUE wire. This is the APP sensor 1 signal wire located on pin #47. Again carefully strip back the wire without cutting through it. Now solder the BLUE wire from the WOT box to the DARK BLUE wire and secure in electrical tape.
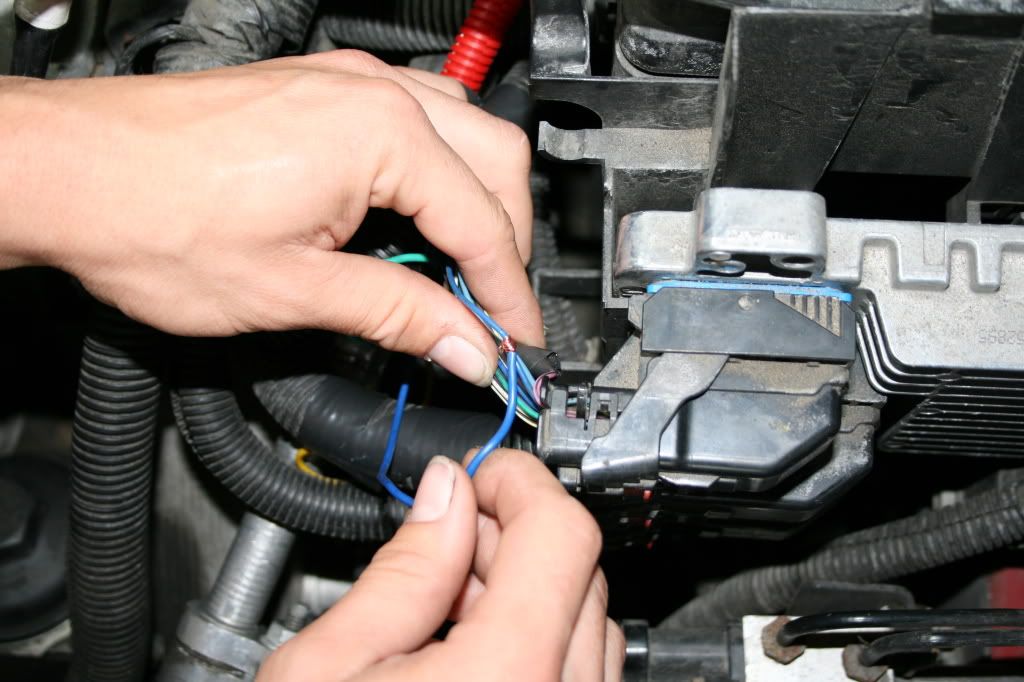
-That will be all the work that you will need to do with the first connector. Replace the factory wire loom back over the wires and wrap a piece of electrical tape over the end of the loom to keep it in place. reinstall the connector into to ECU.
-Remove connector 2 (middle) in the same way that you removed connector 1. Unwrap the tape and pull back the loom. There is only one wire that you will need to tap into in this connector which is the ORANGE/WHITE wire. This is the IC 2 control which is located at pin #53. Again carefully strip back the wire without breaking it. Solder the YELLOW wire from the WOT box to the ORANGE/WHITE wire and secure with electrical tape.
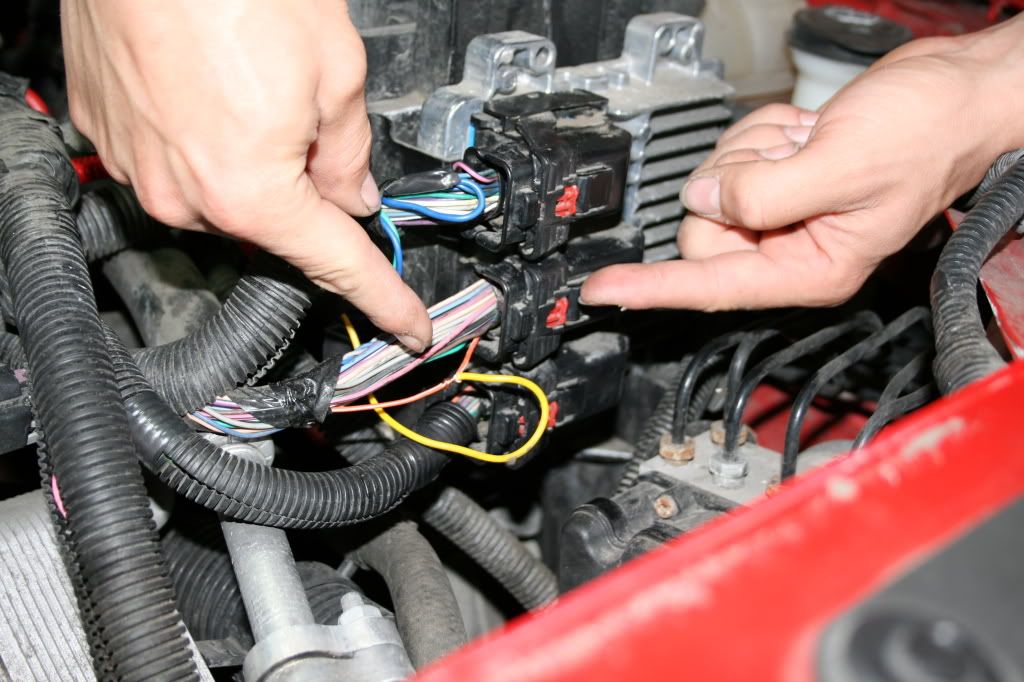
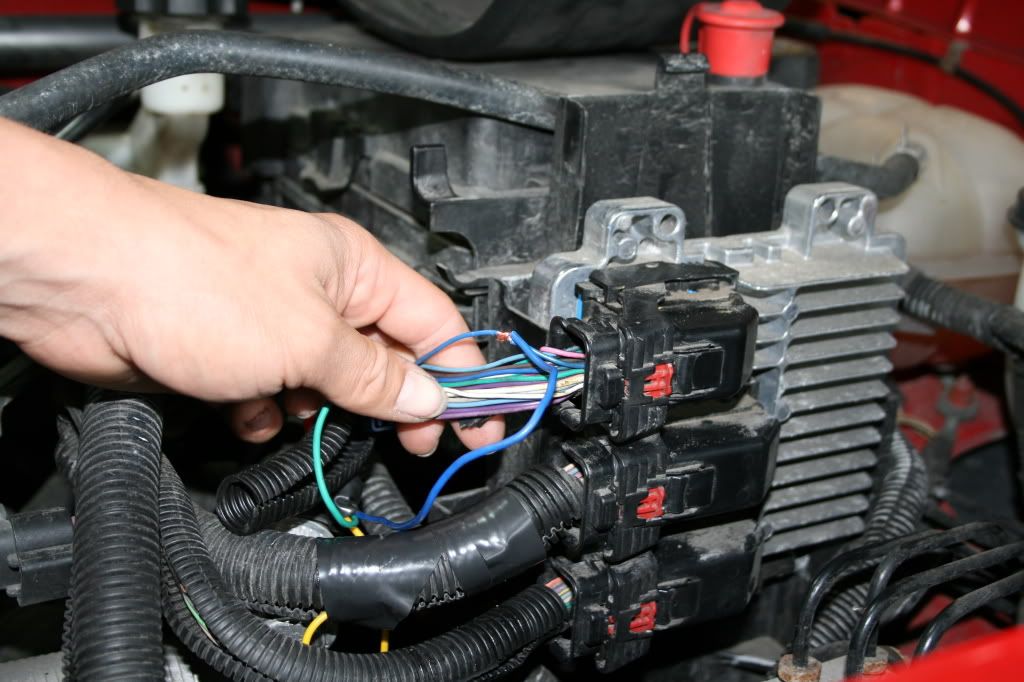
-Just as before you can replace the factory loom over the wires and secure with electrical tape. Replace the connector in the ECU.
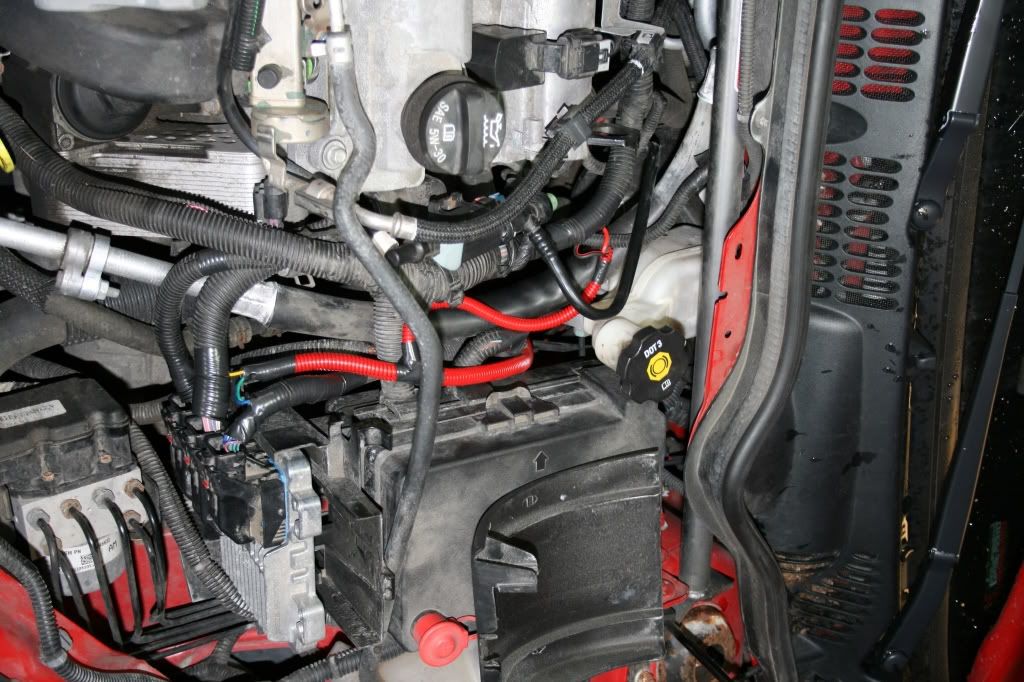
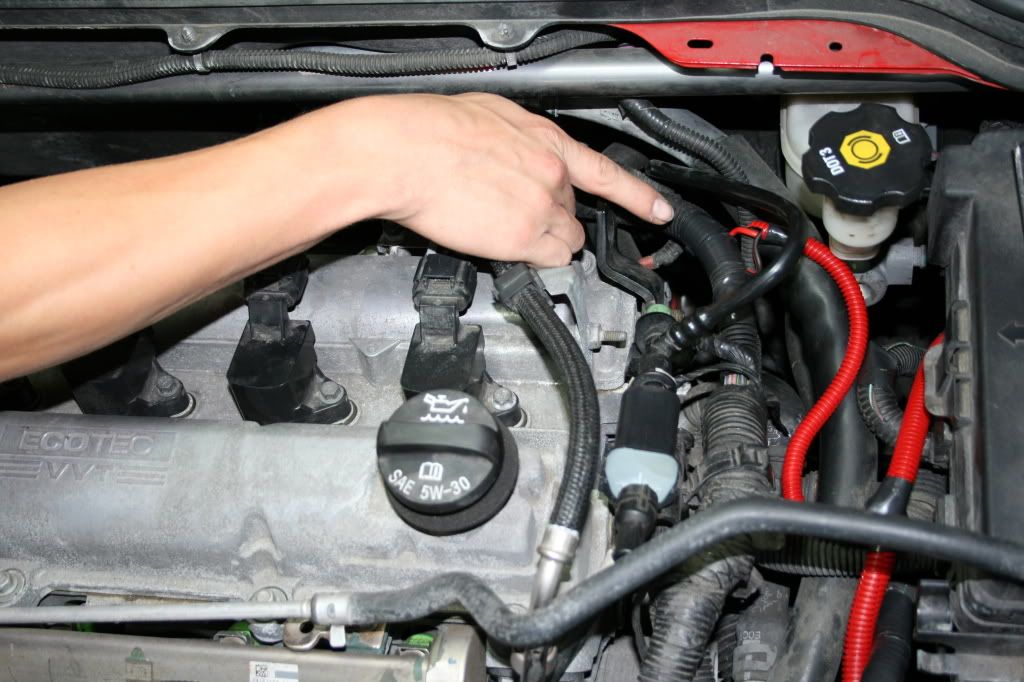
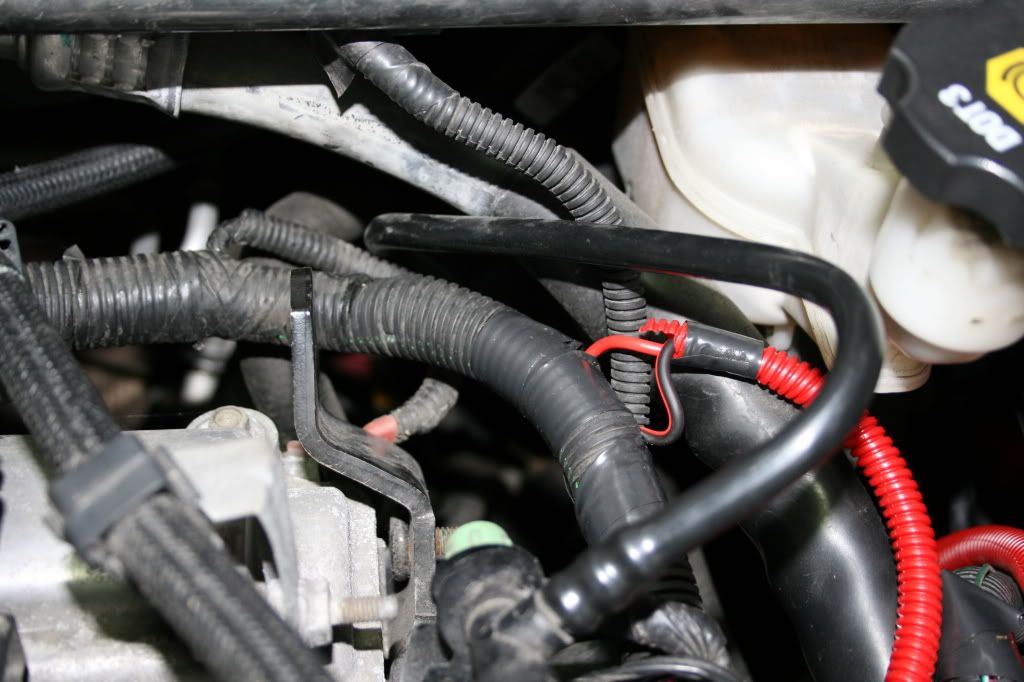
-Next locate the harness that leads to the coil packs on the drivers side of the motor. Remove the wire loom next to the head and locate the PINK/WHITE wire. Cut this wire completely through and strip back both ends. Take the RED and BLACK wires from the WOT box and split then down a bit. Strip back the ends of these wires as well. Before soldering any wires be sure to slide heat shrink down the wires for later use. Solder the BLACK wire to the PINK/WHITE wire that leads to the coils/back of the motor. Secure with heat shrink. Now solder the red wire from the WOT box to the PINK/WHITE wire leading towards the front of the car. Again secure this connection with heat shrink. You may now replace the factory wire loom and secure with electrical tape.
-That concludes the under hood section of this write up. Now it's time to move inside the car. Once inside the car take the single back wire that you left in the cabin from the WOT box and using the provided ring terminal find a suitable ground location and connect. (We chose to use a ground from a previous installation on electrical components.)
-Next secure all the wire under the dash while taking care to leave slack so that you can still open and close the compartment after mounting the WOT box. Again be sure that the wires are clear of all moving components including pedals, steering components and your own feet.
-This concludes the mandatory steps needed to install the WOT box. It is now recommended that you test the WOT box using the procedures located on this page.
http://www.npcompleteperformance.com...oninstructions
Option steps:
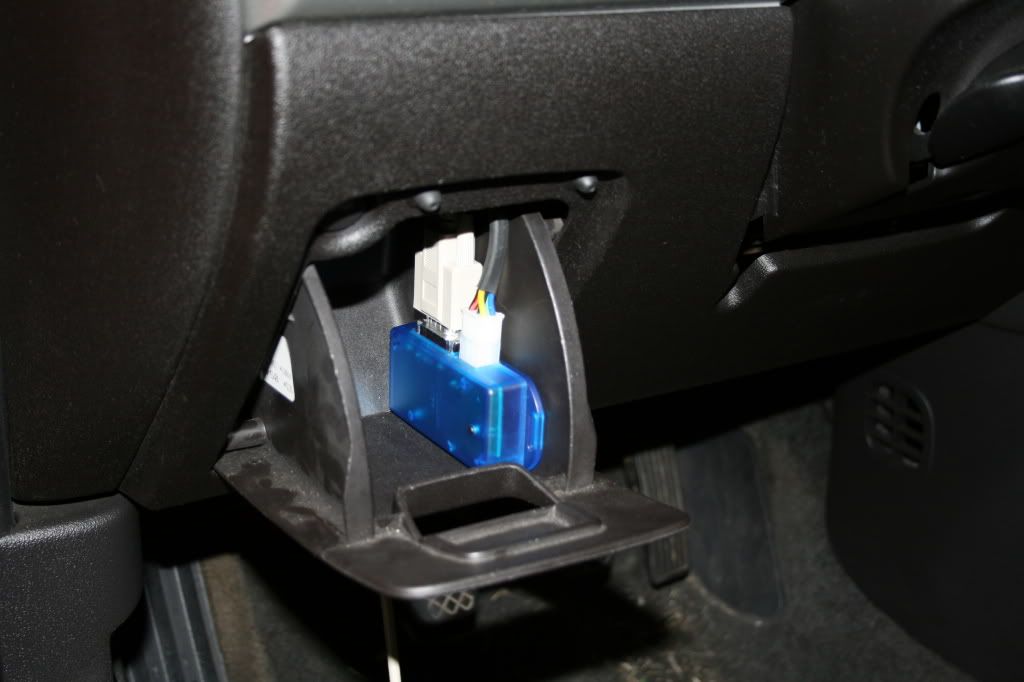
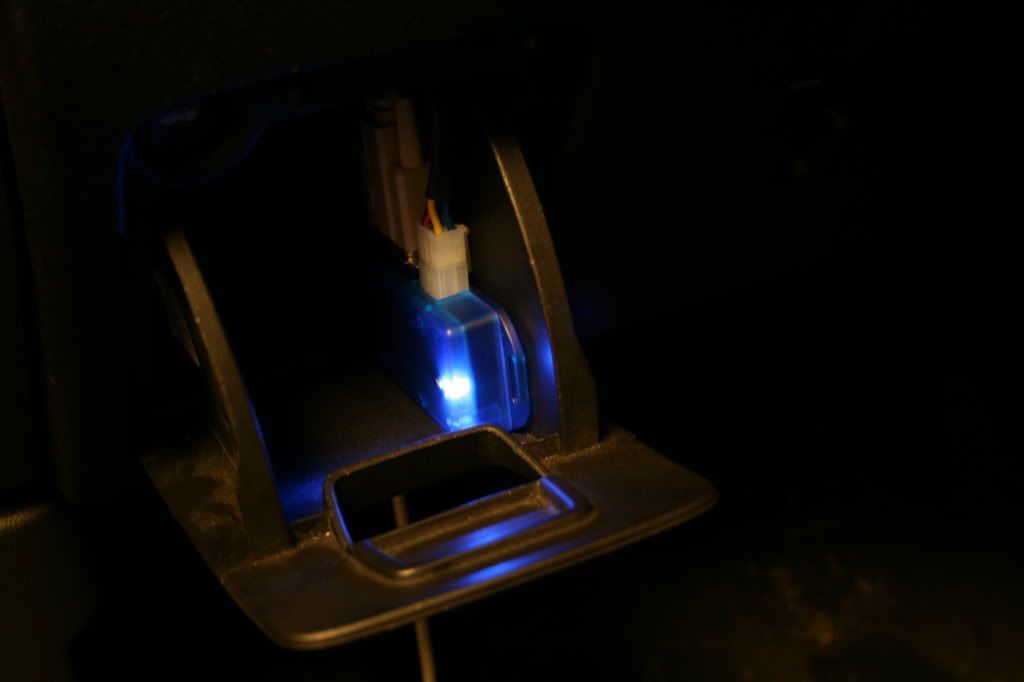
-We chose to attach the serial cable and remote mount it under the glove box using Velcro.
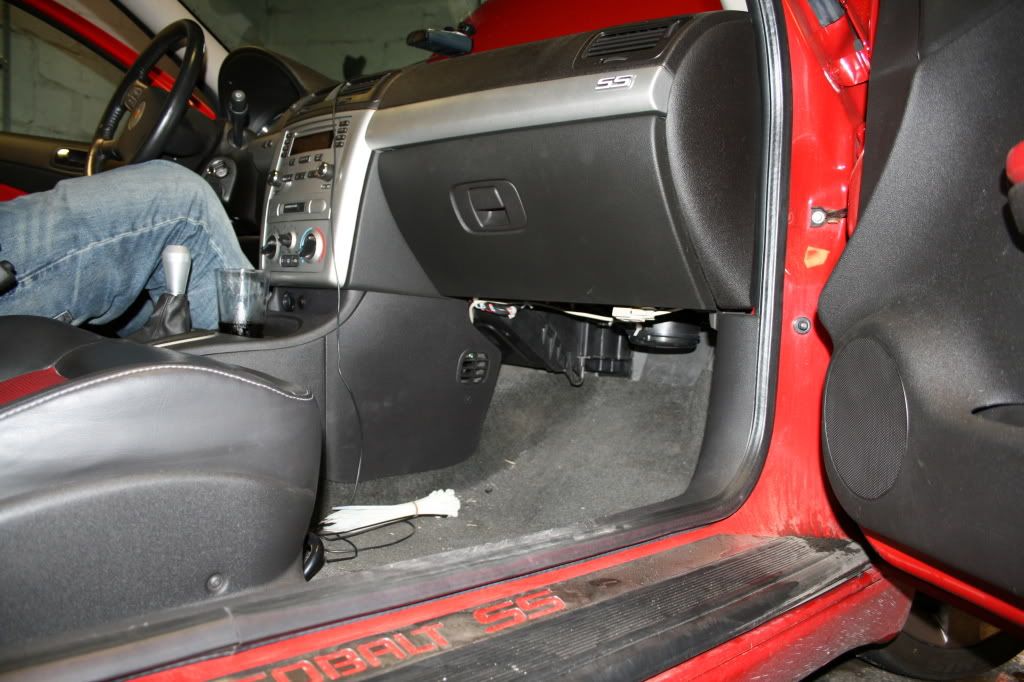
-We the attached the WOT box the the side of the small compartment using double sided foam tape.
This concludes the complete installation of a WOT box. Videos to come soon!!! Keep an eye out. The WOT box makes a serious difference in both launching and shifting during a racing situation. The launch control is commonly using on boosted cars in order to assist in building boost before a launch. However it is still very helpful in a naturally aspirated situation as it helps to provide more consistent launching and I have found it much easier to control my launches. Shifting while using the no lift shift system is also a very nice feeling. Not only are the shifts obviously faster but they feel considerably smoother as well.
I would highly recommend that every 2.4 owner buys this product due to all the reasons listed above and also because you now have a full set of instructions for installing this in your car. All the guess work is done for you. Be sure to mention my name, REDSSNA, to PHROZEN when ordering the WOT box for your 2.4 cobalt!!!
-WOT box
-coat hanger
-side cuts
-wire strippers
-electrical tape
-soldering gun and solder
-extra zip ties (depending on how crazy you like to get, we used at least 20)
-wire loom for a more professional/ factory install
-grab a friend if possible, definitely helpful
-option double sided foam tape/Velcro
Instructions:
-It is strongly recommended that you disconnect the negative battery terminal while tampering with electrical components on your car, especially ECU wires.
-Start by passing a metal coat hanger through the rubber grommet on the firewall located next to the steering shaft. We found it much easier to do this while starting from the inside of the car.
-Proceed to make a small hook in the coat hanger on the end inside he car. Take the WOT box wires and wrap them around the hook you just made. Leave the small individual BLACK wire inside the passenger compartment. The solidly wrap them up in electrical tape.
-This is where a friend comes in handy. One of you need to slowly pull the coat hanger from the engine compartment as the other person helps to feeds the wires through the rubber grommet from the passenger compartment. Be sure to leave enough wire inside the car to place the box in the desired location.
-This is where you can route the wire towards where you'd like the box mounted. We chose to wrap the wires in loom due to moving steering components and sharp metal brackets. Better to be safe then sorry. Our mounting location for the box was in the pull down compartment located to the left of the steering wheel.
-Now its time to move under the hood. begin routing the wires up toward the 3 ECU connectors. We chose to wrap the wires in loom once again to protect against heat and also provide a cleaner looking install. (It was a late night install and all we had laying around was red loom. It does the job and for the sake of this write up will probably help a few people clarify what we"re talking about.)
*This is an after install picture*
-We chose to completely remove connector 1 (top) from the ECU to make it easier to locate wires and eliminate the guess work. Once the connector is removed take the front plastic shield off of it so you can see which wire corresponds with each pin. GM has actually been helpful enough to label the beginning wires in each row of the connector so that you can easily figure out how to count the pins.
-On the first ECU connector there are 2 wires that will need to be tapped into. Start by unwrapping the tape and pulling back the factory wire loom leading into the connector. This gives you the room needed to splice into the wires. The first wire that you're going to want to look for is the BROWN/WHITE wire. The is the CPP switch signal which is pin #6. Carefully strip back the insulation while taking extra care NOT to cut through the wire. Now solder the GREEN wire from the WOT box to the BROWN/WHITE wire that you just stripped. Now wrap the connection securely in electrical tape.
-The second wire in this connector that you'll need to tap into is the DARK BLUE wire. This is the APP sensor 1 signal wire located on pin #47. Again carefully strip back the wire without cutting through it. Now solder the BLUE wire from the WOT box to the DARK BLUE wire and secure in electrical tape.
-That will be all the work that you will need to do with the first connector. Replace the factory wire loom back over the wires and wrap a piece of electrical tape over the end of the loom to keep it in place. reinstall the connector into to ECU.
-Remove connector 2 (middle) in the same way that you removed connector 1. Unwrap the tape and pull back the loom. There is only one wire that you will need to tap into in this connector which is the ORANGE/WHITE wire. This is the IC 2 control which is located at pin #53. Again carefully strip back the wire without breaking it. Solder the YELLOW wire from the WOT box to the ORANGE/WHITE wire and secure with electrical tape.
-Just as before you can replace the factory loom over the wires and secure with electrical tape. Replace the connector in the ECU.
-Next locate the harness that leads to the coil packs on the drivers side of the motor. Remove the wire loom next to the head and locate the PINK/WHITE wire. Cut this wire completely through and strip back both ends. Take the RED and BLACK wires from the WOT box and split then down a bit. Strip back the ends of these wires as well. Before soldering any wires be sure to slide heat shrink down the wires for later use. Solder the BLACK wire to the PINK/WHITE wire that leads to the coils/back of the motor. Secure with heat shrink. Now solder the red wire from the WOT box to the PINK/WHITE wire leading towards the front of the car. Again secure this connection with heat shrink. You may now replace the factory wire loom and secure with electrical tape.
-That concludes the under hood section of this write up. Now it's time to move inside the car. Once inside the car take the single back wire that you left in the cabin from the WOT box and using the provided ring terminal find a suitable ground location and connect. (We chose to use a ground from a previous installation on electrical components.)
-Next secure all the wire under the dash while taking care to leave slack so that you can still open and close the compartment after mounting the WOT box. Again be sure that the wires are clear of all moving components including pedals, steering components and your own feet.
-This concludes the mandatory steps needed to install the WOT box. It is now recommended that you test the WOT box using the procedures located on this page.
http://www.npcompleteperformance.com...oninstructions
Option steps:
-We chose to attach the serial cable and remote mount it under the glove box using Velcro.
-We the attached the WOT box the the side of the small compartment using double sided foam tape.
This concludes the complete installation of a WOT box. Videos to come soon!!! Keep an eye out. The WOT box makes a serious difference in both launching and shifting during a racing situation. The launch control is commonly using on boosted cars in order to assist in building boost before a launch. However it is still very helpful in a naturally aspirated situation as it helps to provide more consistent launching and I have found it much easier to control my launches. Shifting while using the no lift shift system is also a very nice feeling. Not only are the shifts obviously faster but they feel considerably smoother as well.
I would highly recommend that every 2.4 owner buys this product due to all the reasons listed above and also because you now have a full set of instructions for installing this in your car. All the guess work is done for you. Be sure to mention my name, REDSSNA, to PHROZEN when ordering the WOT box for your 2.4 cobalt!!!
Last edited by redssna; 09-20-2008 at 07:46 PM.

 09-14-2008, 06:39 AM
#4
Former Vendor

Join Date: 07-01-08
Location: Philadelphia
Posts: 354
Likes: 0
Received 0 Likes
on
0 Posts
It will improve your turbo kits performance. You will hold boost through the shift and you can launch under boost.

Yes, we recommend that all the connections are soldered and then covered with electrical tape. I think he said that, but didn't show it in the pictures.
Last edited by phrozen; 09-14-2008 at 06:39 AM. Reason: Automerged Doublepost

 09-14-2008, 04:36 PM
#8
Former Vendor
Join Date: 07-01-08
Location: Philadelphia
Posts: 354
Likes: 0
Received 0 Likes
on
0 Posts


 09-22-2008, 06:29 PM
#22
For the launch control the box regulates the rpm's to your preset level. mine is 3,400 right now. you press the clutch all the way to the floor, then quickly floor the gas pedal. it holds that rpm while you then let the clutch out and as soon as it's completely out it stops regulating the rpms and its just normal wide open throttle. then you can also no lift shift. keep the gas to the floor and only use the clutch while shifting. it reduces the engine rpm's for a split second while you shift gears.
09-22-2008, 06:32 PM
#23
Senior Member

Join Date: 09-16-05
Location: UNDER YOUR BED
Posts: 13,309
Likes: 0
Received 0 Likes
on
0 Posts
For the launch control the box regulates the rpm's to your preset level. mine is 3,400 right now. you press the clutch all the way to the floor, then quickly floor the gas pedal. it holds that rpm while you then let the clutch out and as soon as it's completely out it stops regulating the rpms and its just normal wide open throttle. then you can also no lift shift. keep the gas to the floor and only use the clutch while shifting. it reduces the engine rpm's for a split second while you shift gears.
09-22-2008, 06:35 PM
#24
correct me if i'm wrong but doesn't the SS/TC come from the factory with the options the WOT box provides. and I believe the box was originally designed for the NSRT4.
I'm sure that it will eventually take its toll on the clutch but it's also a stock 2.4 clutch with 55,000 miles and it's taking it just fine for now. besides that it actually feels rather smooth while 2 step launching or flat shifting.
I'm sure that it will eventually take its toll on the clutch but it's also a stock 2.4 clutch with 55,000 miles and it's taking it just fine for now. besides that it actually feels rather smooth while 2 step launching or flat shifting.
Last edited by redssna; 09-22-2008 at 06:35 PM. Reason: Automerged Doublepost
09-22-2008, 06:40 PM
#25
Senior Member
Join Date: 09-16-05
Location: UNDER YOUR BED
Posts: 13,309
Likes: 0
Received 0 Likes
on
0 Posts
correct me if i'm wrong but doesn't the SS/TC come from the factory with the options the WOT box provides. and I believe the box was originally designed for the NSRT4.
I'm sure that it will eventually take its toll on the clutch but it's also a stock 2.4 clutch with 55,000 miles and it's taking it just fine for now. besides that it actually feels rather smooth while 2 step launching or flat shifting.
I'm sure that it will eventually take its toll on the clutch but it's also a stock 2.4 clutch with 55,000 miles and it's taking it just fine for now. besides that it actually feels rather smooth while 2 step launching or flat shifting.
Its for the NSRT, not the CSRT4. Dunno what the hold up is.