J. Rayth's 3k system install
 03-05-2008, 01:34 AM
#1
Member
Thread Starter

Join Date: 02-08-08
Location: US
Posts: 271
Likes: 0
Received 0 Likes
on
0 Posts
It begins tomorrow!!!!
Thanks to all the help I have gotten from the people here on the forums, I have been able to piece together a really nice system. Everything is on the way in various stages of shipping, but the work will begin tomorrow. Also, I feel I need to single out EmperorJJ1, because I was originally looking to spend around $1,000 on my system, but he convinced me (pretty easily I must admit) to upgrade part after part... and now my total bill is around $3,500 (pre-labor).
This is my first real system install, so I intend to take pictures of the install process and show it off here. Aside from sound dampening, I am not doing most of the labor. The local Digital Designs contractor is doing most of the muscle work but I am trading services with him and lingering as everything is installed, so there will be plenty of progress pics.
Here is the part list so far:
Pre-install
80 sqft Second Skin Damplifier
1 gal Second Skin Spectrum (with spray gun)
36 sqft Second Skin Overkill (with 3 cans spray adheisive)
1 set Second Skin Speaker Tweakers (for front component speakers)
Head Unit & EQ
Pioneer FH-P800BT
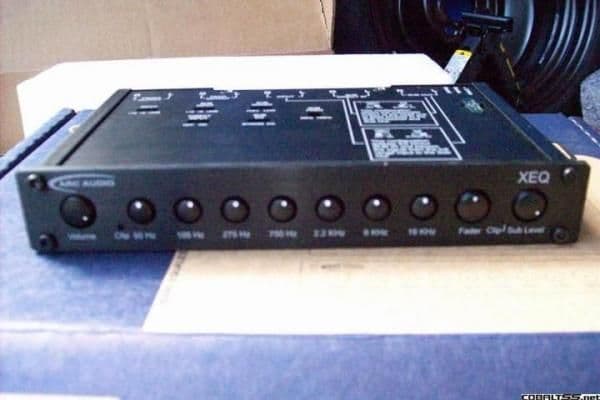
Arc Audio XEQ
Components
Font = Arc Audio Arc-6000
Rear = Arc KS-6936
Amp = Arc Chip Foose Edition FD-4100
The big stuff
Subs = 2x Digital Designs 2510
Amp = Arc Chip Foose Edition FD-1200.1
Box = Custom designed center ported box, more info coming, but made from unique composite material and designed in part by a lead DD tech.
Wiring and Power
Kinetik HC 1800 Power Cell battery
Stinger SR200 High Current Relay
Stinger terminals & wires (Stinger 0ga amp power, Stinger 10ga speaker wire, Stinger RCA's)
Winding alternator back to 160amps
That's the list as far as I can remember. I'll post updates as soon as the raping of the interior begins tomorrow along with some product pics for the stuff that has already arrived.
Love to hear your comments.
Thanks to all the help I have gotten from the people here on the forums, I have been able to piece together a really nice system. Everything is on the way in various stages of shipping, but the work will begin tomorrow. Also, I feel I need to single out EmperorJJ1, because I was originally looking to spend around $1,000 on my system, but he convinced me (pretty easily I must admit) to upgrade part after part... and now my total bill is around $3,500 (pre-labor).
This is my first real system install, so I intend to take pictures of the install process and show it off here. Aside from sound dampening, I am not doing most of the labor. The local Digital Designs contractor is doing most of the muscle work but I am trading services with him and lingering as everything is installed, so there will be plenty of progress pics.
Here is the part list so far:
Pre-install
80 sqft Second Skin Damplifier
1 gal Second Skin Spectrum (with spray gun)
36 sqft Second Skin Overkill (with 3 cans spray adheisive)
1 set Second Skin Speaker Tweakers (for front component speakers)
Head Unit & EQ
Pioneer FH-P800BT
Arc Audio XEQ
Components
Font = Arc Audio Arc-6000
Rear = Arc KS-6936
Amp = Arc Chip Foose Edition FD-4100
The big stuff
Subs = 2x Digital Designs 2510
Amp = Arc Chip Foose Edition FD-1200.1
Box = Custom designed center ported box, more info coming, but made from unique composite material and designed in part by a lead DD tech.
Wiring and Power
Kinetik HC 1800 Power Cell battery
Stinger SR200 High Current Relay
Stinger terminals & wires (Stinger 0ga amp power, Stinger 10ga speaker wire, Stinger RCA's)
Winding alternator back to 160amps
That's the list as far as I can remember. I'll post updates as soon as the raping of the interior begins tomorrow along with some product pics for the stuff that has already arrived.
Love to hear your comments.
Last edited by James Rayth; 03-07-2008 at 02:08 AM. Reason: changed title to warn dial-up users
 03-06-2008, 02:16 AM
#7
Member
Thread Starter
Join Date: 02-08-08
Location: US
Posts: 271
Likes: 0
Received 0 Likes
on
0 Posts
No major updates today, but we started stripping the interior:
Front seats removed

Rear seats removed
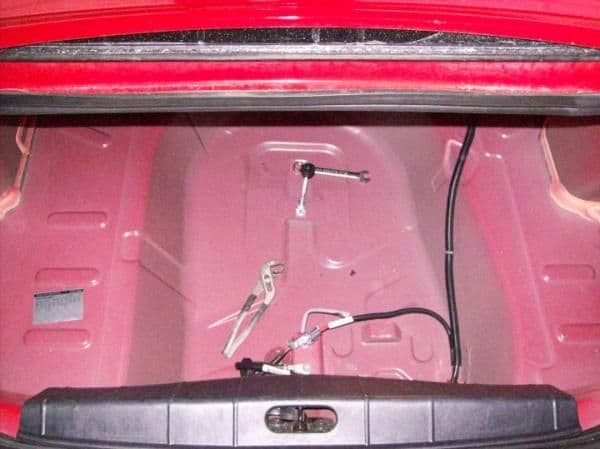
Trunk completely stripped and battery removed
The first 40 sqft of Damplifier comes tomorrow, hopefully in the morning. The rest of the carpet will also be pulled up then and I should get some pics of the components, subs, wires, and 1200.1 amp all tomorrow. The terminals and relay are already in, I just didn't get pics today. I'll get those tomorrow too.
Front seats removed
Rear seats removed
Trunk completely stripped and battery removed
The first 40 sqft of Damplifier comes tomorrow, hopefully in the morning. The rest of the carpet will also be pulled up then and I should get some pics of the components, subs, wires, and 1200.1 amp all tomorrow. The terminals and relay are already in, I just didn't get pics today. I'll get those tomorrow too.


 i love naked car pics!
03-06-2008, 01:28 PM
i love naked car pics!
03-06-2008, 01:28 PM
#11
Member
Thread Starter
Join Date: 02-08-08
Location: US
Posts: 271
Likes: 0
Received 0 Likes
on
0 Posts
YAAAAY! The first 40 sqft of damplifier came in nice and early, so I'm heading off to start on it now. My Arc speakers, XEQ, the 1200.1 amp, and my ought gauge wire all came in too; so plenty of pics later today.
 03-06-2008, 11:47 PM
#13
Member
Thread Starter
Join Date: 02-08-08
Location: US
Posts: 271
Likes: 0
Received 0 Likes
on
0 Posts
YAY most of the parts are in!!!
Pics pics pics:
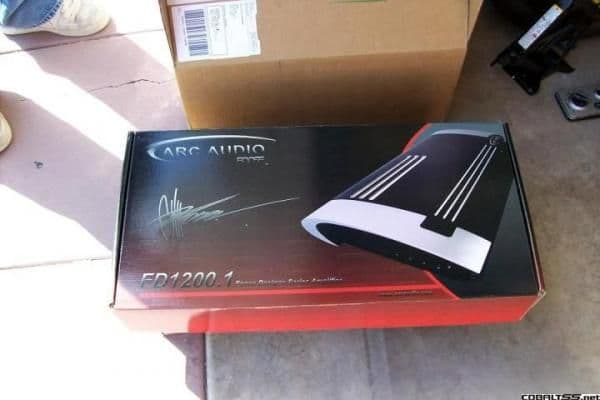
Arc FD-1200.1 amp box
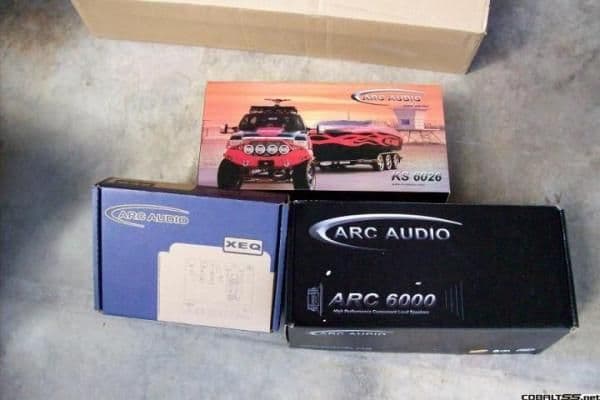
Arc coaxials (Arc KS-6026), components (Arc 6000), and EQ/Crossover (Arc XEQ)
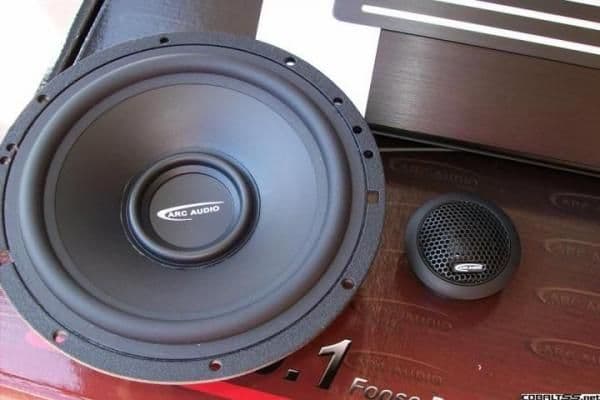
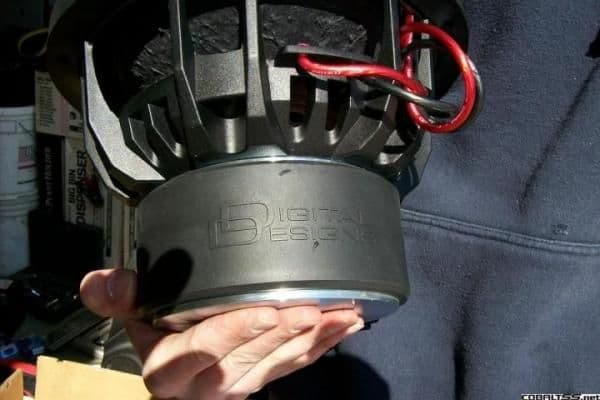
Digital Designs 2510 subs

And whats inside:
Arc Stuffs!!!
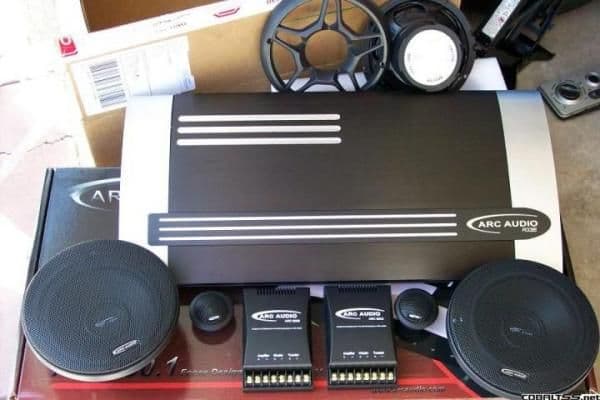
Arc 6000 - Front Aren't they beautiful! (these are the front component speakers)
Arc 6000 - Side
Arc 6000 - Back I like shiney things

Arc KS-6026 (these are the rear speakers)

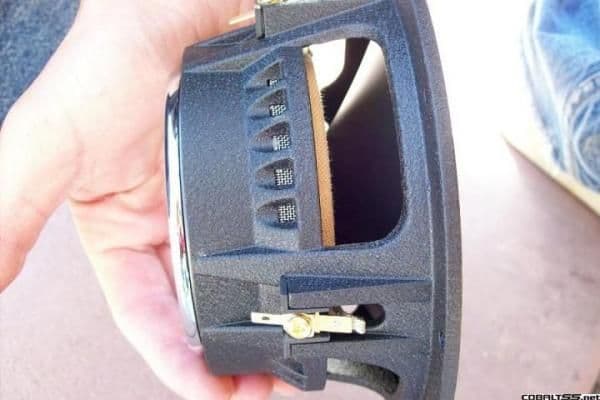
Arc XEQ (I didn't have my macro mode on my camera turned on so its blurry, sorry )
)
Digital Designs 2510 Sub
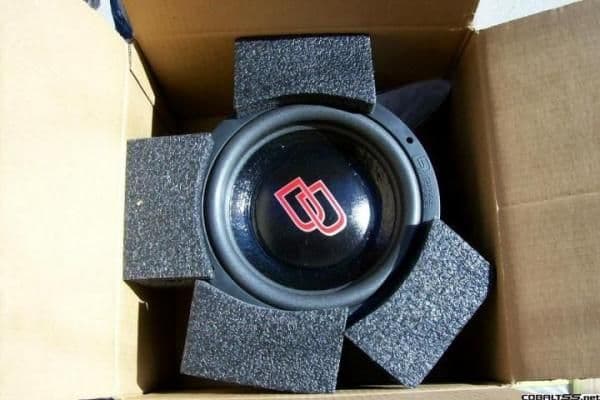
Look at that magnet!!!
Some wiring stuff:
Stinger power relay, ground, and battery terminals

Stinger HPM 0 gauge power & ground wire & 8 gauge speaker wire
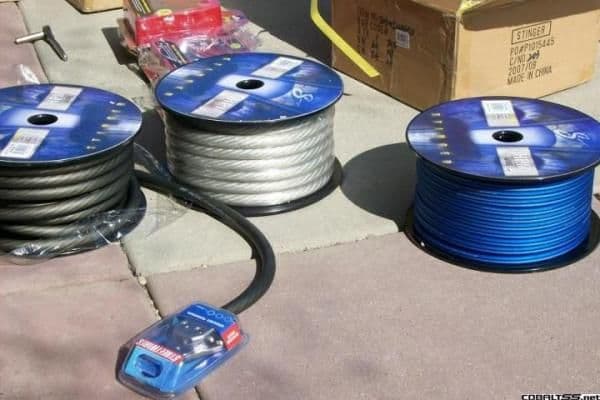
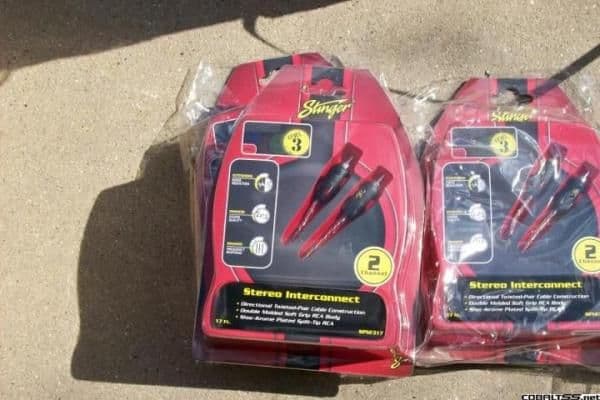
Stinger Pro2 braided RCA cables
Pics pics pics:
Arc FD-1200.1 amp box
Arc coaxials (Arc KS-6026), components (Arc 6000), and EQ/Crossover (Arc XEQ)
Digital Designs 2510 subs
And whats inside:
Arc Stuffs!!!
Arc 6000 - Front Aren't they beautiful! (these are the front component speakers)
Arc 6000 - Side
Arc 6000 - Back I like shiney things
Arc KS-6026 (these are the rear speakers)
Arc XEQ (I didn't have my macro mode on my camera turned on so its blurry, sorry
Digital Designs 2510 Sub
Look at that magnet!!!
Some wiring stuff:
Stinger power relay, ground, and battery terminals
Stinger HPM 0 gauge power & ground wire & 8 gauge speaker wire
Stinger Pro2 braided RCA cables
03-07-2008, 01:38 AM
#14
Member
Thread Starter
Join Date: 02-08-08
Location: US
Posts: 271
Likes: 0
Received 0 Likes
on
0 Posts
Dampening round one
When we finished yesterday we were stuck with the carpet still on because we didn't have our torx bits to get the seat belts off, so we started today getting the seat belts off. It wasn't before long that one torx bit broke trying to get those damn things off. Our pneumatic driver couldn't get it off so we had to use a massive 14" handled socket wrench and good old fashioned elbow grease to get them loose.
Once those were off we got rid of the quarter panels and carpet.

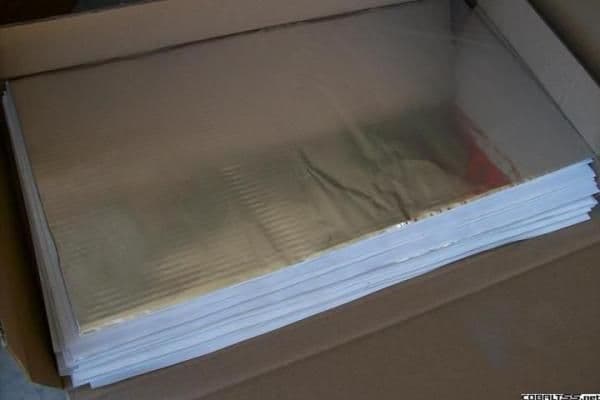
For those who haven't seen Damplifier before, it comes in sheets. Not a roll like some of the asphalt based products out there. Here is the first 40 sq ft fresh in the box.
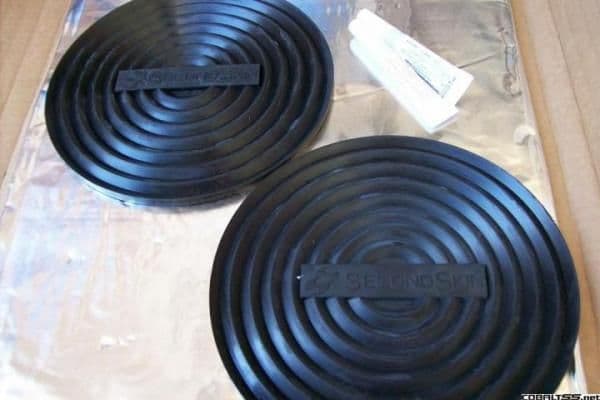
I also had a "speaker tweaker" set sent on this first order. The rippled rubber circles are intended to be glued to the dampening pad so they rest behind the mid-range component speakers. They are designed to redirect the sound that fires into the door back into the cabin, so more of the speakers music goes where it is intended and not lost by backfiring in the door.
After quite a bit of thought and planning, knowing I have another 40 sq ft of damplifier coming on Monday along with some spectrum and overkill, we decided it would be best to start in the areas that are the hardest to get to. Since the seatbelts were a royal pain in the ass to get off, we figured it would be best to start with the wheel wells and quarter panels, then do the floor with the 40 sq that is coming on Monday, and the doors and trunk with the 80 sq ft that is coming later in the week.
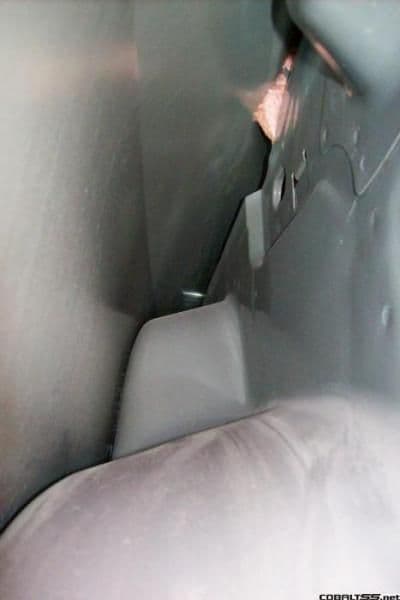
Considering most of the road noise comes from the wheels, we started first with the wheel wells. If you look in the picture below, the two white circles are the rubber "doors" that covering the wheel wells... at least the inner wheel wells.

It is a hollow area that goes all the way up and over the wheel well and extends down the back side of the well quite a bit. I stuck the camera inside to show how far back it goes (this is a shot of the passenger side wheel well).
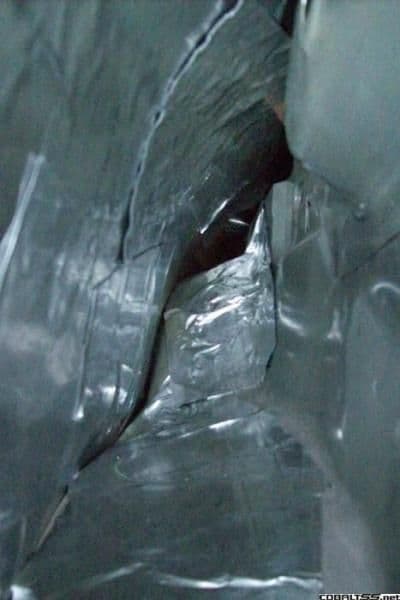
Since this is such a pain to get to, we didn't want to ever think "Damn, we should have put just a little more inside those wheel wells", so we did two layers of damplifier against the wheel well itself, and covered every area we could reach inside that cubby. Here is the after shot.
At this point I started working on the quarter panel and the post with the seatbelts on it. I took all the bolts off and put the damplifier on, then cut the holes out for the bolts and slots for the body panel clips. It was quite time consuming, took about 3 hours for just one side.
Here is the drivers side quarter panel. The wheel well "doors" were in those two holes, and in there is where we double layered the damplifier. I didn't go down any further with the pieces of damplifier because we are going to seal rest over with one piece of damplifier tomorrow.
Here is a better shot whee you can see in the doors, and the double layered damplifier pad we did in there. Again, that entire section will be covered with one sheet of damplifier tomorrow. --And that's the pretty 8 gauge speaker wire.
This is what I feel was my biggest accomplishment of the day, the seatbelt bar (I re-mounted the seatbelt as it was getting in my way, its only 1/2 screwed in though)

That is all the major progress today. Tomorrow we'll just finish using the 4 or so sheets left over to cover up the wheel well "doors", then take the weekend off while we wait for the second shipment of Second Skin products to arrive on Monday, along with the radio harness from Crutchfield.
When we finished yesterday we were stuck with the carpet still on because we didn't have our torx bits to get the seat belts off, so we started today getting the seat belts off. It wasn't before long that one torx bit broke trying to get those damn things off. Our pneumatic driver couldn't get it off so we had to use a massive 14" handled socket wrench and good old fashioned elbow grease to get them loose.
Once those were off we got rid of the quarter panels and carpet.
For those who haven't seen Damplifier before, it comes in sheets. Not a roll like some of the asphalt based products out there. Here is the first 40 sq ft fresh in the box.
I also had a "speaker tweaker" set sent on this first order. The rippled rubber circles are intended to be glued to the dampening pad so they rest behind the mid-range component speakers. They are designed to redirect the sound that fires into the door back into the cabin, so more of the speakers music goes where it is intended and not lost by backfiring in the door.
After quite a bit of thought and planning, knowing I have another 40 sq ft of damplifier coming on Monday along with some spectrum and overkill, we decided it would be best to start in the areas that are the hardest to get to. Since the seatbelts were a royal pain in the ass to get off, we figured it would be best to start with the wheel wells and quarter panels, then do the floor with the 40 sq that is coming on Monday, and the doors and trunk with the 80 sq ft that is coming later in the week.
Considering most of the road noise comes from the wheels, we started first with the wheel wells. If you look in the picture below, the two white circles are the rubber "doors" that covering the wheel wells... at least the inner wheel wells.
It is a hollow area that goes all the way up and over the wheel well and extends down the back side of the well quite a bit. I stuck the camera inside to show how far back it goes (this is a shot of the passenger side wheel well).
Since this is such a pain to get to, we didn't want to ever think "Damn, we should have put just a little more inside those wheel wells", so we did two layers of damplifier against the wheel well itself, and covered every area we could reach inside that cubby. Here is the after shot.
At this point I started working on the quarter panel and the post with the seatbelts on it. I took all the bolts off and put the damplifier on, then cut the holes out for the bolts and slots for the body panel clips. It was quite time consuming, took about 3 hours for just one side.
Here is the drivers side quarter panel. The wheel well "doors" were in those two holes, and in there is where we double layered the damplifier. I didn't go down any further with the pieces of damplifier because we are going to seal rest over with one piece of damplifier tomorrow.
Here is a better shot whee you can see in the doors, and the double layered damplifier pad we did in there. Again, that entire section will be covered with one sheet of damplifier tomorrow. --And that's the pretty 8 gauge speaker wire.
This is what I feel was my biggest accomplishment of the day, the seatbelt bar
That is all the major progress today. Tomorrow we'll just finish using the 4 or so sheets left over to cover up the wheel well "doors", then take the weekend off while we wait for the second shipment of Second Skin products to arrive on Monday, along with the radio harness from Crutchfield.
 03-07-2008, 03:27 AM
#19
Good thinking on your installers point of veiw... that rear quarter panel is second to the doors in terms of road noise IMO and while doing the inside panel helps doing that outer panel is what you reall need.
Oh ya while you want to get those holes covered by damp see if you can seal them first with some sheet metal. one of the ways damplifier works is by vibrating inbetween 2 stiff surfaces. So all that damp that wouldnt be touching anything would only be adding weight.
Oh ya while you want to get those holes covered by damp see if you can seal them first with some sheet metal. one of the ways damplifier works is by vibrating inbetween 2 stiff surfaces. So all that damp that wouldnt be touching anything would only be adding weight.
03-07-2008, 05:38 PM
#20
Member
Thread Starter
Join Date: 02-08-08
Location: US
Posts: 271
Likes: 0
Received 0 Likes
on
0 Posts
Well to my pleasant suprise, my second shipment of Second Skin products came in this morning. So, we are currently working on putting damplifier along the floorboards and finishing the rear quarter panels. Then tonight we'll be spraying the spectrum in the wheel wells and along the floors. It takes 36 hours to fully cure, so we will basically be taking tomorrow off and then resuming Monday with the overkill foam along the floor, rear seat, quarter panels, and firewall.
I'll have more pics and updates tonight.
I'll have more pics and updates tonight.
 03-07-2008, 09:53 PM
#23
Member
Thread Starter
Join Date: 02-08-08
Location: US
Posts: 271
Likes: 0
Received 0 Likes
on
0 Posts
Please explain how they sold out? Because they had Chip Foose design a line of amps and speakers? That is hardly selling out, its not like they have a Xhibit edition, or Fast and the Furious line of stuff. They simply wanted a line of amps and speakers that had more of a visual appeal to them. The rest of their stuff is still very basic and to the point, but now they have one line that is also good looking.
Or is this the same kind of comment teenagers throw out when their favorite band signs a bigger deal and gets more popularity, all of a sudden its not their "little known band" but a huge band everybody knows about so they say that band "sold out" and they go find another garage band to idolize.
Either way, I completely disagree. They still make an amazing product and haven't saturated the market like some other brands have.
Dampening Round Two
As I mentioned above, to my surprise, my second shipment of dampening materials came in today instead of Monday (which is when the tracking number said it would be in). So, we were able to get a lot more of the dampening done. But, before I show you the dampening progress, we also solved another issue we were facing: How to get the 6 3/4" Arc speakers into the doors.
We looked for brackets to mount the Arc speakers to the door, but nobody seemed to have the right brackets that would fit the Arc speakers. Seemed everybody had brackets for 6 1/2" speakers but not ones that would fit the 6 3/4". So, we had to come up with another solution. We did like how the factory speaker brackets screwed and clipped into the door, but the bracket was a part of the speaker.
Here's the factory speaker, front and back.

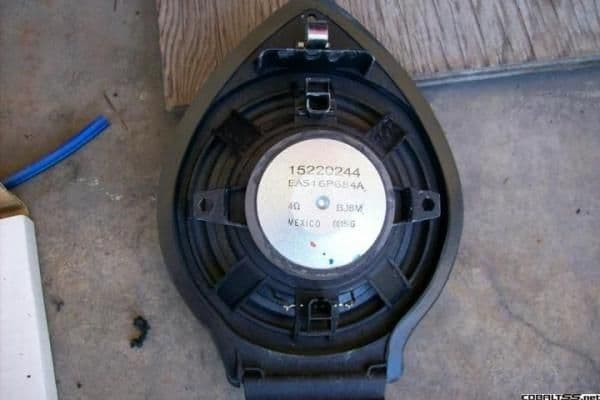
You can see the clip on the top of the picture above. Very handy, but its all a part of the speaker... so my trusty skilled installer man (Brannan) cut the junky speakers out of the bracket and made it fit the Arc's.

Here's what the arc's look like in the brackets.
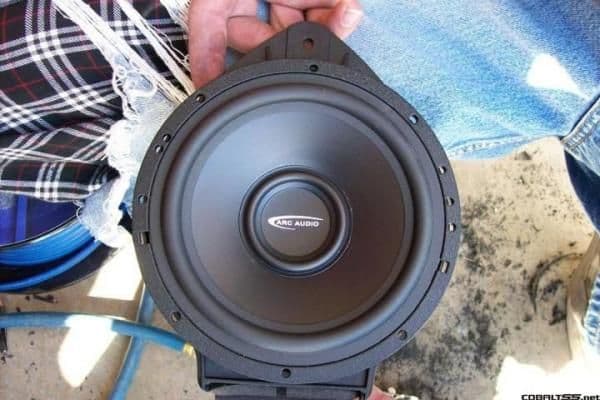
And the back side... have I mentioned I love shiny things?

Here is a side-by-side comparison of the Arc's in the factory brackets and the factory speaker.

Now on to the dampening. Aside from figuring out how to mount the Arc's in the door, today was pretty much uneventful. We used the other 40 sqft of Damplifier that came in today to dampen the floors and rear seat, and the inner (cabin side) part of the wheel well (which we again double-layered).
I did get pretty obsessive with the damplifier while doing the floors. I went under the ac/heater duct and then over it, sandwiching it between damplifier pads. The same went with all the factory wiring, under and over. Here is the start of the drivers side.
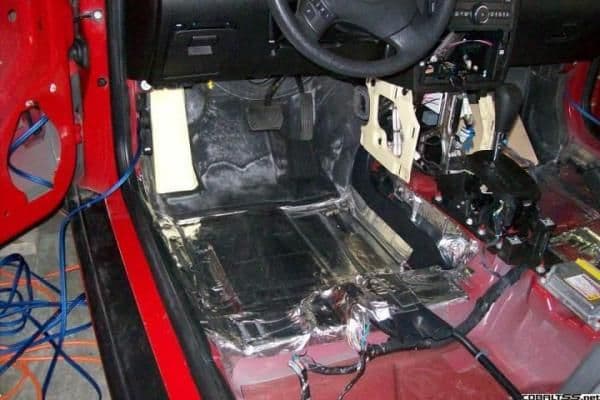
And the passenger side...

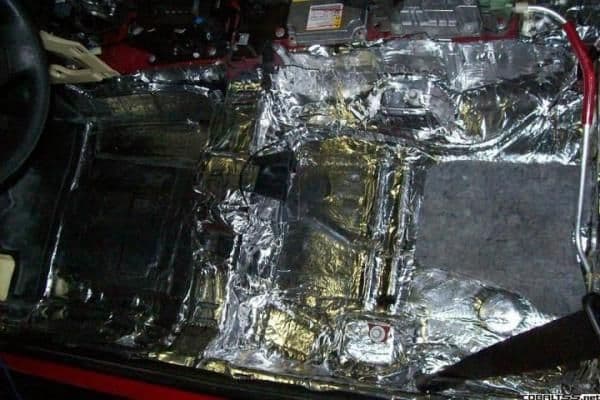
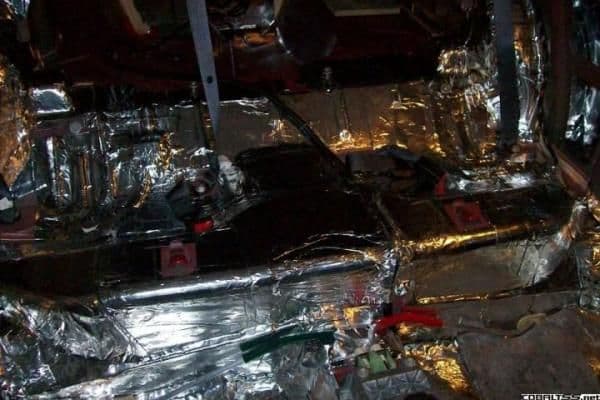
We didn't cover the foam by the firewall with the damplifier because tomorrow we are going to start the spectrum coating and we are going to lift the foam up to coat under it, and then coat over it and all the damplifier pads on the floor, wheel well, and rear seat.
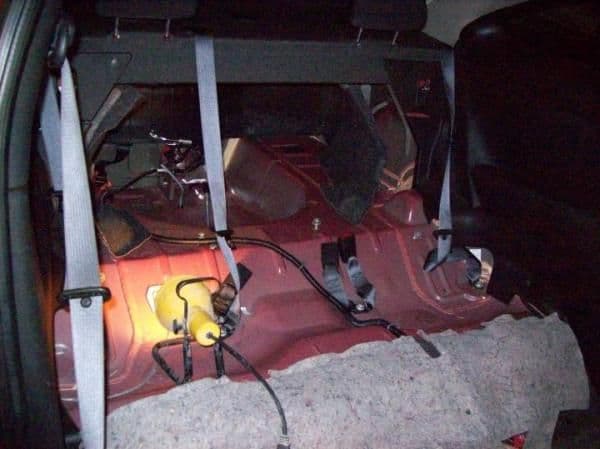
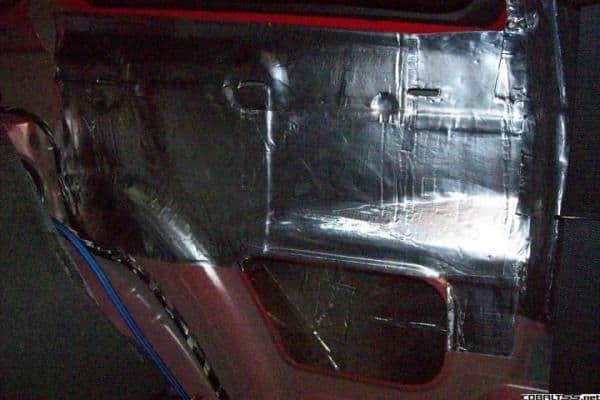
Here is the drivers side completed (there is no yellow anywhere in the car, yet yellow keeps appearing... I think it must be the head liner?)
And the passenger side completed

Rear seat finished (sorry its so dark, it gets dark here fast and being in a garage with 5% windows doesn't help much either)
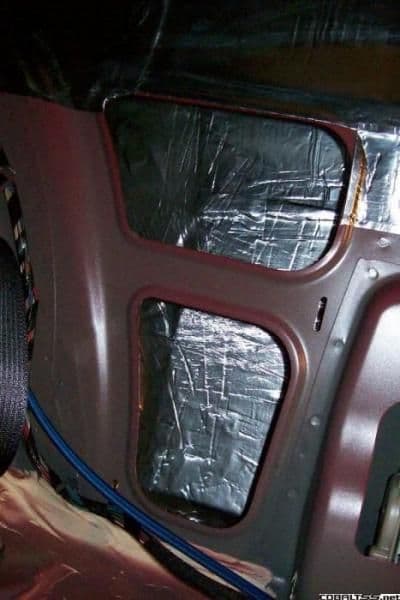
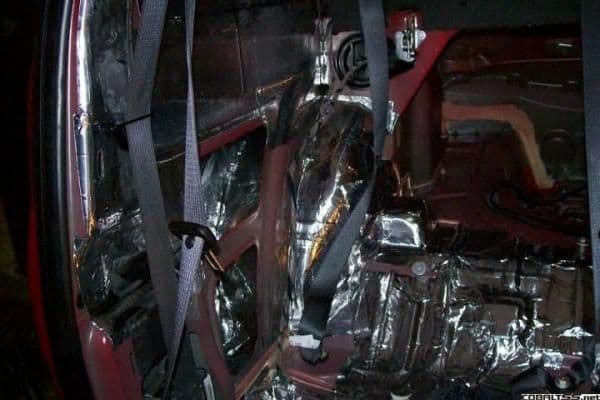
Drivers side quarter panel (still waiting to seal the holes as we're going to spray the spectrum in there tomorrow)

Passenger side quarter panel (you can pretty clearly see the double coated wheel well in this pic)
Tomorrow will be spectrum spraying and painting, then Sunday the spectrum will be drying all day. Monday we will be attaching the 36 sqft of regular Overkill foam to the quarter panels, rear seat, floors, and inner firewall and putting the carpet back in. Once the 80 sqft of Damplifier and 36 sqft of Overkill Pro comes in, we will be doing the doors and trunk. The doors will have the outer frame dampened as well as the inside of the body moulding so it will essentially be double coated, then on the plastic gas trap we'll affix the overkill pro. The trunk will be double coated with overkill all over (including the deck lid and rear deck), Spectrum sprayed, and topped with overkill pro. Any left over Damplifier will be used on the engine side of the firewall and on the roof, any left over Overkill Pro will be used in the roof.
My Arc 4100 amp is due to arrive on Tuesday along with the Kinetic HC-1800, and the box and head unit are still a week out.
And that is all for today!
Or is this the same kind of comment teenagers throw out when their favorite band signs a bigger deal and gets more popularity, all of a sudden its not their "little known band" but a huge band everybody knows about so they say that band "sold out" and they go find another garage band to idolize.
Either way, I completely disagree. They still make an amazing product and haven't saturated the market like some other brands have.
Dampening Round Two
As I mentioned above, to my surprise, my second shipment of dampening materials came in today instead of Monday (which is when the tracking number said it would be in). So, we were able to get a lot more of the dampening done. But, before I show you the dampening progress, we also solved another issue we were facing: How to get the 6 3/4" Arc speakers into the doors.
We looked for brackets to mount the Arc speakers to the door, but nobody seemed to have the right brackets that would fit the Arc speakers. Seemed everybody had brackets for 6 1/2" speakers but not ones that would fit the 6 3/4". So, we had to come up with another solution. We did like how the factory speaker brackets screwed and clipped into the door, but the bracket was a part of the speaker.
Here's the factory speaker, front and back.
You can see the clip on the top of the picture above. Very handy, but its all a part of the speaker... so my trusty skilled installer man (Brannan) cut the junky speakers out of the bracket and made it fit the Arc's.
Here's what the arc's look like in the brackets.
And the back side... have I mentioned I love shiny things?
Here is a side-by-side comparison of the Arc's in the factory brackets and the factory speaker.
Now on to the dampening. Aside from figuring out how to mount the Arc's in the door, today was pretty much uneventful. We used the other 40 sqft of Damplifier that came in today to dampen the floors and rear seat, and the inner (cabin side) part of the wheel well (which we again double-layered).
I did get pretty obsessive with the damplifier while doing the floors. I went under the ac/heater duct and then over it, sandwiching it between damplifier pads. The same went with all the factory wiring, under and over. Here is the start of the drivers side.
And the passenger side...
We didn't cover the foam by the firewall with the damplifier because tomorrow we are going to start the spectrum coating and we are going to lift the foam up to coat under it, and then coat over it and all the damplifier pads on the floor, wheel well, and rear seat.
Here is the drivers side completed (there is no yellow anywhere in the car, yet yellow keeps appearing... I think it must be the head liner?)
And the passenger side completed
Rear seat finished (sorry its so dark, it gets dark here fast and being in a garage with 5% windows doesn't help much either)
Drivers side quarter panel (still waiting to seal the holes as we're going to spray the spectrum in there tomorrow)
Passenger side quarter panel (you can pretty clearly see the double coated wheel well in this pic)
Tomorrow will be spectrum spraying and painting, then Sunday the spectrum will be drying all day. Monday we will be attaching the 36 sqft of regular Overkill foam to the quarter panels, rear seat, floors, and inner firewall and putting the carpet back in. Once the 80 sqft of Damplifier and 36 sqft of Overkill Pro comes in, we will be doing the doors and trunk. The doors will have the outer frame dampened as well as the inside of the body moulding so it will essentially be double coated, then on the plastic gas trap we'll affix the overkill pro. The trunk will be double coated with overkill all over (including the deck lid and rear deck), Spectrum sprayed, and topped with overkill pro. Any left over Damplifier will be used on the engine side of the firewall and on the roof, any left over Overkill Pro will be used in the roof.
My Arc 4100 amp is due to arrive on Tuesday along with the Kinetic HC-1800, and the box and head unit are still a week out.
And that is all for today!
Last edited by James Rayth; 03-07-2008 at 09:53 PM. Reason: Automerged Doublepost