
Gauging vendor interest. (COOLING MOD)

 08-24-2008, 12:45 PM
#27
Haz l33t wheelz.

i don't need this, because i have option b on the way, but i support harickstu becoming a supporting vendor, then you can advertise doing details as well, and we all know you rock at that.
 08-24-2008, 04:46 PM
#33
Senior Member
Thread Starter
iTrader: (1)

Join Date: 05-03-05
Location: Ar-kan-sas
Posts: 15,395
Likes: 0
Received 0 Likes
on
0 Posts
that wouldnt make any sense!
went and started parts shopping today. hope noone in town needs a coolant reservoir in the next couple days
went and started parts shopping today. hope noone in town needs a coolant reservoir in the next couple days
Last edited by hatrickstu; 08-24-2008 at 04:46 PM. Reason: Automerged Doublepost
08-24-2008, 06:02 PM
#35
Senior Member
Thread Starter
iTrader: (1)
Join Date: 05-03-05
Location: Ar-kan-sas
Posts: 15,395
Likes: 0
Received 0 Likes
on
0 Posts
will do, do you mean a set date for payment?
if so im not sure because its going to depend on how quickly the list fills up. i wont make you guys pay until i have hte kits ready to be shipped out though
if so im not sure because its going to depend on how quickly the list fills up. i wont make you guys pay until i have hte kits ready to be shipped out though
08-24-2008, 06:09 PM
#37
Senior Member

Join Date: 04-23-06
Location: S. Jersey
Posts: 5,165
Likes: 0
Received 0 Likes
on
0 Posts
I dont need one but looks like you did everything cleanly on your car and nothing better than having evidence to show the results! Best of luck with the "business venture".
08-24-2008, 06:44 PM
#45
Senior Member

Join Date: 09-13-06
Location: San Antonio
Posts: 828
Likes: 0
Received 0 Likes
on
0 Posts
So with this did you retain the factory filling spot as well? Also, I am super interested in this and so want one but just don't have the funds to spare at the moment, but as soon as I do you can be sure as hell that I will hit you up for one 
08-24-2008, 06:47 PM
#46
Senior Member

Join Date: 08-08-06
Location: Duncannon, PA
Posts: 1,918
Likes: 0
Received 0 Likes
on
0 Posts
No, the factory filling cap is removed. You fill the system in the new tank.
08-24-2008, 06:49 PM
#47
Senior Member
Thread Starter
iTrader: (1)
Join Date: 05-03-05
Location: Ar-kan-sas
Posts: 15,395
Likes: 0
Received 0 Likes
on
0 Posts
and for the doubters, ^^^ is one person that looked at my logs and was like "WTF???" when he saw how little the numbers pick up during a pull
Last edited by hatrickstu; 08-24-2008 at 06:49 PM. Reason: Automerged Doublepost
08-24-2008, 09:10 PM
#49
Senior Member
Thread Starter
iTrader: (1)
Join Date: 05-03-05
Location: Ar-kan-sas
Posts: 15,395
Likes: 0
Received 0 Likes
on
0 Posts
sweet, please post in this thread as well.
ok guys this is a long post, but here are the instructions for the insall. I will also be able to email you these as an office 2007 word doc or as an 97-2003 word document.
Larger Reservoir Swap Instructions
Required Tools-
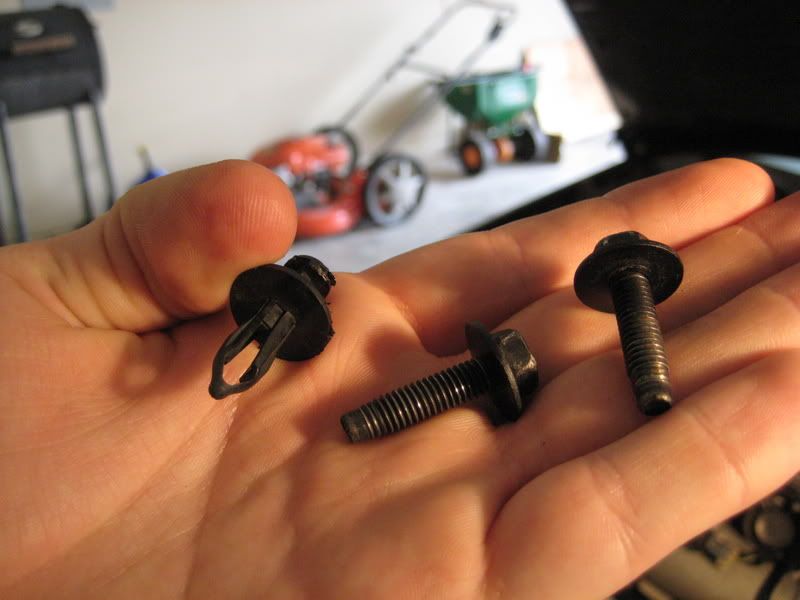
Flat head Scewdriver
10mm socket, short extension, ratchet
Pliers and/or Channel locks
Drill, drill bits
Screws to mount reservoir
Soapy water, preferably in a spray bottle
Good scissors or dikes
(Jack and Jack-stands make for running lines easier.)
Step 1-
The old line running to the factory heat exchanger is much easier to get off if the car is jacked up. Place car on jack-stands, DO NOT WORK UNDER A JACK.
Step 2-
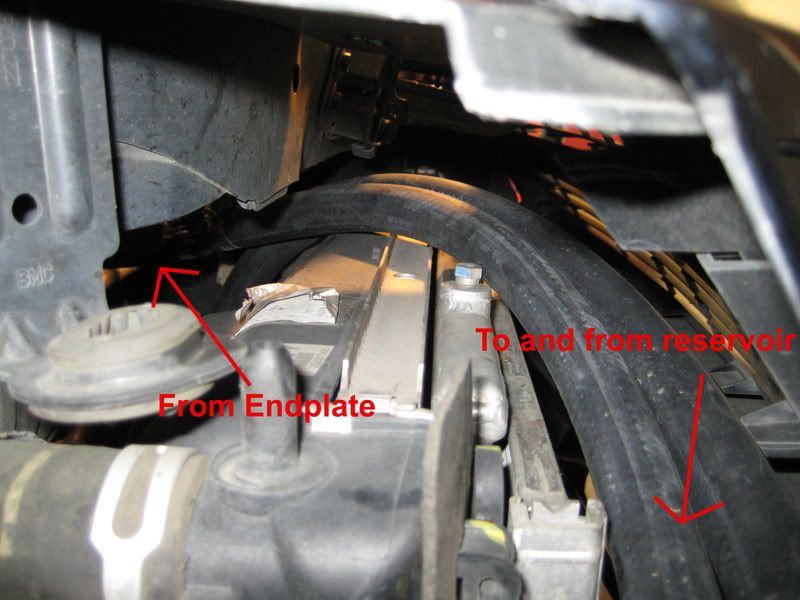
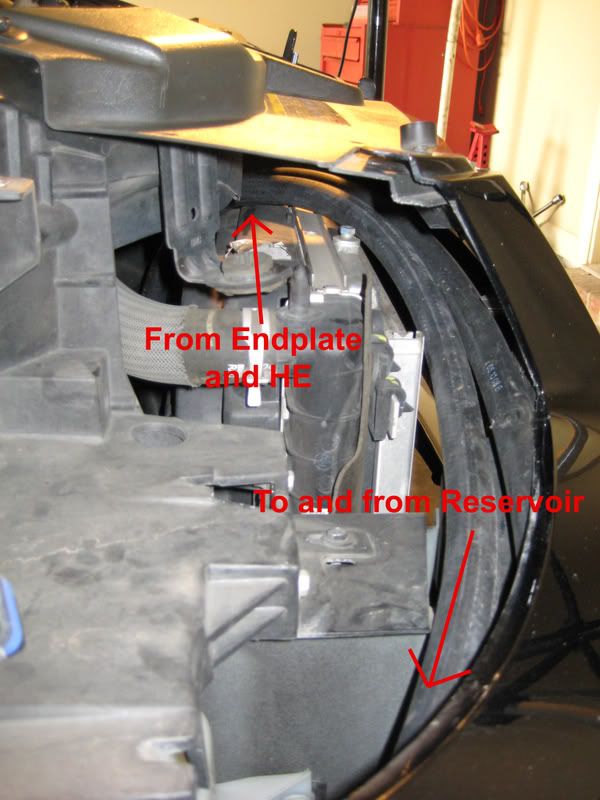
Use channel locks or pliers to remove factory clamp from input line to factory heat exchanger, pull hose off the heat exchanger nipple (passenger side of car). Be careful because coolant will coming running out, and you do not want this getting in your eyes, nose, mouth, etc.
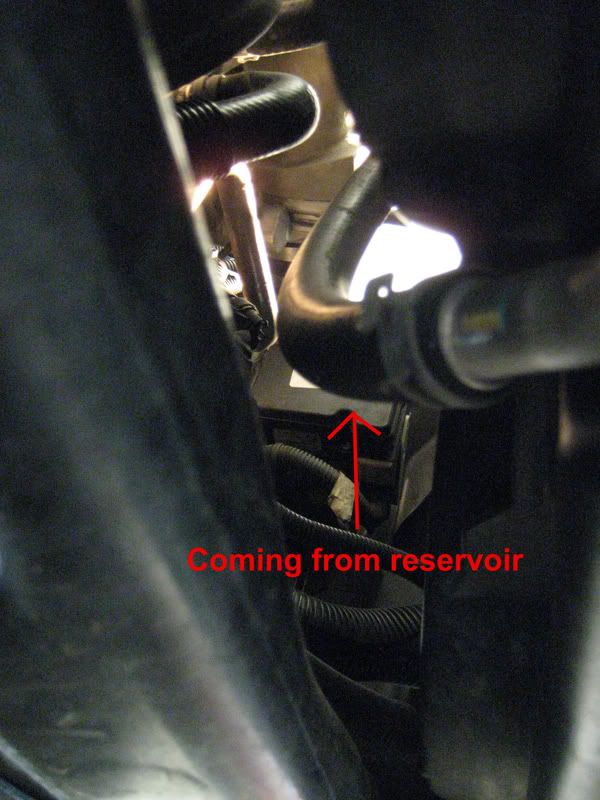
(Note: Picture above already has the new hose on, just showing where to look.)
Step 3-
Find the hose running from the factory filler neck to the endplate. Remove the clamp and pull hose off the factory endplate. You will be removing off the top nipple on the endplate.
Step 4-
At this point the only thing holding the factory filler neck on is the bracket connected to the supercharger. Remove the 10mm bolts and you can simply pull the filler neck out.
Step 5-
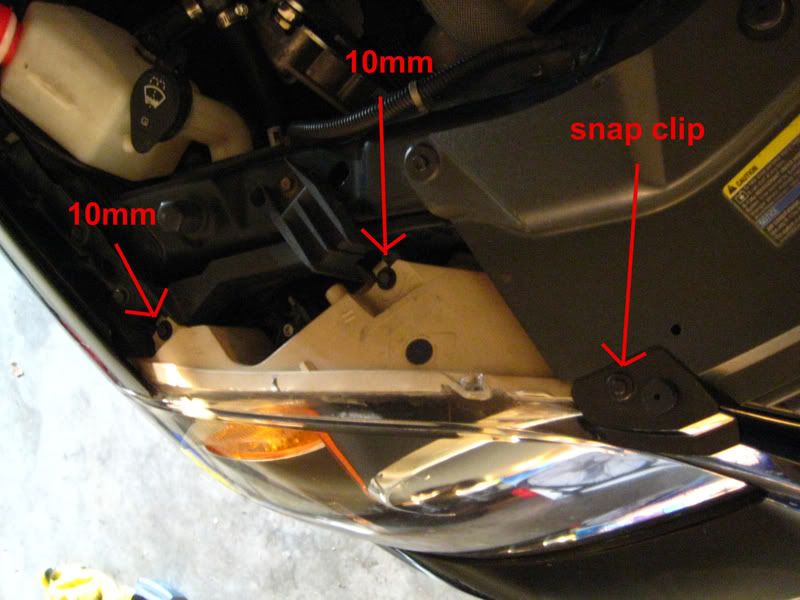
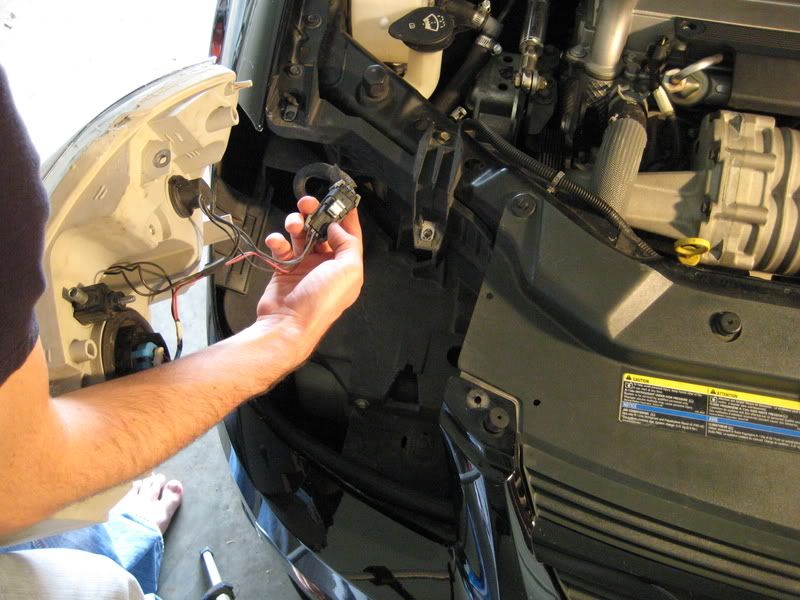
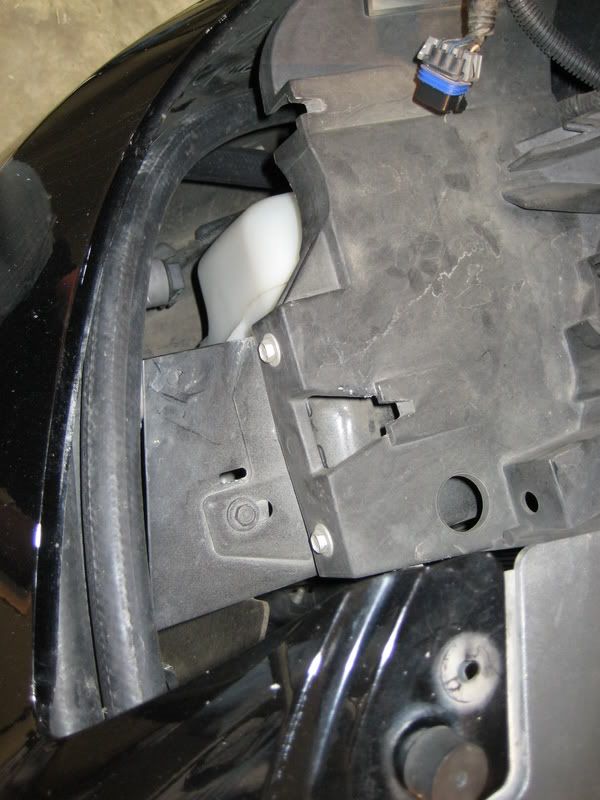
Now remove the two 10mm bolts holding the passenger side headlight in. Make sure you are taking the bolts out on the headlight itself, not the headlight bracket on the frame. Also, remove the plastic snap using a flathead clip to ease removal. Simply put the screwdriver blade in between the two levels on the head of the clip and rotate. It will slightly pop up and then you can pull it out with your fingers. Now you will have to pull the headlight out, and disconnect the main wiring connector.
Step 6-
Now you need to get the holes drilled to mount the reservoir bracket. There are a couple ways you can do this, but I prefer to run mine like this-
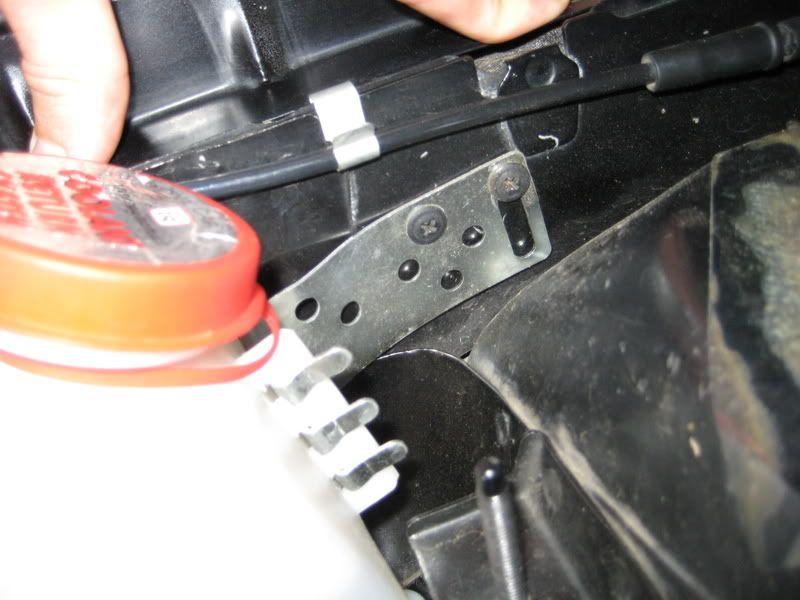
You will need to buy two screws to go in here, if you do not want to use the supplied ones. The main thing to look out for when mounting the reservoir is that you have room to connect the bottom hose to the output nipple on the reservoir. The reservoir will not be mounted when you attach the hose, but it will need a small portion of clearance once the hose is attached. Once you have test fitted the reservoir, dismount it.
Step 7-
Now we will run the hose. The hose with the T-connector and elbow will be running from the top of the stock endplate to the side nipple on the new reservoir. The other hose will be running from the bottom of the new reservoir to the nipple on the factory heat exchanger. Try not to tangle the two lines up. I suggest not attaching either ends on the lines until you have it plumbed correctly. The best way I saw to run them was back over the radiator then behind the front grill, and under the headlight and through the hole near the passenger side wheel well. I pull them back into the engine bay where the stock windshield washer fluid tank is. It is important that you run the hose under the headlight mounting bracket.

Step 8-
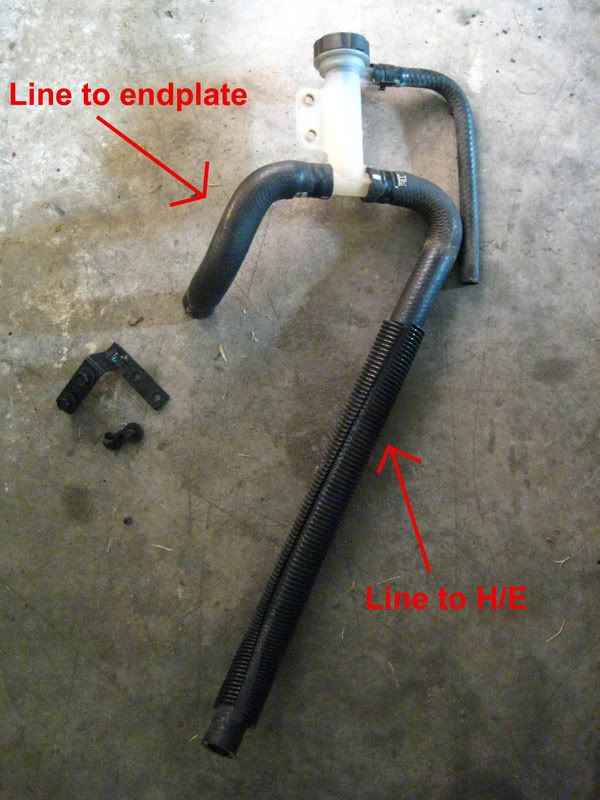
We are now ready to start connecting hoses. I would suggest you use a spray bottle with soapy water in it to ease sliding the hoses on. First connect the hose to the stock endplate and clamp with the supplied clamps. This line is the input to the reservoir and has the elbow and T-connector. Next connect the other hose to the factory heat exchanger, this is the line coming from the bottom of the new reservoir.
Step 9-
This is the most crucial step of install. We will now attach both hoses to the reservoir. First we will attach the hose running to the heat exchanger from the bottom of the reservoir. MAKE SURE YOU LUBRICATE THE NIPPLE AND DO NOT TWIST WHEN PUTTING THE HOSE ON. Clamp the hose down. Now put the reservoir back to where it will mount up (you can mount it now if you like) and use caution when moving it so you do not strain the bottom nipple and hose. You should be able to just slide the hose on, but whatever you do, do not twist the hose because you could risk separating the sealant. Just be gentle and you will be fine. On the hose running from the endplate to the side nipple on the tank, you will have to cut some off. The reason I did not do this is because I did not want to mistakenly cut this hose to short. Simply hold the hose up near the side (about how it would be when mounted) along with the elbow and cut accordingly. Obviously the elbow already has the hose mounted to run onto the tank nipple, but I would measure, cut hose, connect the hose on the other end of the elbow, then mount on the reservoir. Again use, soapy water when putting all hose ends on. Finish by clamping all of your hose ends down with the supplied clamps. Mount the reservoir again if you have not.
Step 10-
Fill the reservoir with coolant or water, whichever you are running. Start the car (or if you have the pump enabled through HPTuners, put in ACC position). You might see a little bit of fluid moving, but you could see none as well. This is perfectly fine just keep an eye on it and it will begin to bubble and flow. Make sure to keep checking the level and adding fluid. The system will bleed VERY QUICKLY if you go for a drive just around the block so I suggest you do not go far, or take some coolant/water with you. You will notice the level drop significantly. After you notice the fluid is staying at a constant height and flowing after driving, fill to your desired level. Put your headlight back in and YOU ARE DONE!!!
Just make sure you keep an eye on the fluid level and check the connections for leaks. The most common leak point is the bottom seal of the tank, but if you were careful it should be fine. If it is leaking you will need to pull the reservoir off, buy some waterproof sealant from an auto-parts store and re-seal it yourself. Again, the other systems I have installed did not leak after I put the hoses on gently. ENJOY AND POST UP YOUR RESULTS!!!
Bonus step-
Finish off with a gay pose
ok guys this is a long post, but here are the instructions for the insall. I will also be able to email you these as an office 2007 word doc or as an 97-2003 word document.
Larger Reservoir Swap Instructions
Required Tools-
Flat head Scewdriver
10mm socket, short extension, ratchet
Pliers and/or Channel locks
Drill, drill bits
Screws to mount reservoir
Soapy water, preferably in a spray bottle
Good scissors or dikes
(Jack and Jack-stands make for running lines easier.)
Step 1-
The old line running to the factory heat exchanger is much easier to get off if the car is jacked up. Place car on jack-stands, DO NOT WORK UNDER A JACK.
Step 2-
Use channel locks or pliers to remove factory clamp from input line to factory heat exchanger, pull hose off the heat exchanger nipple (passenger side of car). Be careful because coolant will coming running out, and you do not want this getting in your eyes, nose, mouth, etc.
(Note: Picture above already has the new hose on, just showing where to look.)
Step 3-
Find the hose running from the factory filler neck to the endplate. Remove the clamp and pull hose off the factory endplate. You will be removing off the top nipple on the endplate.
Step 4-
At this point the only thing holding the factory filler neck on is the bracket connected to the supercharger. Remove the 10mm bolts and you can simply pull the filler neck out.
Step 5-
Now remove the two 10mm bolts holding the passenger side headlight in. Make sure you are taking the bolts out on the headlight itself, not the headlight bracket on the frame. Also, remove the plastic snap using a flathead clip to ease removal. Simply put the screwdriver blade in between the two levels on the head of the clip and rotate. It will slightly pop up and then you can pull it out with your fingers. Now you will have to pull the headlight out, and disconnect the main wiring connector.
Step 6-
Now you need to get the holes drilled to mount the reservoir bracket. There are a couple ways you can do this, but I prefer to run mine like this-
You will need to buy two screws to go in here, if you do not want to use the supplied ones. The main thing to look out for when mounting the reservoir is that you have room to connect the bottom hose to the output nipple on the reservoir. The reservoir will not be mounted when you attach the hose, but it will need a small portion of clearance once the hose is attached. Once you have test fitted the reservoir, dismount it.
Step 7-
Now we will run the hose. The hose with the T-connector and elbow will be running from the top of the stock endplate to the side nipple on the new reservoir. The other hose will be running from the bottom of the new reservoir to the nipple on the factory heat exchanger. Try not to tangle the two lines up. I suggest not attaching either ends on the lines until you have it plumbed correctly. The best way I saw to run them was back over the radiator then behind the front grill, and under the headlight and through the hole near the passenger side wheel well. I pull them back into the engine bay where the stock windshield washer fluid tank is. It is important that you run the hose under the headlight mounting bracket.
Step 8-
We are now ready to start connecting hoses. I would suggest you use a spray bottle with soapy water in it to ease sliding the hoses on. First connect the hose to the stock endplate and clamp with the supplied clamps. This line is the input to the reservoir and has the elbow and T-connector. Next connect the other hose to the factory heat exchanger, this is the line coming from the bottom of the new reservoir.
Step 9-
This is the most crucial step of install. We will now attach both hoses to the reservoir. First we will attach the hose running to the heat exchanger from the bottom of the reservoir. MAKE SURE YOU LUBRICATE THE NIPPLE AND DO NOT TWIST WHEN PUTTING THE HOSE ON. Clamp the hose down. Now put the reservoir back to where it will mount up (you can mount it now if you like) and use caution when moving it so you do not strain the bottom nipple and hose. You should be able to just slide the hose on, but whatever you do, do not twist the hose because you could risk separating the sealant. Just be gentle and you will be fine. On the hose running from the endplate to the side nipple on the tank, you will have to cut some off. The reason I did not do this is because I did not want to mistakenly cut this hose to short. Simply hold the hose up near the side (about how it would be when mounted) along with the elbow and cut accordingly. Obviously the elbow already has the hose mounted to run onto the tank nipple, but I would measure, cut hose, connect the hose on the other end of the elbow, then mount on the reservoir. Again use, soapy water when putting all hose ends on. Finish by clamping all of your hose ends down with the supplied clamps. Mount the reservoir again if you have not.
Step 10-
Fill the reservoir with coolant or water, whichever you are running. Start the car (or if you have the pump enabled through HPTuners, put in ACC position). You might see a little bit of fluid moving, but you could see none as well. This is perfectly fine just keep an eye on it and it will begin to bubble and flow. Make sure to keep checking the level and adding fluid. The system will bleed VERY QUICKLY if you go for a drive just around the block so I suggest you do not go far, or take some coolant/water with you. You will notice the level drop significantly. After you notice the fluid is staying at a constant height and flowing after driving, fill to your desired level. Put your headlight back in and YOU ARE DONE!!!
Just make sure you keep an eye on the fluid level and check the connections for leaks. The most common leak point is the bottom seal of the tank, but if you were careful it should be fine. If it is leaking you will need to pull the reservoir off, buy some waterproof sealant from an auto-parts store and re-seal it yourself. Again, the other systems I have installed did not leak after I put the hoses on gently. ENJOY AND POST UP YOUR RESULTS!!!
Bonus step-
Finish off with a gay pose
Last edited by hatrickstu; 08-26-2008 at 06:34 PM. Reason: Automerged Doublepost
08-24-2008, 09:26 PM
#50
Senior Member

Join Date: 12-29-05
Location: Niceville, Florida
Posts: 1,457
Likes: 0
Received 0 Likes
on
0 Posts
i have been running this for about 2 weeks with the CA heat exchanger on a 2.7 in pulley. i have had no leaks or any other type of problem. i tried it at the track and after running almost all the way third from a dead stop i didnt get over 114*. i used to see upwards of 130s to 140s dependent on the ambiant temps. for those who think a second heat exchanger is enough you are incorrect. like i said i had the CA one and yes it helped but it still would get hot and stay hot. now it gets warm and cools down very quickly. and for you redline guys i will be getting with stu to help install one on my buddys redline. the reason i say that is the routing of the coolant lines will be quite a bit different due to the way the engine bay is setup. if you dont have time or if you just dont want to do the work yourself grab this mess up it will help greatly and you will not be disappointed.