
A look at the Intercooler pump.( Lots of pics)
 12-21-2009, 12:59 PM
#1
Senior Member
Thread Starter
A look at the Intercooler pump.( Lots of pics)
I posted a how-to , but ether it want approved and the mods just haven't got around to looking at it. but anyway here some info on why our inter-cooler pump dies. Its written in a how to format.
Its known that the Ic Pump fails on the Cobalt SS and Ion reline. As well as the svt lightning and svt cobra uses the same pump and has the same problem. In the past the only fis was the Hammer fix, or replacing it.
What causes the failure are the brushes in the motor wearing out or carbon dust causing the brushes to get stuck on there guides and not make contact with the commutator. The hammer fix works becasue it shakes the brushes into place.
If you don�t understand the above statement then maybe this fix isn�t for you.
this will require fabrication and soldering skills. Its kind of like replacing brushes on alternators, starters or RC car motors.
Your gonna need >
String
Soldering iron
Solder
Rosin Flux (even if you use flux core solder.)
Small to medium standard screwdriver (�flat head is a engine not a tool� My auto shop teacher for high school)
Needle nose pliers small.
13MM socket/retched or gear wrench
� hose coupler.
Vice grips.
Now I�m not going to go into detail on how to remove the ic pump form the car , its pretty self explanatory once you look at it , but that�s what the 13mm ,hose coupler and vice grips are for.
Your going to need to jack the car up of have it on ramps. Two 13mm bolts hold the pump on. Use the vice grips for the spring hose clamps.(I replaced my spring claps with screw type clamps)
When you get the pump off connect to two open hoses together with the coupler . that way you can still drive the car if you need to, just don�t do any long high speed runs cause the intercooler is no longer functional
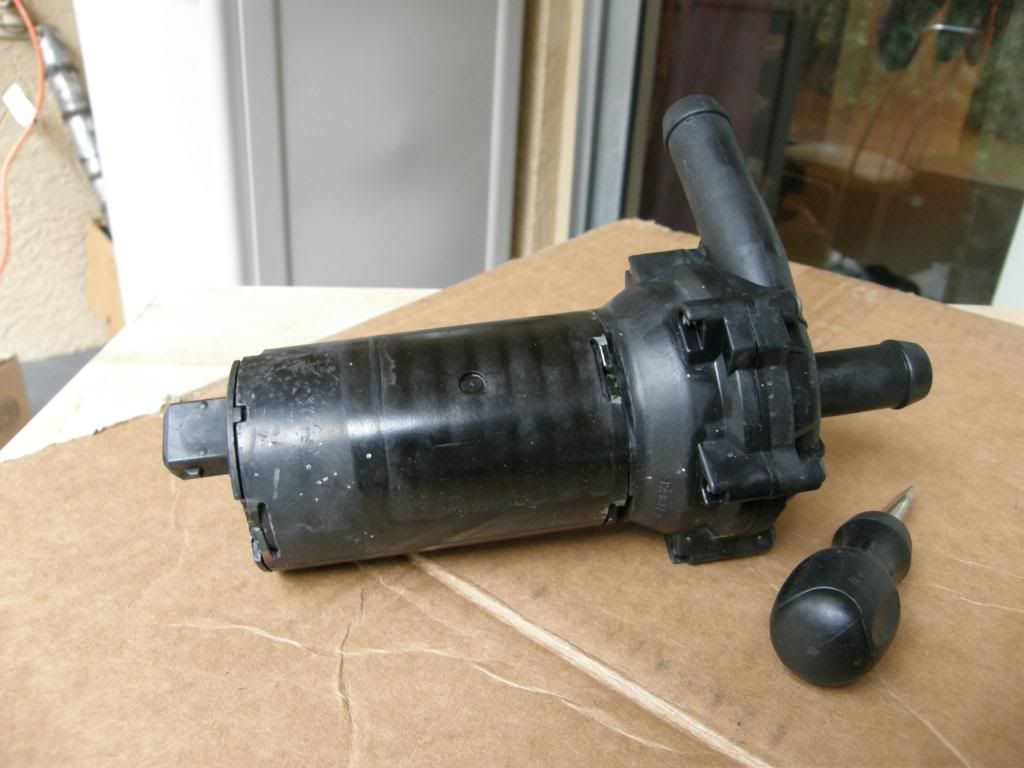
Heres the pump.
ne the back are (motor side ) there are three sets of tabs.
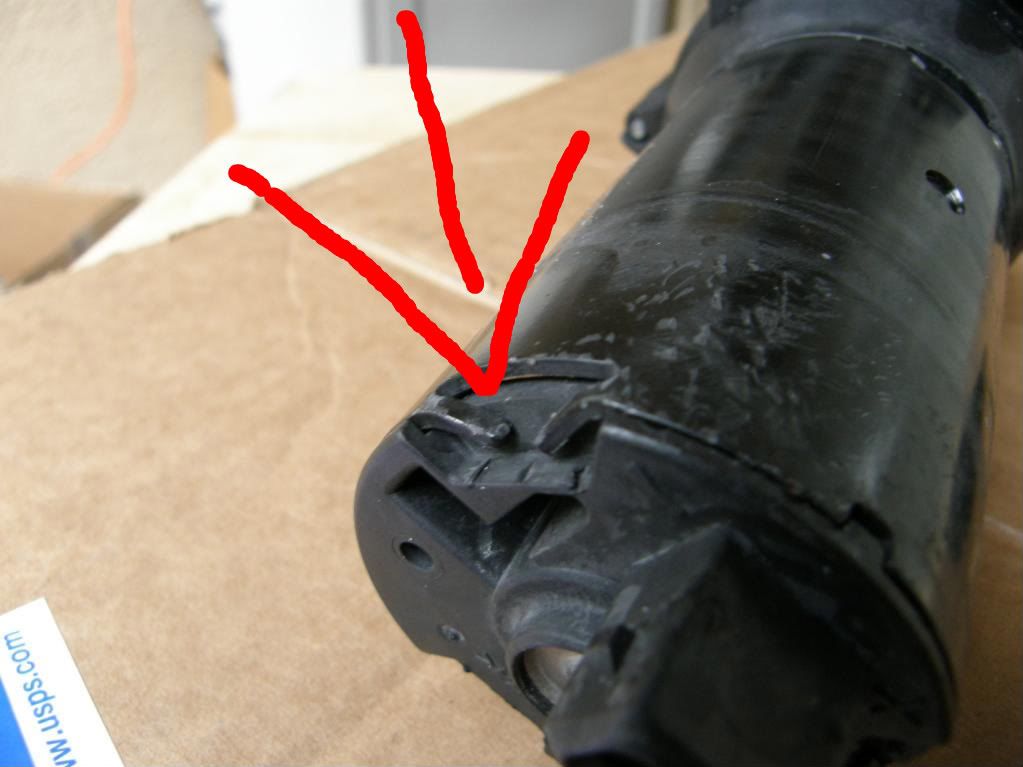
Bend the tabs up(just enough to clear the cap) with a screw driver or needle nose pliers .Once all the tabs are bent up pray the cap form the body with a standard screwdriver. There will be some resistance due to the rubber o-ring .
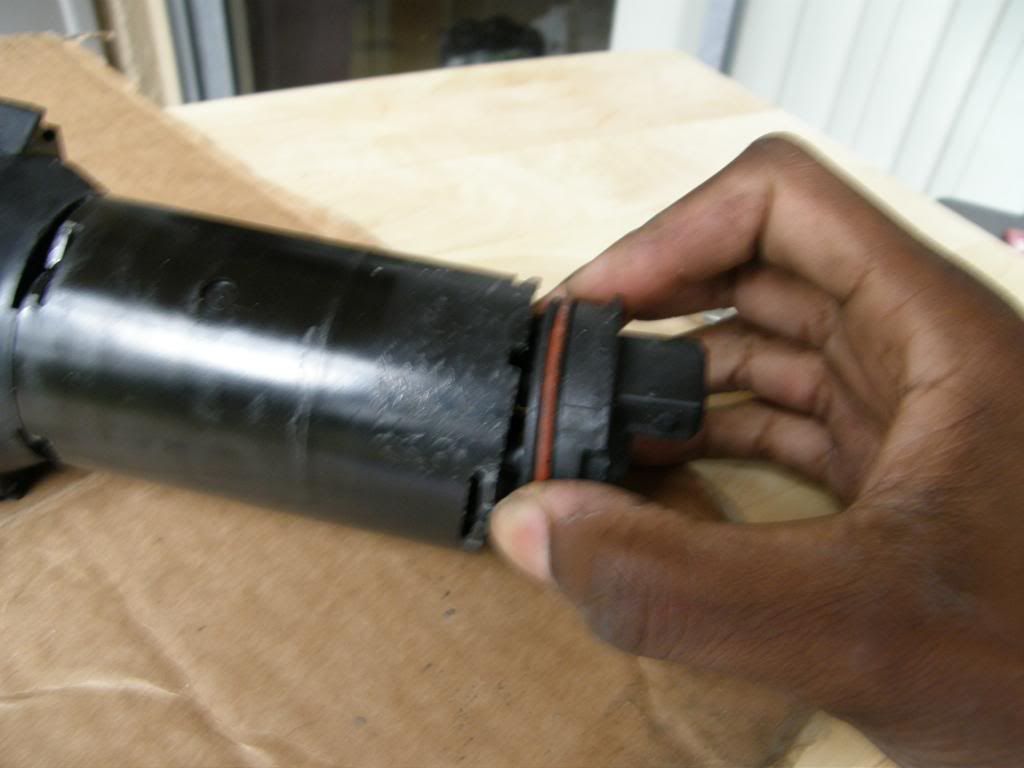
Once you get this far the Brushes will be stuck on the end bearing. And it will feel like it might break, almost like its spring loaded, with some finagling they should come free.
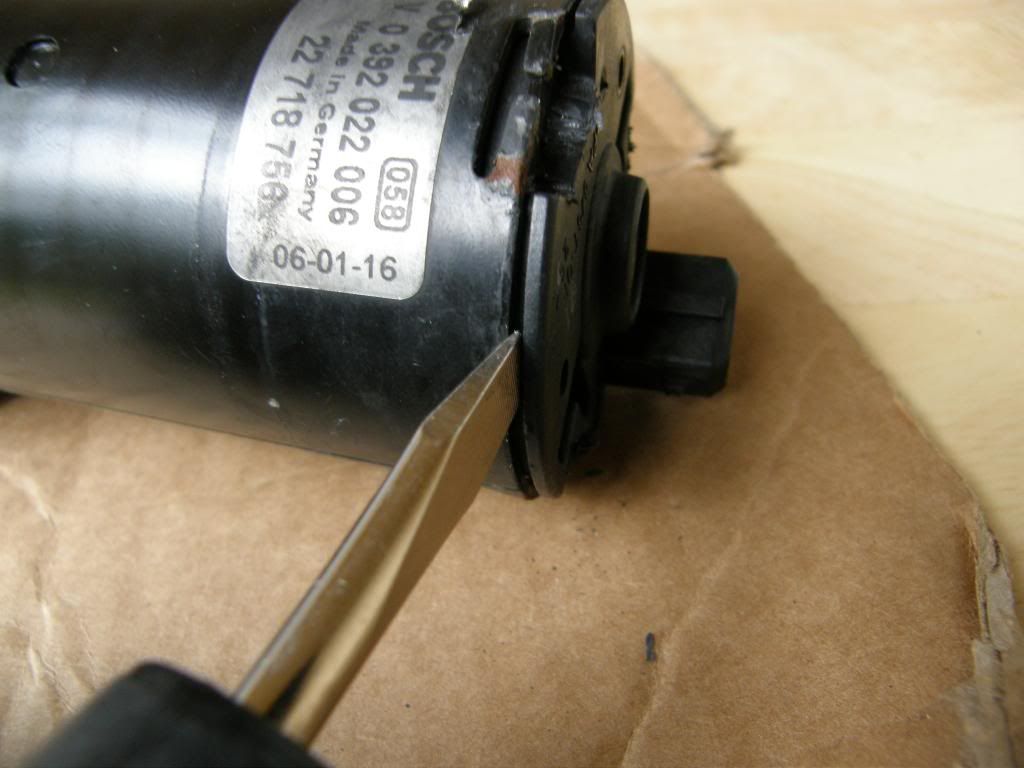
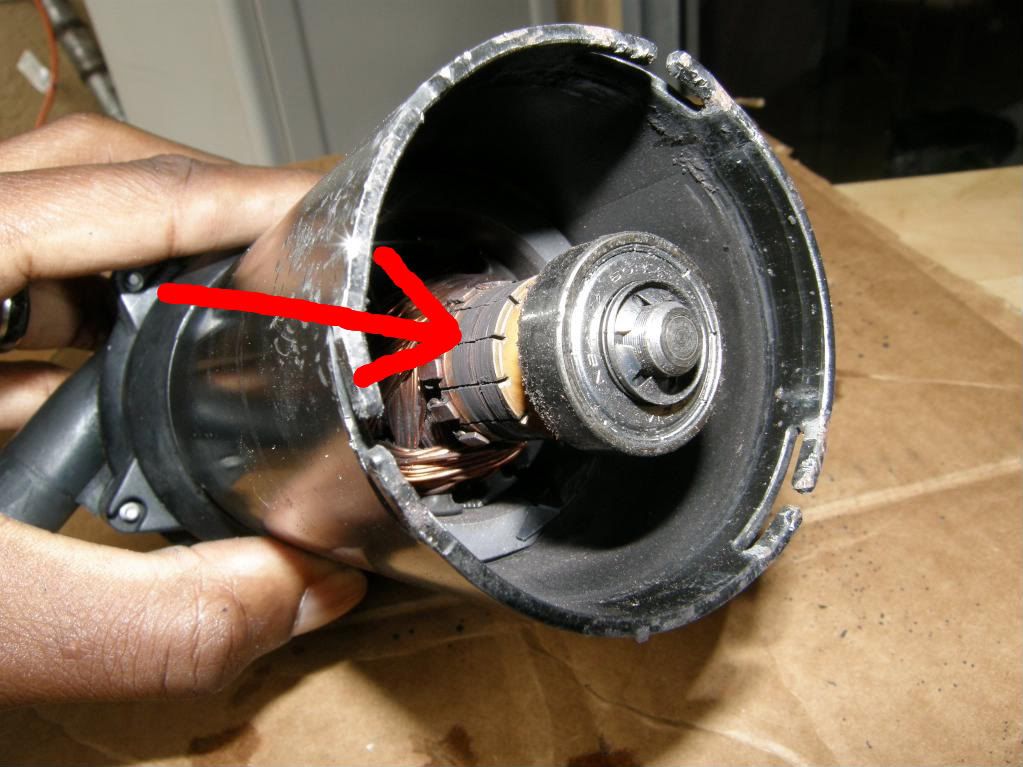
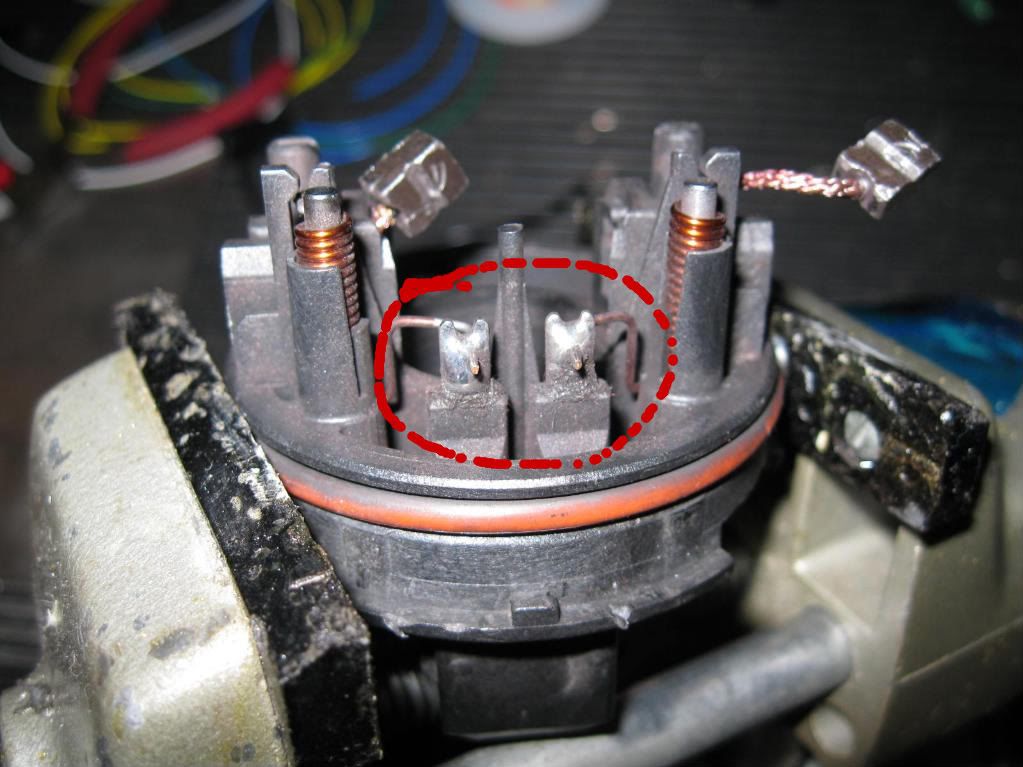
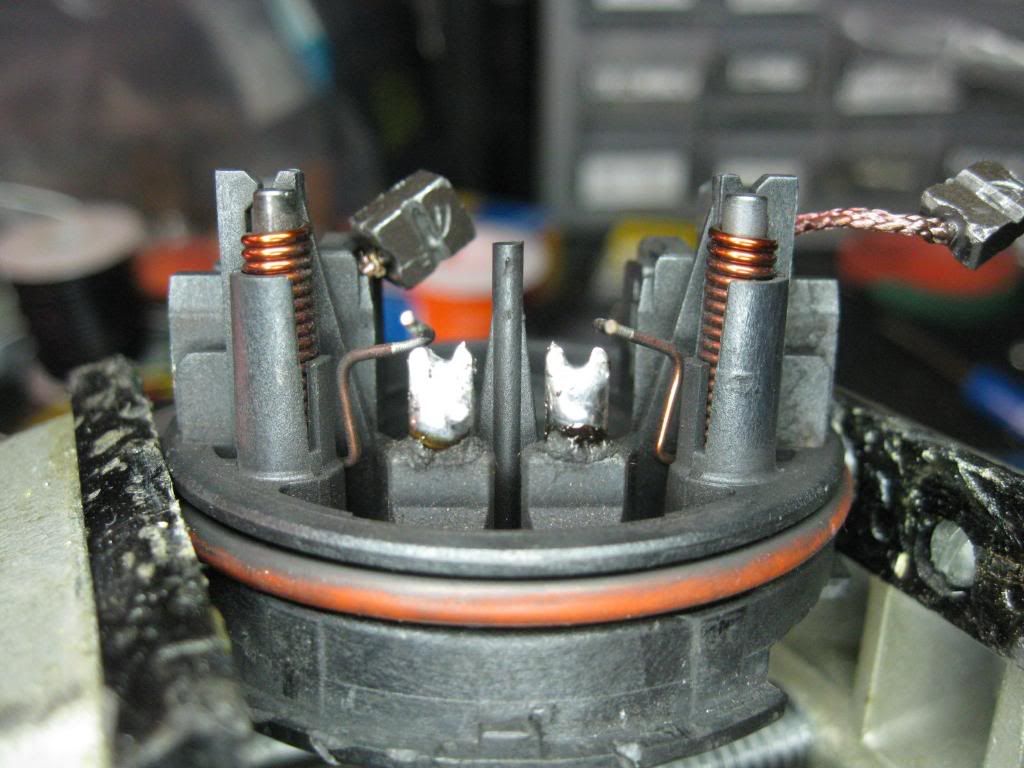
Heres the end of the motor with the cap removed, you can see were the commutator was starting to develop a grove were the brush turned sideways. While you have it open take some isopropyl alcohol and q-tips and clean the commutator. in this case the commutator is pretty worn, this might casue the brushes to ware faster than normal but its still added life to a other wise dead pump.
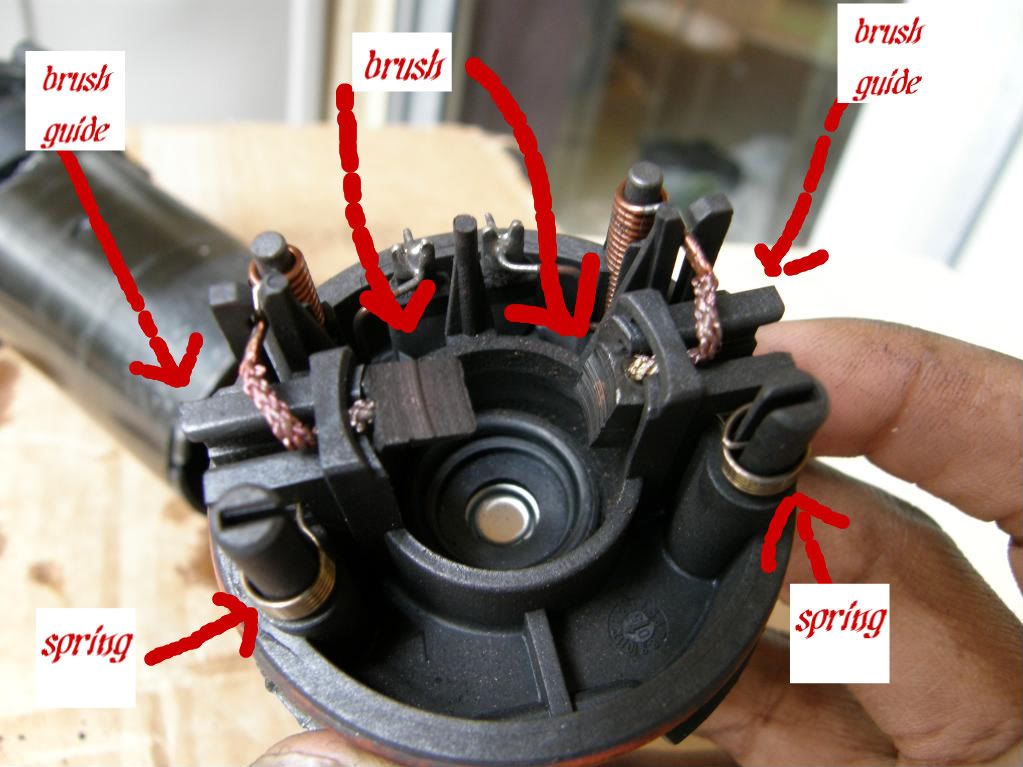
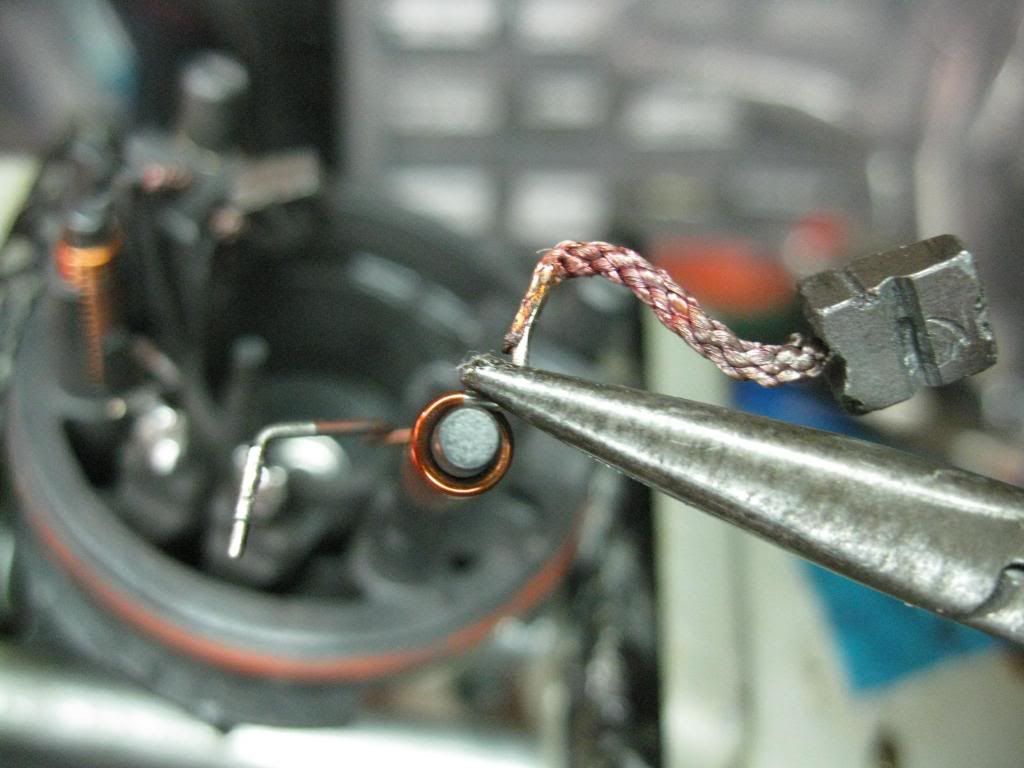
Here is the end cap. The Brushes are worn down to the nub. Now if your brushes aren�t worn all the way down , you may just be able to clean out the inside and re assimilable the motor. But since its apart might as well change them.
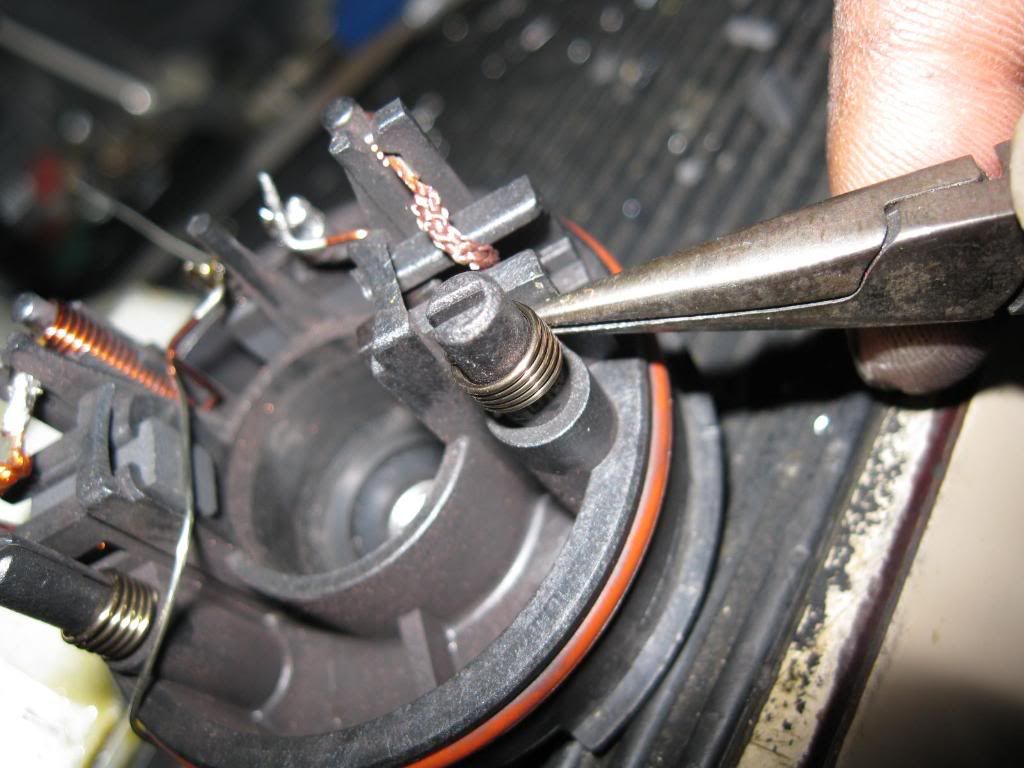
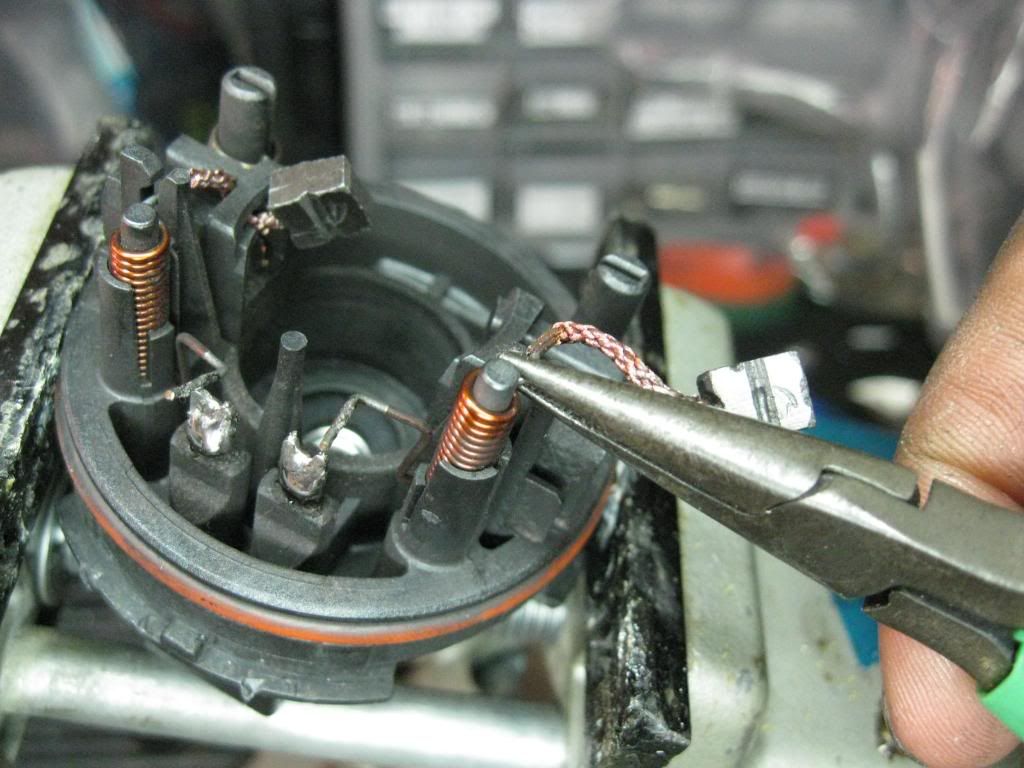
Use your needle nose pliers to pull the spring back out of the brush guide then with your other hand slide the spring up the post and off, the brush can then be removed from the guide.. It helps if you have a vice to hold the cap.

Now place cap in vice, and with your soldering iron heat the solder joint . leave the solder , it will be reused later when you put it all back togather. use your needle nose pliers to lift the tab out of the hot solder.
Lift the whole assembly out of the cap.
At this point you need new brushes. I would tell you part number I used, but every ACE hardware Carrey different stock. Take you cap and find a bursh that will fit in the cap. Or one that alittle larger then it can be shaped to fit with a file, or drimle. I happened to find a burhs that fit like a glove but the lead was on the wrong side.

New brush in brush guide. The brush it a little long so I cut it down and filed to the right length. Since the lead is on the back and not the top , you must be sure to make sure the lead wont touch the body of the motor.
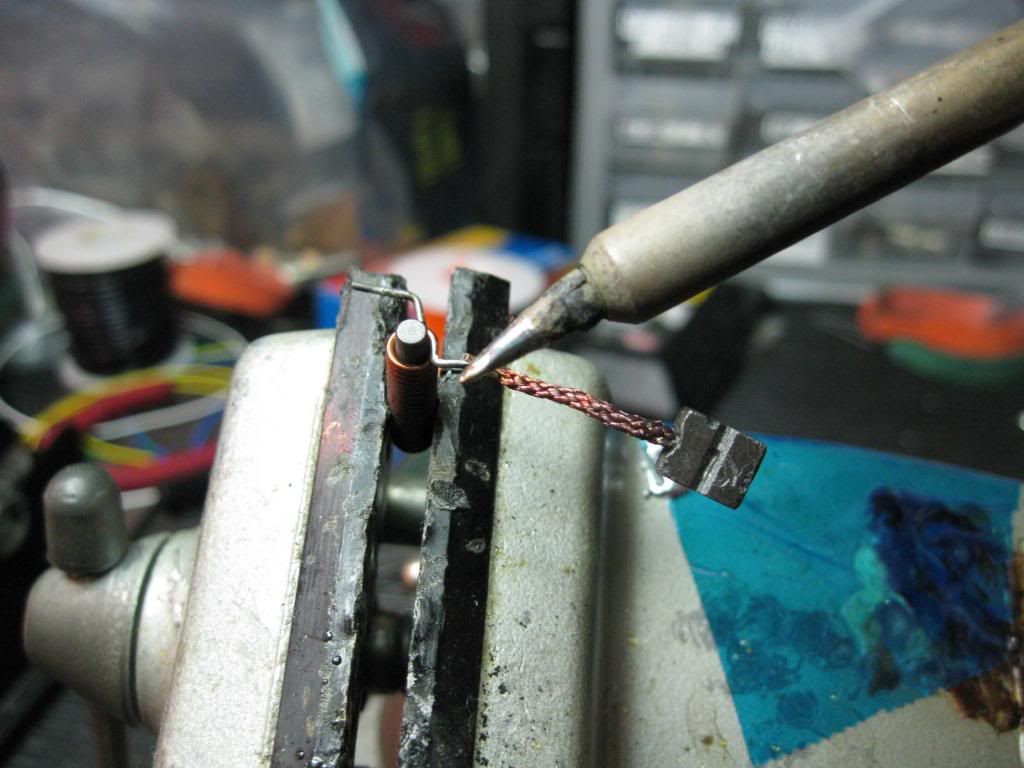
Now take your brush assembly and place it in a vice. The lead is hard soldered to the coil. So I just cut the lead at the post. And soldered the new brush lead to it.
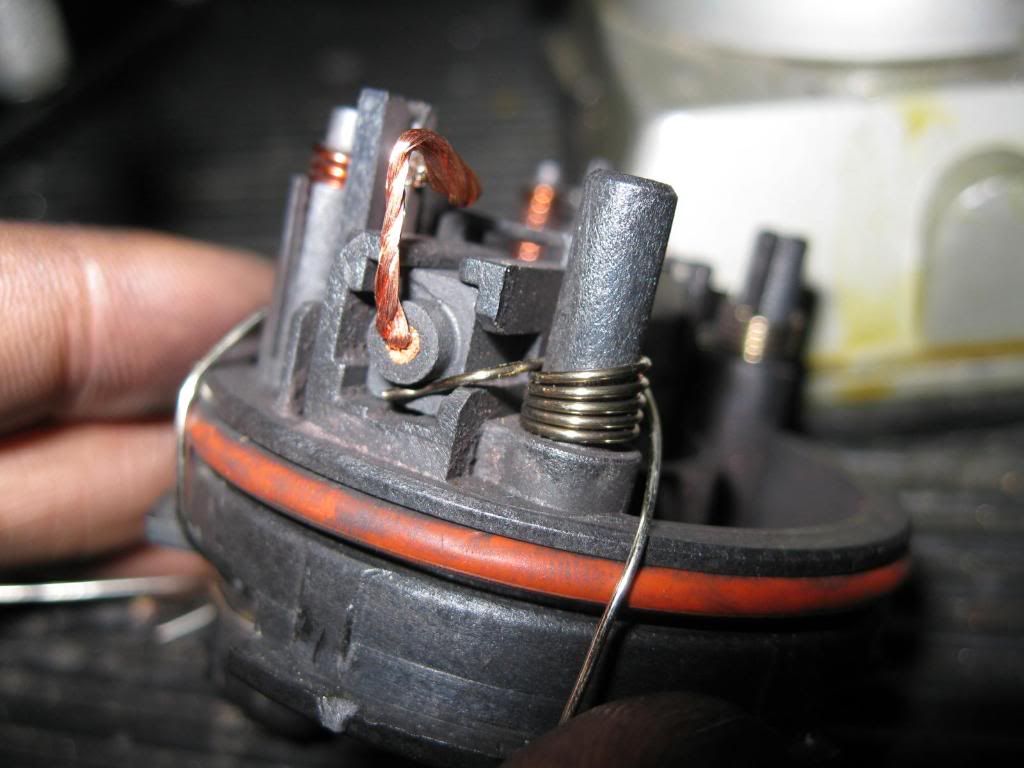
New brush in the cap. Note the safety wire holding the brush in place.
Put everything back together in the cap in reveres order. The spring will be off center due to the lead being in the rear.
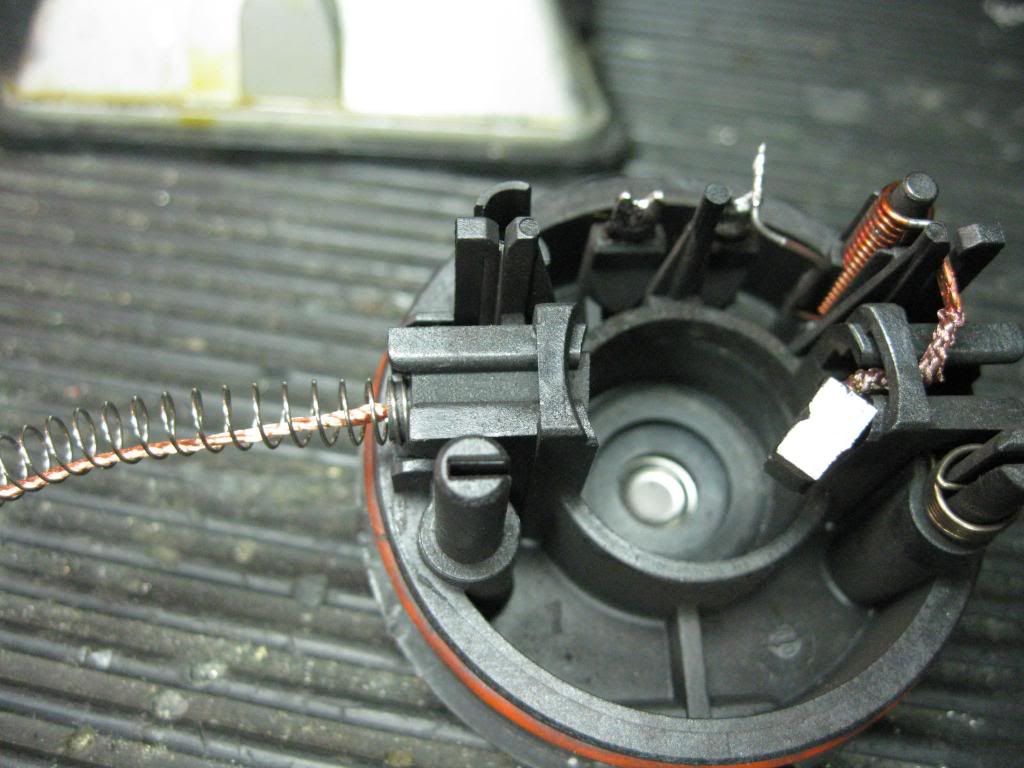
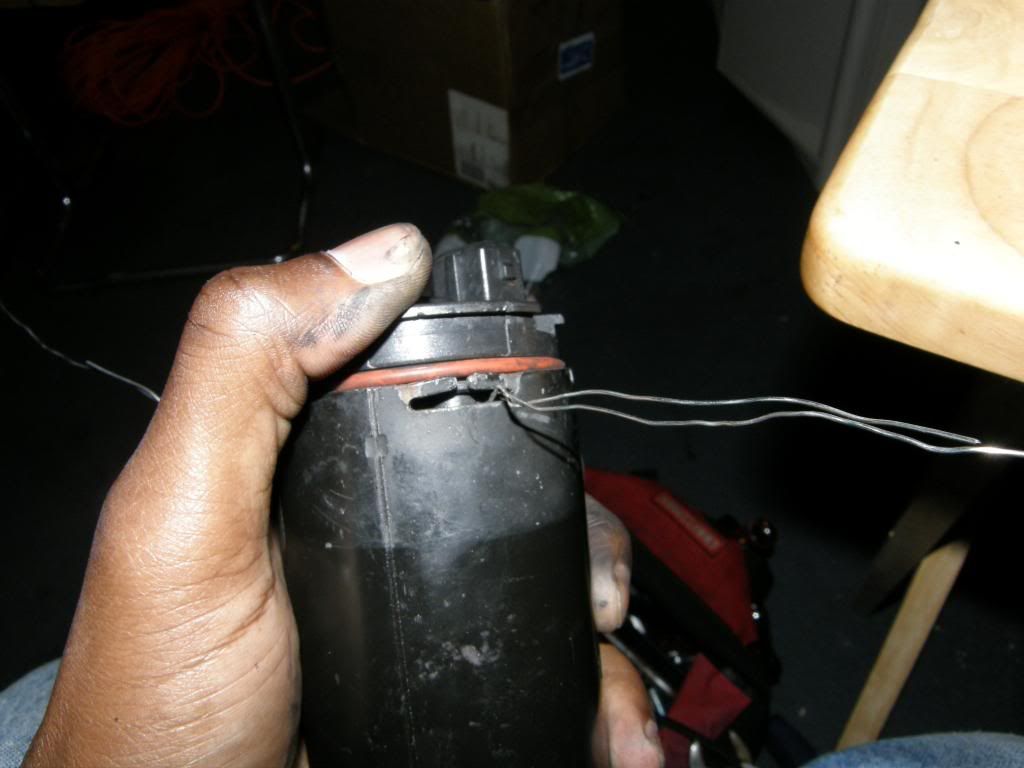
Now when you go to put the cap back on the motor , take string , or thin safety wire and loop it around back of the spring. This is so you can remove spring tension and slide the brushes past the end bearing.
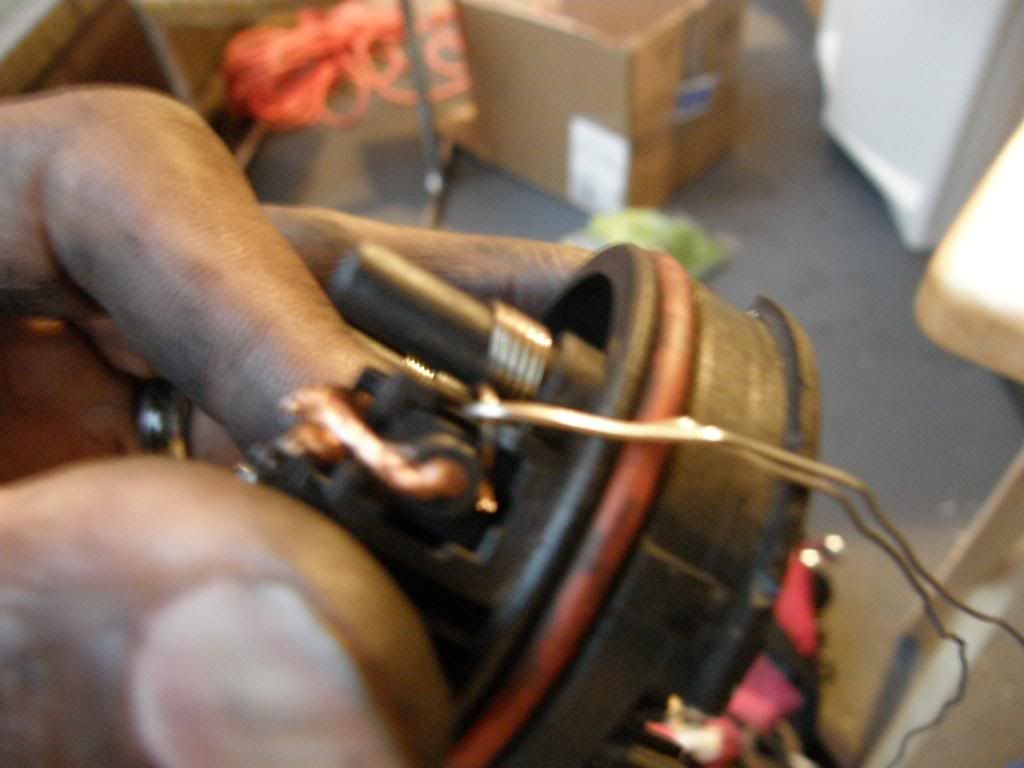
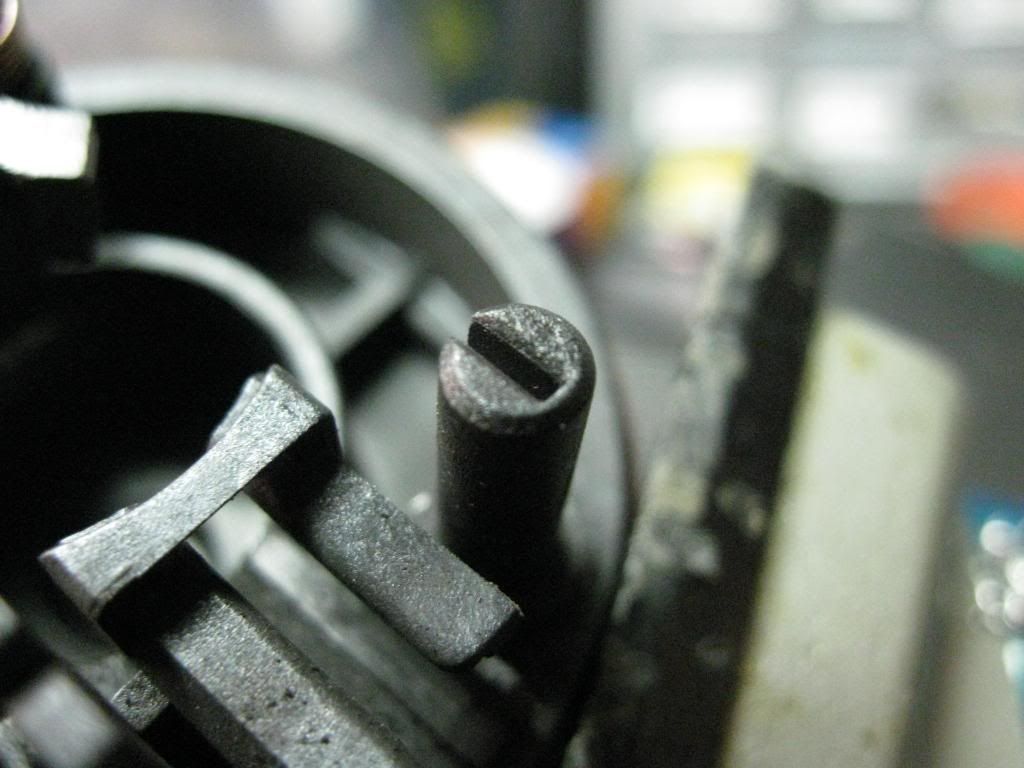
Once the brushes are past the bearing remove the sting. There is a notch and guide on the cap and motor , make sure they are lined up.
Its known that the Ic Pump fails on the Cobalt SS and Ion reline. As well as the svt lightning and svt cobra uses the same pump and has the same problem. In the past the only fis was the Hammer fix, or replacing it.
What causes the failure are the brushes in the motor wearing out or carbon dust causing the brushes to get stuck on there guides and not make contact with the commutator. The hammer fix works becasue it shakes the brushes into place.
If you don�t understand the above statement then maybe this fix isn�t for you.
this will require fabrication and soldering skills. Its kind of like replacing brushes on alternators, starters or RC car motors.
Your gonna need >
String
Soldering iron
Solder
Rosin Flux (even if you use flux core solder.)
Small to medium standard screwdriver (�flat head is a engine not a tool� My auto shop teacher for high school)
Needle nose pliers small.
13MM socket/retched or gear wrench
� hose coupler.
Vice grips.
Now I�m not going to go into detail on how to remove the ic pump form the car , its pretty self explanatory once you look at it , but that�s what the 13mm ,hose coupler and vice grips are for.
Your going to need to jack the car up of have it on ramps. Two 13mm bolts hold the pump on. Use the vice grips for the spring hose clamps.(I replaced my spring claps with screw type clamps)
When you get the pump off connect to two open hoses together with the coupler . that way you can still drive the car if you need to, just don�t do any long high speed runs cause the intercooler is no longer functional
Heres the pump.
ne the back are (motor side ) there are three sets of tabs.
Bend the tabs up(just enough to clear the cap) with a screw driver or needle nose pliers .Once all the tabs are bent up pray the cap form the body with a standard screwdriver. There will be some resistance due to the rubber o-ring .
Once you get this far the Brushes will be stuck on the end bearing. And it will feel like it might break, almost like its spring loaded, with some finagling they should come free.
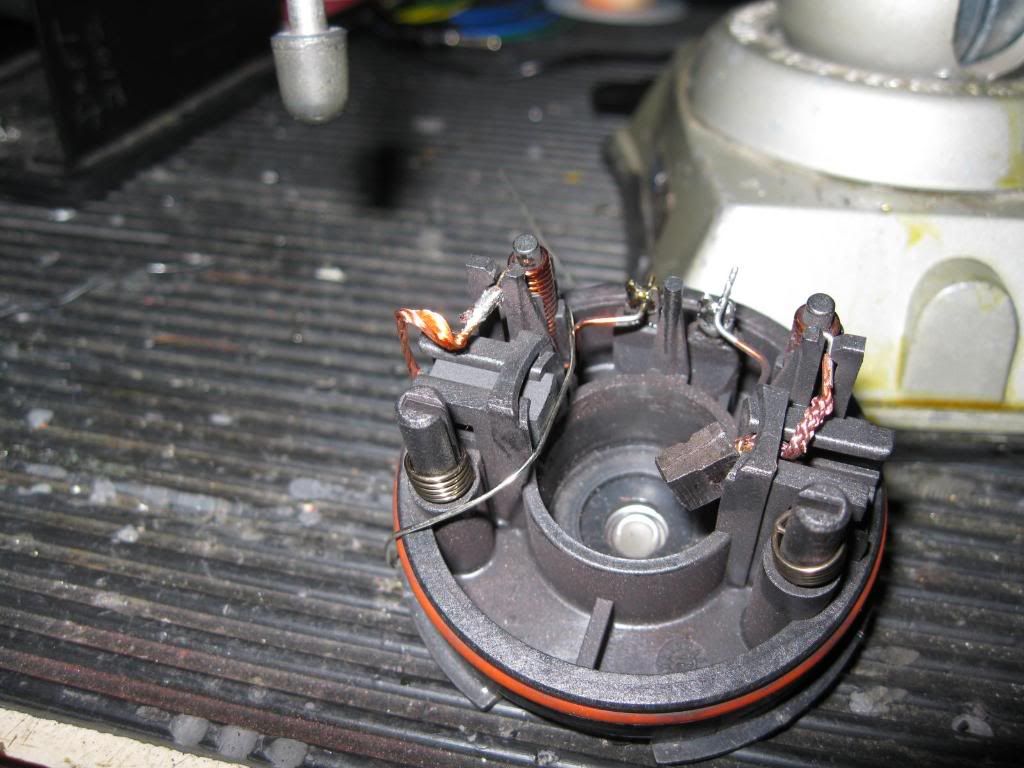
Heres the end of the motor with the cap removed, you can see were the commutator was starting to develop a grove were the brush turned sideways. While you have it open take some isopropyl alcohol and q-tips and clean the commutator. in this case the commutator is pretty worn, this might casue the brushes to ware faster than normal but its still added life to a other wise dead pump.
Here is the end cap. The Brushes are worn down to the nub. Now if your brushes aren�t worn all the way down , you may just be able to clean out the inside and re assimilable the motor. But since its apart might as well change them.
Use your needle nose pliers to pull the spring back out of the brush guide then with your other hand slide the spring up the post and off, the brush can then be removed from the guide.. It helps if you have a vice to hold the cap.
Now place cap in vice, and with your soldering iron heat the solder joint . leave the solder , it will be reused later when you put it all back togather. use your needle nose pliers to lift the tab out of the hot solder.
Lift the whole assembly out of the cap.
At this point you need new brushes. I would tell you part number I used, but every ACE hardware Carrey different stock. Take you cap and find a bursh that will fit in the cap. Or one that alittle larger then it can be shaped to fit with a file, or drimle. I happened to find a burhs that fit like a glove but the lead was on the wrong side.
New brush in brush guide. The brush it a little long so I cut it down and filed to the right length. Since the lead is on the back and not the top , you must be sure to make sure the lead wont touch the body of the motor.
Now take your brush assembly and place it in a vice. The lead is hard soldered to the coil. So I just cut the lead at the post. And soldered the new brush lead to it.
New brush in the cap. Note the safety wire holding the brush in place.
Put everything back together in the cap in reveres order. The spring will be off center due to the lead being in the rear.
Now when you go to put the cap back on the motor , take string , or thin safety wire and loop it around back of the spring. This is so you can remove spring tension and slide the brushes past the end bearing.
Once the brushes are past the bearing remove the sting. There is a notch and guide on the cap and motor , make sure they are lined up.

 12-21-2009, 06:55 PM
#4
Senior Member
Thread Starter
at that point about 79k
when i started to have problems were at about 60k were the hammer fix work till about 67-70k. at wich point i pulled it apart and cleaned out all the carbon dust. the burses were pretty worn, so i told my self when it has problems again, i'll look for brushes.
when i started to have problems were at about 60k were the hammer fix work till about 67-70k. at wich point i pulled it apart and cleaned out all the carbon dust. the burses were pretty worn, so i told my self when it has problems again, i'll look for brushes.
12-21-2009, 08:16 PM
#6
Senior Member
Thread Starter
not much damage can be done if the pump isn't working ,the car will pull timing when the iats shoot up. you'll notice a decrease in power.
when i would hit up the track id trap 104mph one run then 99-98 the next , id pop the hood and see that the pump wasn't running , id tap it with a wrench , make another run and be back to 104, 4-5mph is deff somthing you can feel with the but dyno so just keep an eye on it. if the car feels sluggish then just stay out of boost to be on the safe side.
 12-21-2009, 08:55 PM
#8
Senior Member

Join Date: 06-27-05
Location: southeast florida
Posts: 2,058
Likes: 0
Received 0 Likes
on
0 Posts
the bearing looked sealed. Did it look poss to regrease the bearing. Maybe I should get the broken motors from another member for when I get out of warranty. I changed it so mine come on after 20 sec of the engine on. Over time that will save alot. Even at 1 min a day that is 6 hrs a year. I wish I had a switch to turn it off when on cruise control.

 01-28-2010, 09:20 AM
#13
Senior Member
Join Date: 05-20-06
Location: Jacksonville, Florida
Posts: 5,450
Likes: 0
Received 0 Likes
on
0 Posts
01-28-2010, 09:26 AM
#14
Senior Member
Thread Starter
on a side note. If anyone has dead pump id be willing to buy them off you
 01-28-2010, 09:43 AM
#16
Banned

Join Date: 06-23-05
Location: ky
Posts: 8,032
Likes: 0
Received 0 Likes
on
0 Posts
something i would be interested in, is if we were able to re-wrap the motor to get more rpm's
01-28-2010, 10:36 PM
#19
Banned
Join Date: 06-23-05
Location: ky
Posts: 8,032
Likes: 0
Received 0 Likes
on
0 Posts
care to elaborate on how that could be done if it already runs at system offered voltage? i don't know how the system is set up but i'm guessing it's a regular 12 volt motor that goes up to 14 when the system is running on the alternator

