
The StreetDreamz build.
 06-22-2009, 09:07 AM
#1
Banned
Thread Starter
Join Date: 02-23-06
Location: Mo-town, WV
Posts: 1,287
Likes: 0
Received 0 Likes
on
0 Posts
The StreetDreamz build.
Let's start with a parts list to put it all in perspective. I'm going to try to remember as many as possible lol.
Power mods:
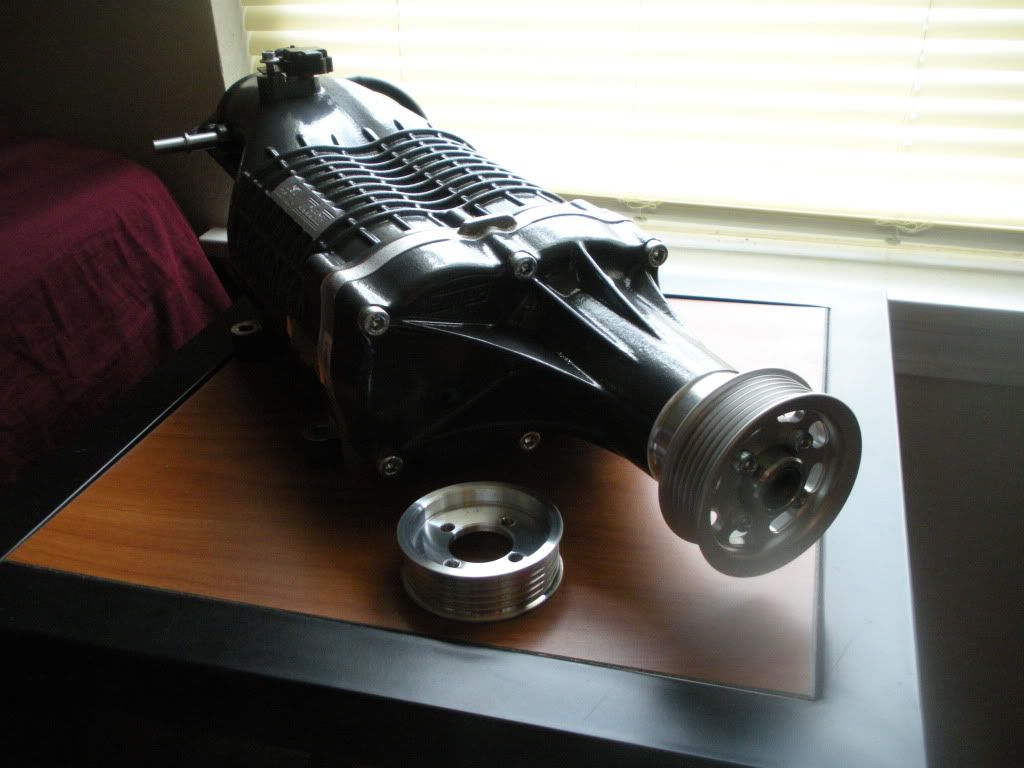
Harrop HTV1320 LSJ 1.3L blower
2.8" pulley for blower
Nitrous Express V8 EFI mainline kit (The V8 kit comes with bigger jets)
Supercharger cooling mods:
26" x 7" x 3.5" OTTP air to water heat exchanger
Devil's Own Progressive methanol/water injection kit with 7GPH nozzle
OTTP dual pass intercooler endplate
Removed a/c condenser
Internal components:
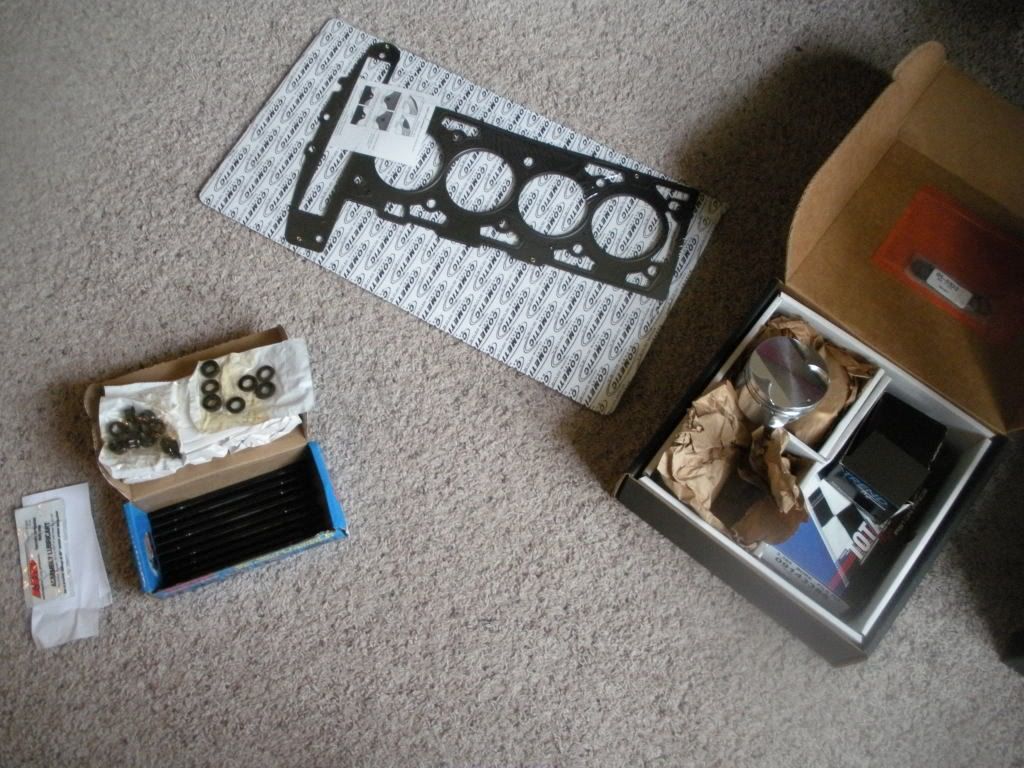
Diamond Racing 9.5:1 dished, high-lift valve forged pistons
Total Seal gapless rings
Cometic MLS head gasket
ARP head studs
Clevite 77 factory clearance rod bearings
ARP rod bolts
Fuel system:
79lb Lucas fuel injectors
Exhaust:
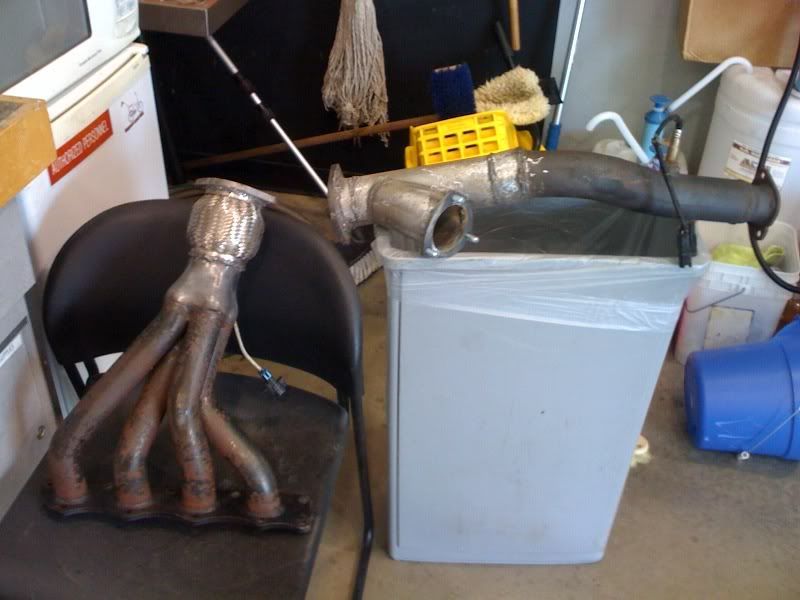
Pacesetter header, modified for maximum flow
3" exhaust cut out in place of catalytic converter
Intake:
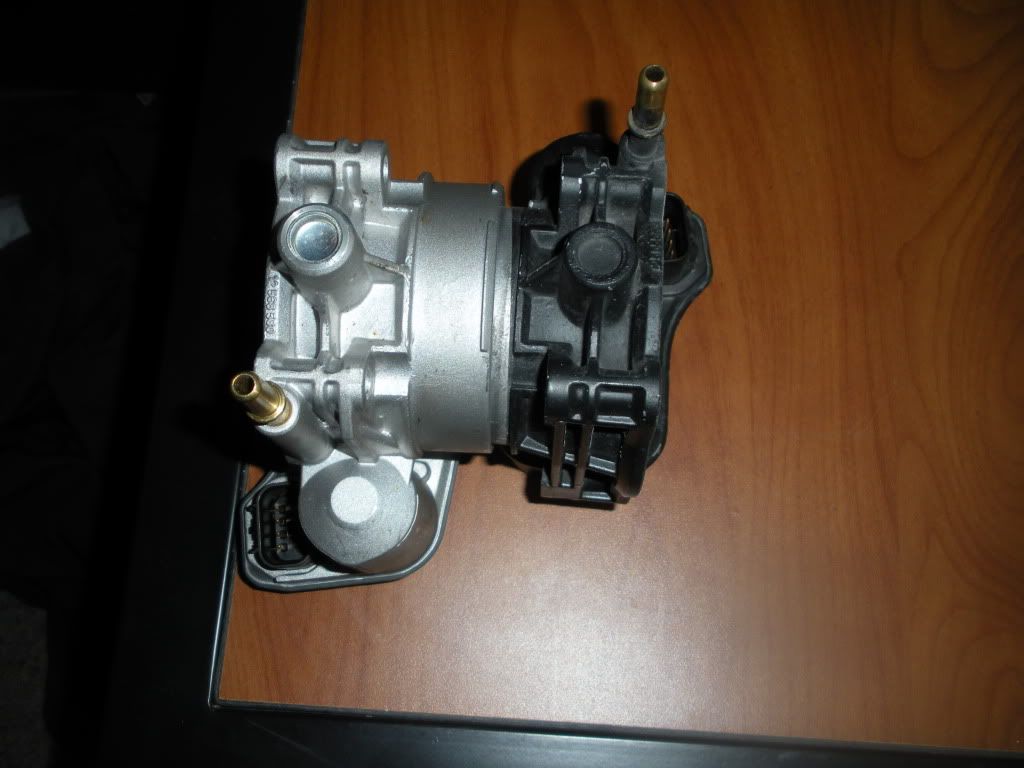
GM LS4 throttle body
Custom made 3" intake with relocated MAF
Engine management:
HP Tuners PRO interface/software
-30 to 30psi Autometer boost gauge
Suspension/Traction/Drivetrain:
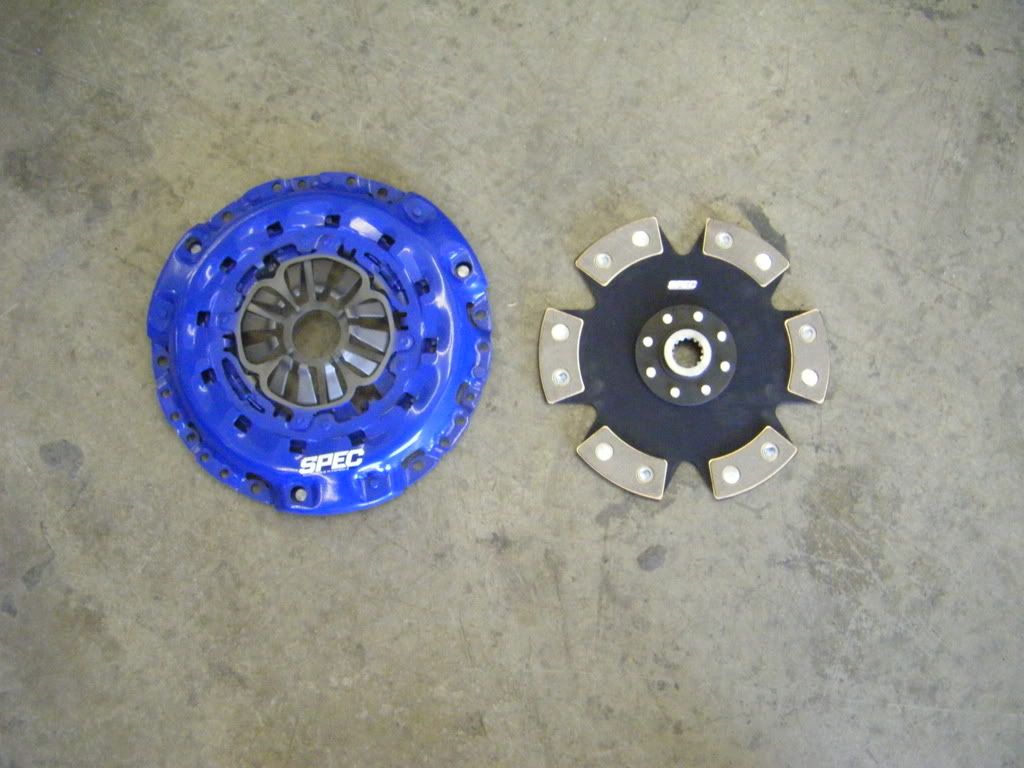
SPEC Stage 4 6-puck, unsprung, sintered iron clutch
OTTP rotated engine mounts
B+G lowering springs
26 x 10.50 x 16 M/T ET Street slicks with tubes
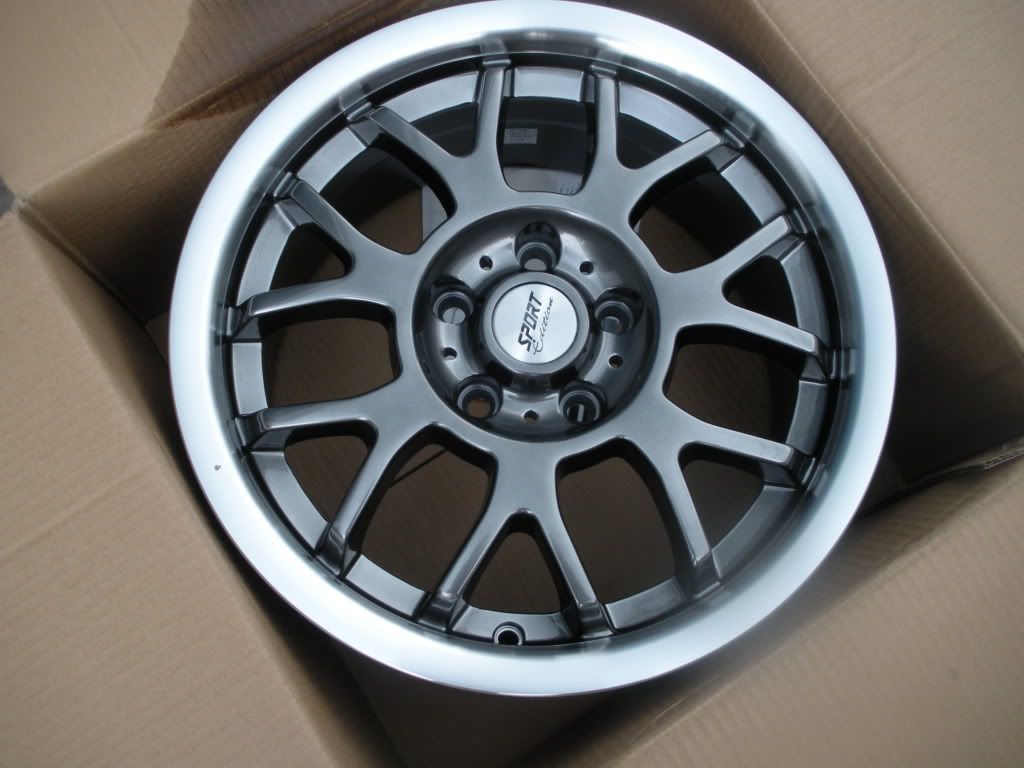
Sport Edition CD black 16 x 7.5 wheels
OTTP upgraded axles
Monroe Air struts custom fit for my car
Limiting chains in the rear
Necessities:
NGK R5671A-9 v-power racing spark plugs
3" tensioner pulley
Dynotune bottle heater
B&M "short-throw" shifter
The Harrop HTV1320 roots style supercharger with Eaton's Twin Vortecies Series screws inside. Displacing 1.32 liters of air while consuming less power and making less heat than the stock Eaton M62 supercharger at higher boost levels. The stock 3.15" pulley will be replaced with a 2.8" pulley for a significant increase in overall output.
The custom modified Pacesetter header. The Pacesetter uses the biggest thin wall primaries and collector of any header made for the LSJ and it happens to be the cheapest. However, I got this header for free, cut off the bullshit 2.5" donut flex joint that Pacesetter uses to save money, and welded a 3" reinforced flex coupler and 2-bolt flange onto the end of it. Thanks to Grimmspeed (Yes the Subaru guys lol) for providing a 3" MLS gasket that is going to handle the EGTs coming from this engine. I then hacked off the cat completely from the mid-pipe and welded in a 3" cutout section to be removed for track days and ear deafening street use. After some trial and error I got the cutout to fit perfectly between the subframe and floorpan.
Random necessities for the internal of the motor. ARP head studs. Cometic 4-layer MLS headgasket. Diamond Racing forged aluminum dished, high-lift valve relief 9.5:1 compression pistons. The piston set uses total seal gapless rings and 8620 .906" wrist pins to keep the parts together. Stock powder forged rods and crank will remain in use as they have proved to be reliable well past my power expectations. I intend to prove their worth.
This is the throttle body that the new Harrop blower was designed to use. It is off the new 5.3L LS4 engine. The stock throttle body from the LSJ will fit it, but clearly you can see why using this blower/throttle body makes significant power gains.....
.....I mean come on, the outside of the stock throttle body inlet fits inside the inlet of the LS4 throttle body haha.
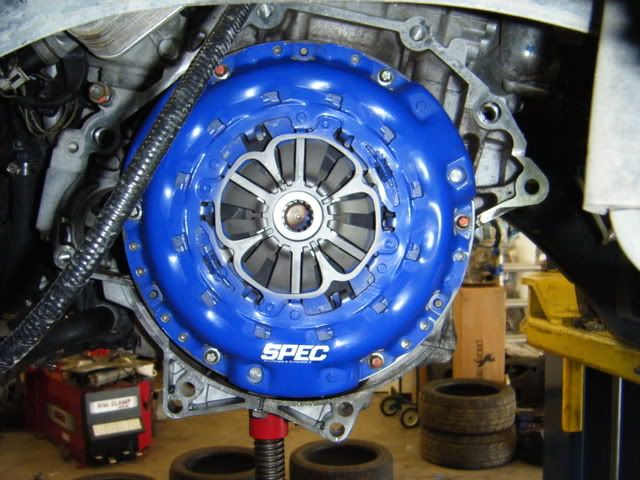
And of course last year the Spec Stage 4 6-disc sintered iron unsprung clutch went in. About 2k miles later she's nice and broken in Using the stock flywheel for streetability on hills in stop and go traffic.
First the nitrous, nothing special, just a mainline NX kit with jettings up to 150. The nozzle feed lines are quite short so this time I will have to actually display the solenoids. At least they're pretty!

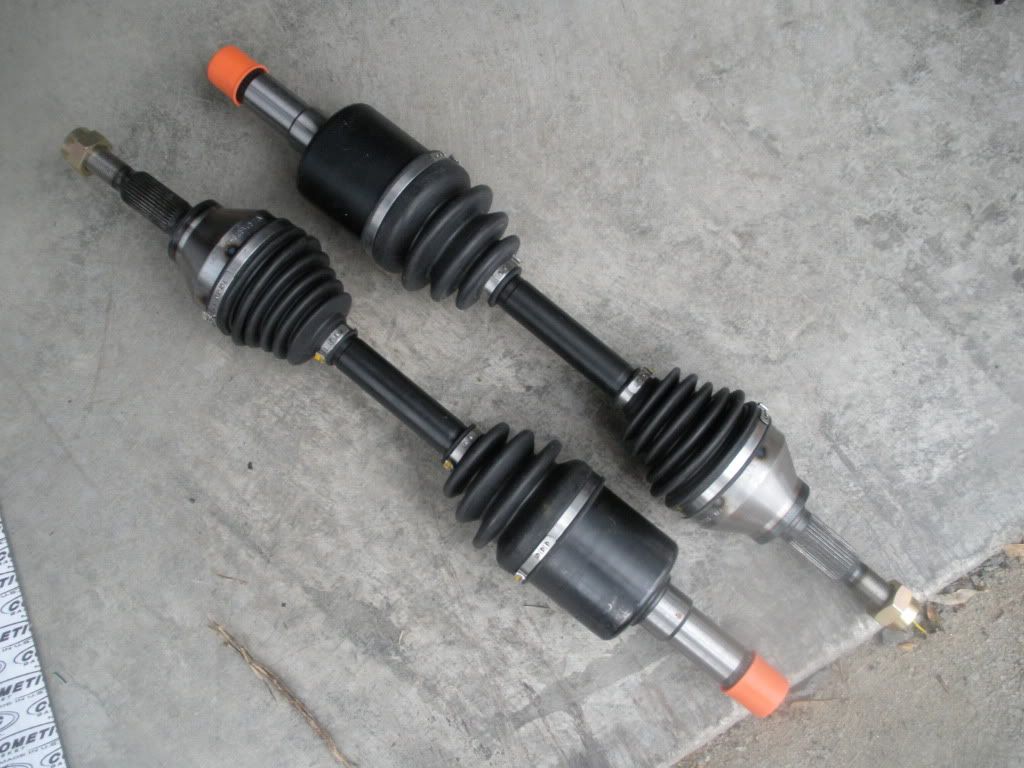
Next up some stronger axles. No one is quite sure of the torque rating of these, but they are considered a "Stage One" axle. The play in the joints is also very minimized and stiff. Guess we'll have to see what they hold to!
The Diamond pistons mounted to the stock rods. The rods are powder forged from the factory so they are quite stout. No worries with them holding up to the abuse...yet.

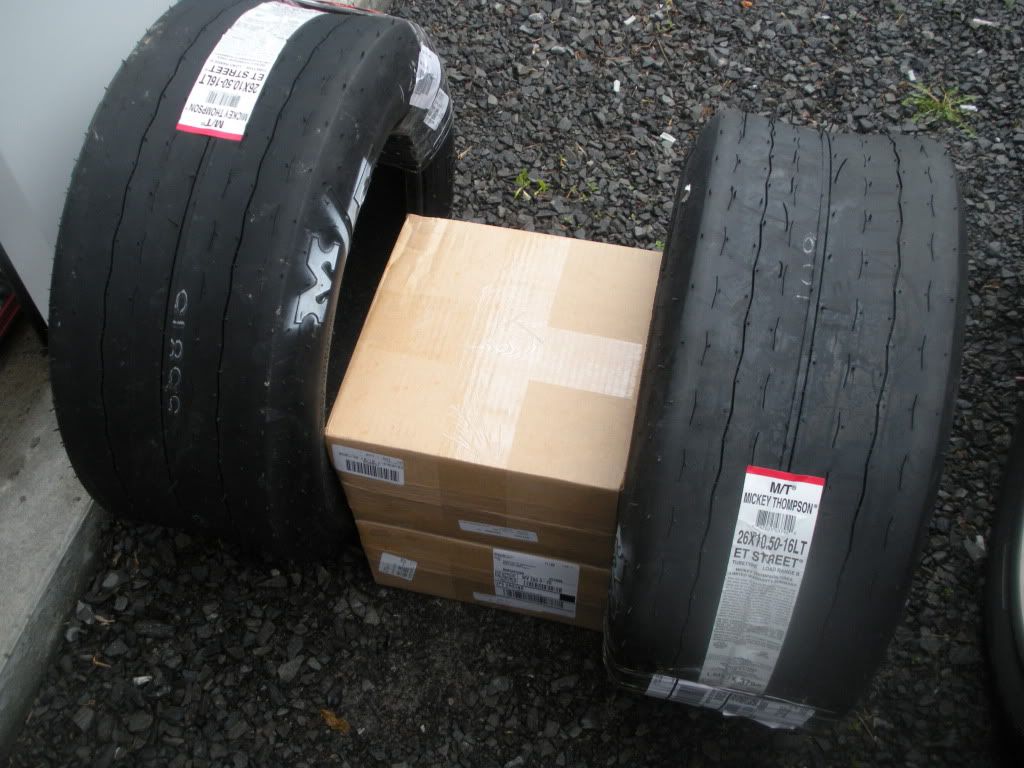
The wheels that will be mounted to the slicks. Summit Racing sure is taking their sweet ass time getting them to me!
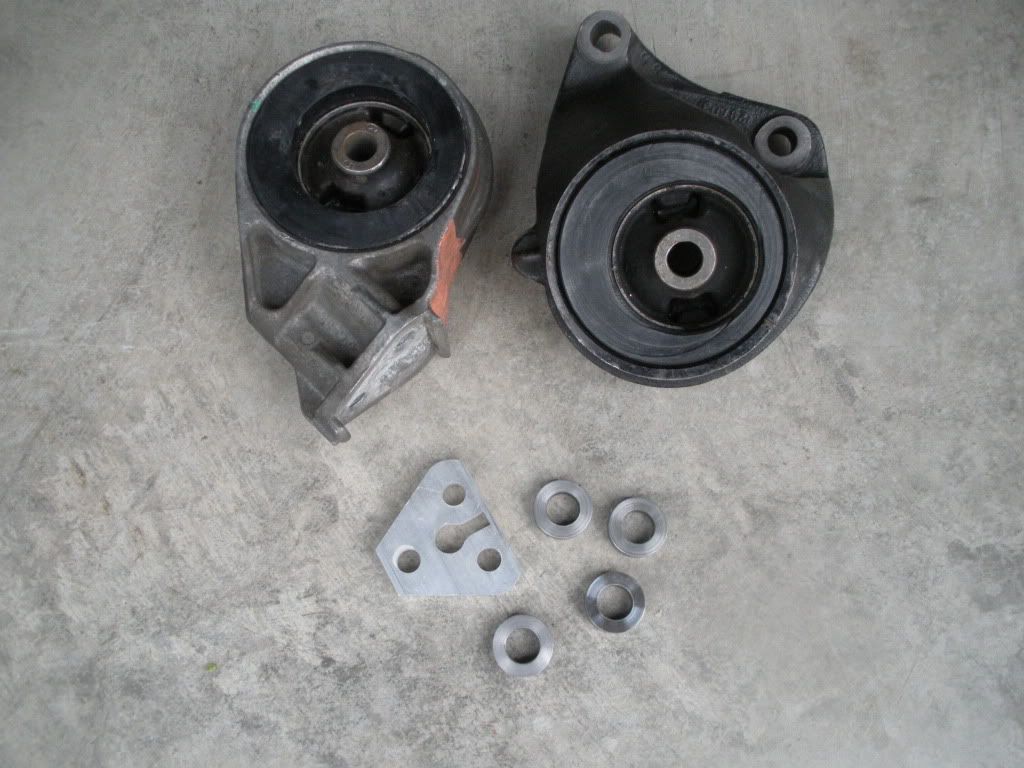
And the pieces that make good launching possible in the LSJ. A set of rotated engine mounts. By rotating the engine forward, the axles are driven more parallel to the engine/transmission, giving them proper geometry and eliminating wheel hop. No need for traction bars with these! These particular mounts are built by the same guy that built the time attack Cobalt for GM and sold by Over the Top Performance. The front mount is custom made just for the 04 Redline. You can see how far the center hole has been moved on the front mount. The rear one is shifted only slightly, but there is a metal spacer that sits under the mount to help tilt the motor forward.
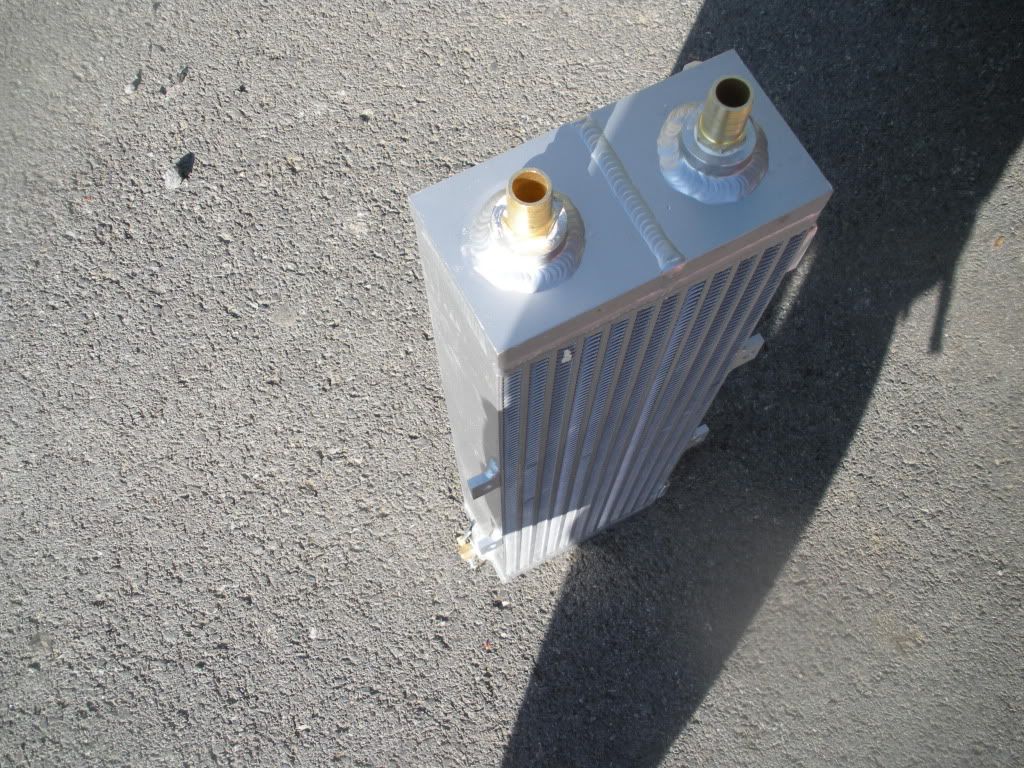
So today the MASSIVE heat exchanger arrived. And when I say massive, I mean massive. This is thicker than a heat exchanger you can buy for a Cobra or Lightning even. It's core dimensions are 26" x 7" x 3.5". And that's without the end tanks! 1" inlet and outlet. This unit functions as a dual pass design, meaning hot fluid flows in the top, and is forced through the entire core before making its way down and out the bottom to the pump, where it heads back up into the manifold and through the Laminova cooling tubes.
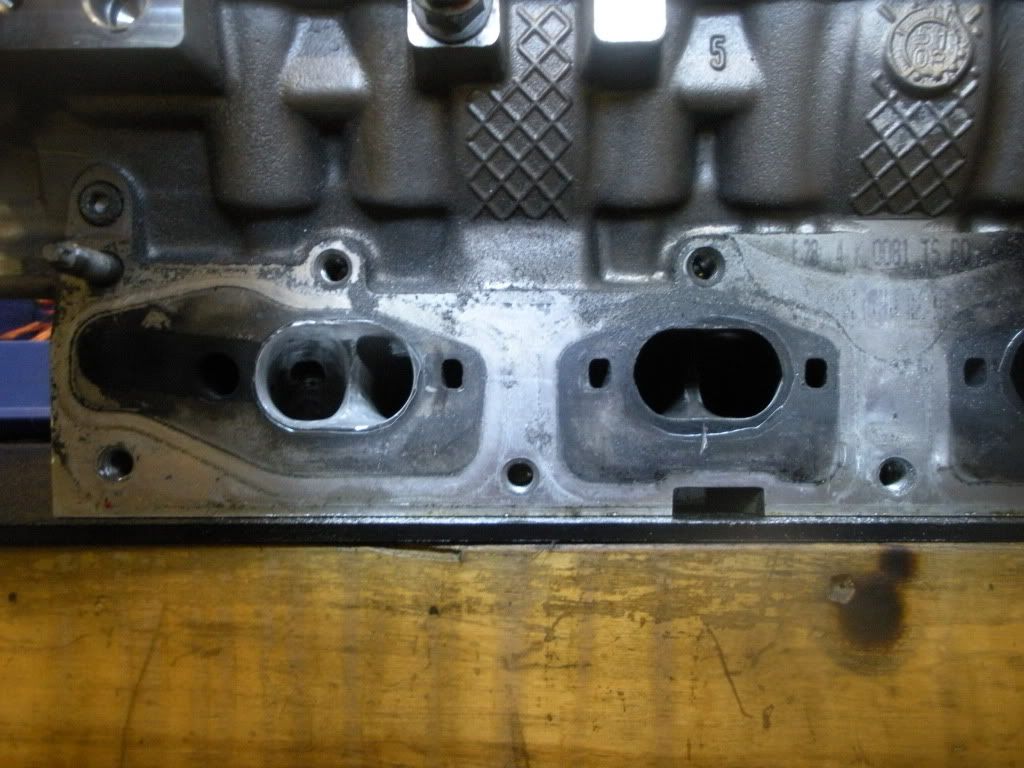
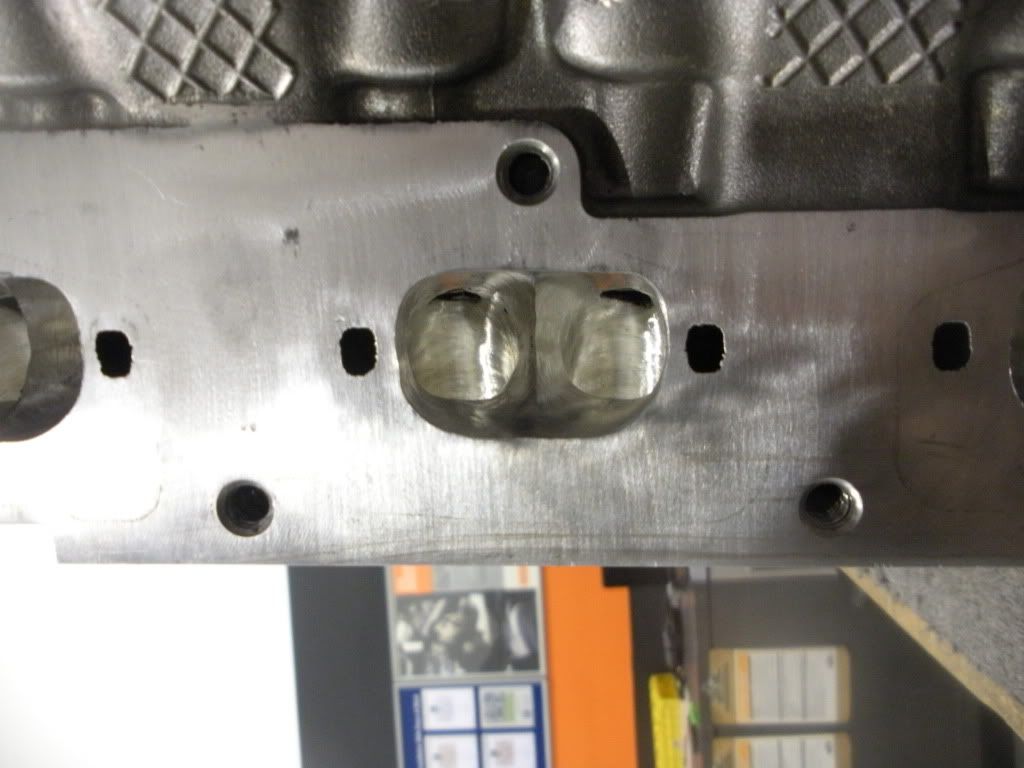
Friday I started on porting the exhaust side of my cylinder head as it needs it bad. I discovered I needed some new carbide bits after ripping through quite a few cartridge rolls on just one port. The tricky part about the LSJ head is that A LOT of coolant flows around the exhaust passages, so you have to be careful about where you clear material out from. The good part is there is a lot that can be removed from the short radius on the bottom of the ports and in the area right behind the valve seal. And of course the exit of the port can be opened significantly. But this was how far I got before stopping and ordering some nice carbide bits. Notice in port #4 the port closer to the outside is MUCH larger than the one closer to the inside. That was done in just about 1/2 hour with some "sand paper" bits. When the carbide bits arrive tomorrow, this head shouldn't take much time at all to finish off.
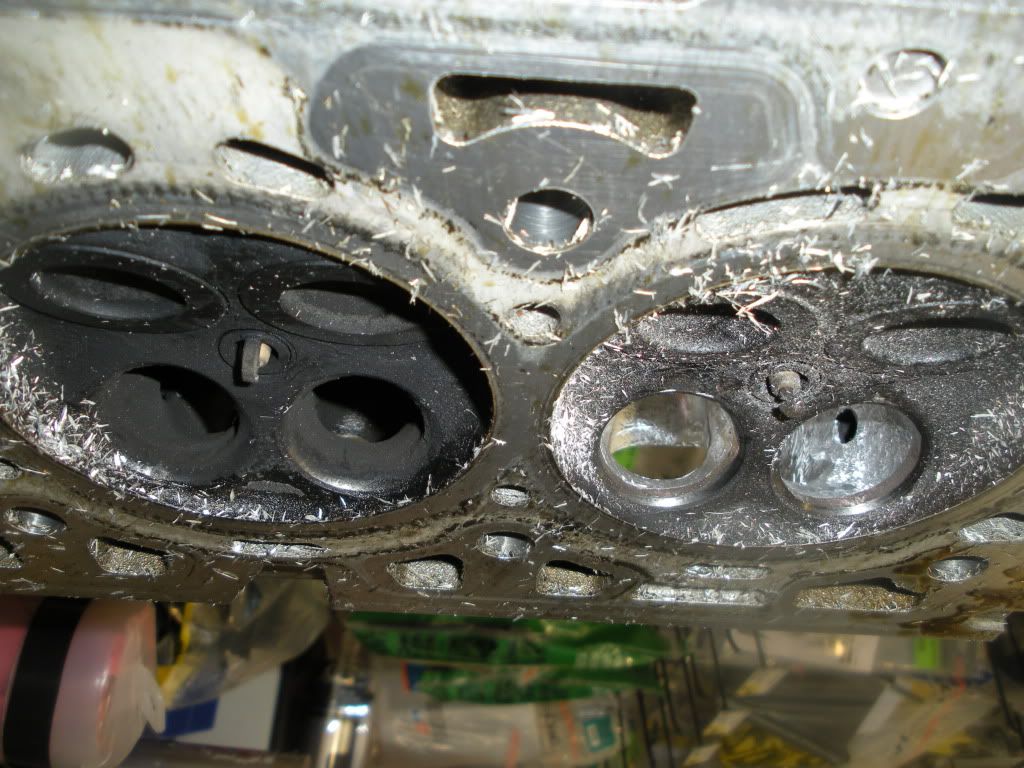
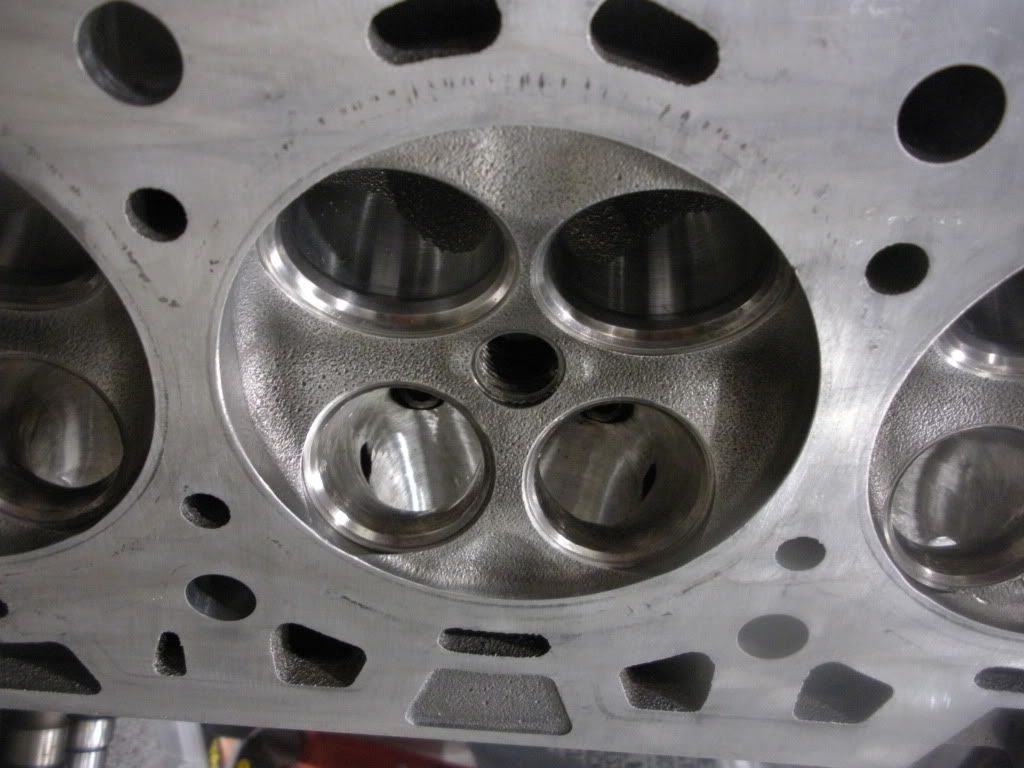
Some more progress on the head. Those carbide bits do wonnders. I haven't started to polish anything yet, just hogging it out for now. Just look at how much material I was able to remove from the short radius on the bottom. You can see clearly through the entire port of cylinder 4, but there is barely a crack of light through the port for cylinder 3. The area right behind the valve seat was able to be opened up significantly also, which is going to make the biggest difference. Also, I opened the the port exits up to match the gasket and header primaries. I can't believe GM left so much material in there. It doesn't make sense.
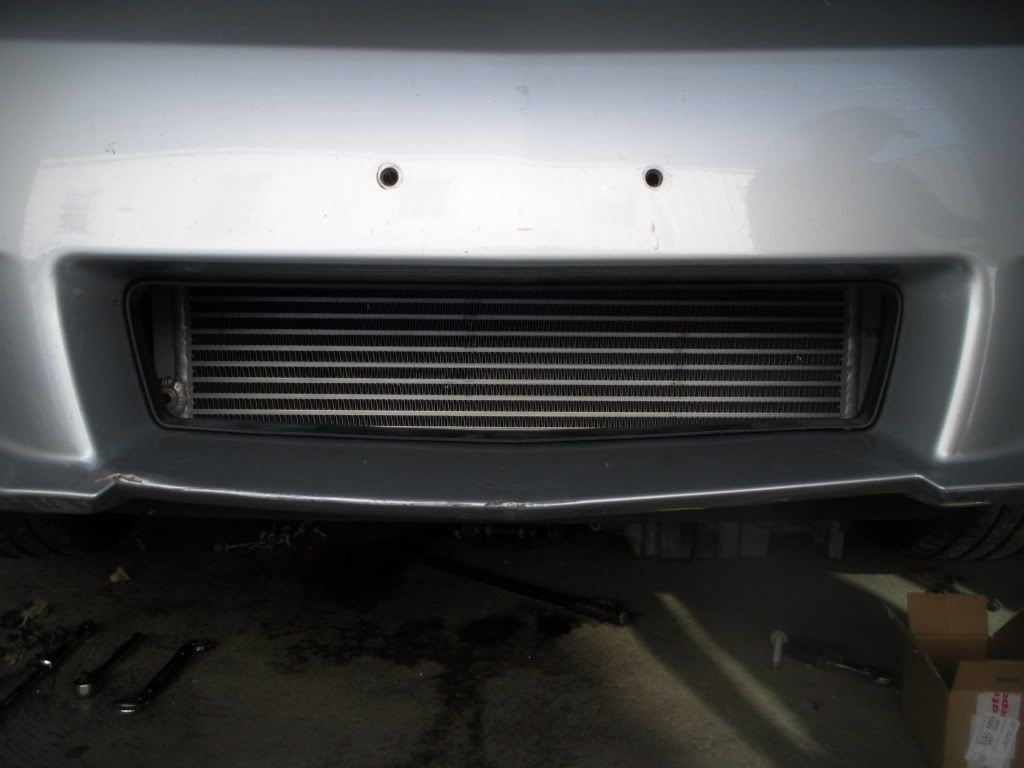
Got the heat exchanger mounted. If you didn't know any better, you'd look in the bumper and swear this car is turbo'd. I mounted it much higher and much more cleanly than the directions suggest. Hey, rules were meant to be broken right?

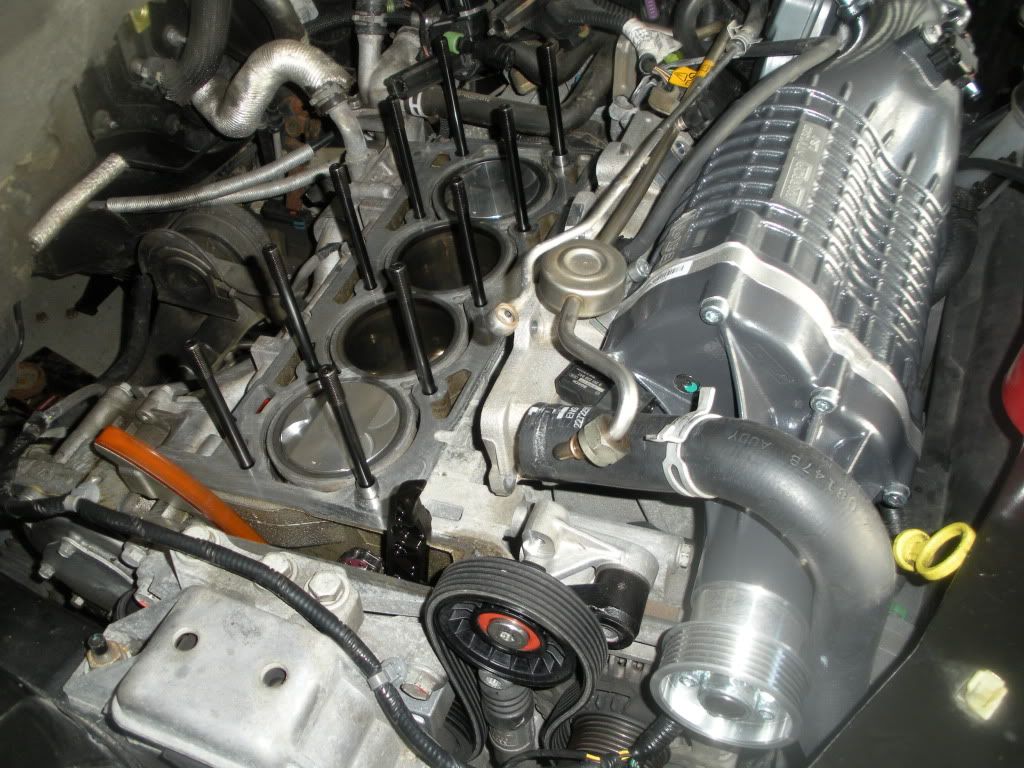
And just a teaser pic. I got the whole block reassembled and dropped back into the cradle before deciding to pull the head and port it. Luckily it's easy enough to do!!! This also shows how tight that blower fits. Many things have to be rerouted, bent, modified, etc to let this bad boy fit.
Well finished the head completely today. Got her all bolted back together and all the mating surfaces smoothed up and ready to get everything bolted together. She's so pretty and just think, I didn't even spen $150 doing this whole thing. That even includes all the parts cleaner I had to use to make her shine!

And a close up of the amount of detail I parts to parts you will never even see!!! Got the inside of the ports nice and polished to a mirror finish too.
Oh yeah. The M/T ET Streets in 26 x 10.50 x 16 with some tubes.
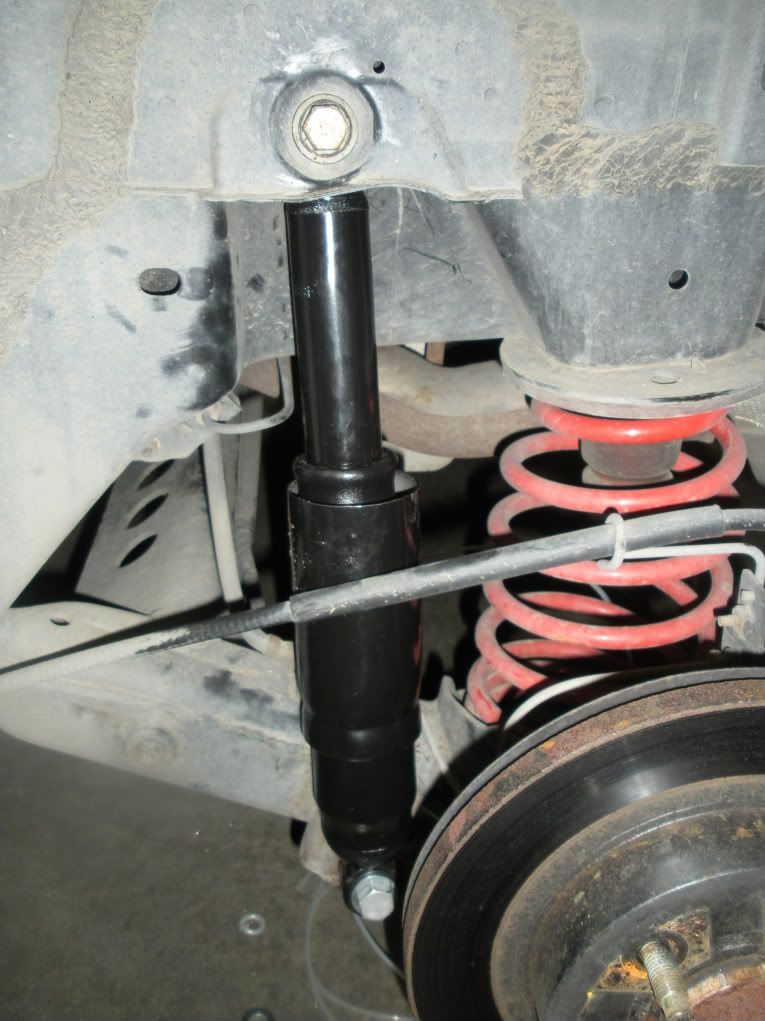
And the Monroe air shocks mounted, the line is ran into the trunk for easy filling. These were an MA803, I don't know what they fit but they were almost dead on the specs for my car's rear strut! They make the ride a little bouncy at lower speeds, but the work great wit the chains strapped on. Yes they are mounted upside down, they have to be. But the work just the same, so what if debris gets in there. They're cheap enough to replace.
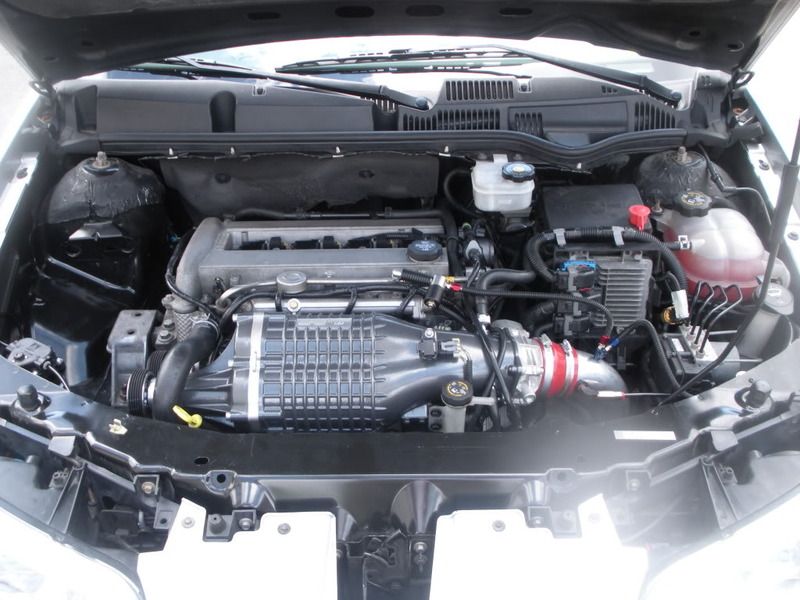
Well here she is all done! Everything has been installed and running smooth for the past week. Got most of the tuning done and this car idles like stock, which is surprising considering the 79lb fuel injectors lol.
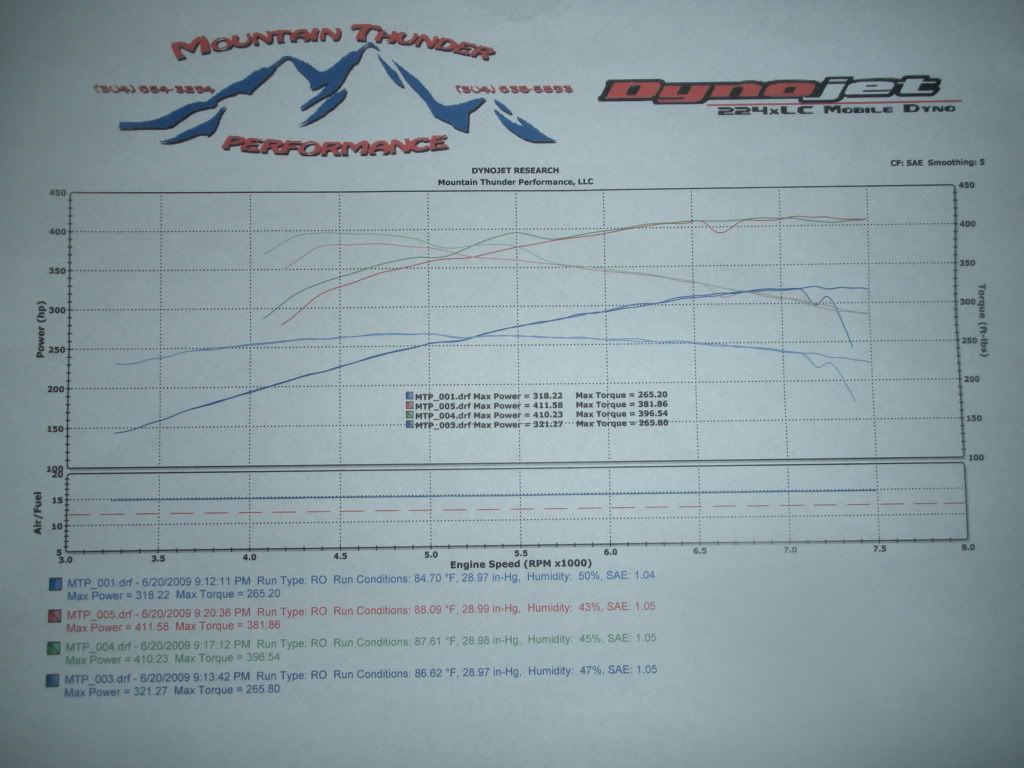
And dyno numbers for backing up the work.
Power mods:
Harrop HTV1320 LSJ 1.3L blower
2.8" pulley for blower
Nitrous Express V8 EFI mainline kit (The V8 kit comes with bigger jets)
Supercharger cooling mods:
26" x 7" x 3.5" OTTP air to water heat exchanger
Devil's Own Progressive methanol/water injection kit with 7GPH nozzle
OTTP dual pass intercooler endplate
Removed a/c condenser
Internal components:
Diamond Racing 9.5:1 dished, high-lift valve forged pistons
Total Seal gapless rings
Cometic MLS head gasket
ARP head studs
Clevite 77 factory clearance rod bearings
ARP rod bolts
Fuel system:
79lb Lucas fuel injectors
Exhaust:
Pacesetter header, modified for maximum flow
3" exhaust cut out in place of catalytic converter
Intake:
GM LS4 throttle body
Custom made 3" intake with relocated MAF
Engine management:
HP Tuners PRO interface/software
-30 to 30psi Autometer boost gauge
Suspension/Traction/Drivetrain:
SPEC Stage 4 6-puck, unsprung, sintered iron clutch
OTTP rotated engine mounts
B+G lowering springs
26 x 10.50 x 16 M/T ET Street slicks with tubes
Sport Edition CD black 16 x 7.5 wheels
OTTP upgraded axles
Monroe Air struts custom fit for my car
Limiting chains in the rear
Necessities:
NGK R5671A-9 v-power racing spark plugs
3" tensioner pulley
Dynotune bottle heater
B&M "short-throw" shifter
The Harrop HTV1320 roots style supercharger with Eaton's Twin Vortecies Series screws inside. Displacing 1.32 liters of air while consuming less power and making less heat than the stock Eaton M62 supercharger at higher boost levels. The stock 3.15" pulley will be replaced with a 2.8" pulley for a significant increase in overall output.
The custom modified Pacesetter header. The Pacesetter uses the biggest thin wall primaries and collector of any header made for the LSJ and it happens to be the cheapest. However, I got this header for free, cut off the bullshit 2.5" donut flex joint that Pacesetter uses to save money, and welded a 3" reinforced flex coupler and 2-bolt flange onto the end of it. Thanks to Grimmspeed (Yes the Subaru guys lol) for providing a 3" MLS gasket that is going to handle the EGTs coming from this engine. I then hacked off the cat completely from the mid-pipe and welded in a 3" cutout section to be removed for track days and ear deafening street use. After some trial and error I got the cutout to fit perfectly between the subframe and floorpan.
Random necessities for the internal of the motor. ARP head studs. Cometic 4-layer MLS headgasket. Diamond Racing forged aluminum dished, high-lift valve relief 9.5:1 compression pistons. The piston set uses total seal gapless rings and 8620 .906" wrist pins to keep the parts together. Stock powder forged rods and crank will remain in use as they have proved to be reliable well past my power expectations. I intend to prove their worth.
This is the throttle body that the new Harrop blower was designed to use. It is off the new 5.3L LS4 engine. The stock throttle body from the LSJ will fit it, but clearly you can see why using this blower/throttle body makes significant power gains.....
.....I mean come on, the outside of the stock throttle body inlet fits inside the inlet of the LS4 throttle body haha.
And of course last year the Spec Stage 4 6-disc sintered iron unsprung clutch went in. About 2k miles later she's nice and broken in Using the stock flywheel for streetability on hills in stop and go traffic.
First the nitrous, nothing special, just a mainline NX kit with jettings up to 150. The nozzle feed lines are quite short so this time I will have to actually display the solenoids. At least they're pretty!
Next up some stronger axles. No one is quite sure of the torque rating of these, but they are considered a "Stage One" axle. The play in the joints is also very minimized and stiff. Guess we'll have to see what they hold to!
The Diamond pistons mounted to the stock rods. The rods are powder forged from the factory so they are quite stout. No worries with them holding up to the abuse...yet.
The wheels that will be mounted to the slicks. Summit Racing sure is taking their sweet ass time getting them to me!
And the pieces that make good launching possible in the LSJ. A set of rotated engine mounts. By rotating the engine forward, the axles are driven more parallel to the engine/transmission, giving them proper geometry and eliminating wheel hop. No need for traction bars with these! These particular mounts are built by the same guy that built the time attack Cobalt for GM and sold by Over the Top Performance. The front mount is custom made just for the 04 Redline. You can see how far the center hole has been moved on the front mount. The rear one is shifted only slightly, but there is a metal spacer that sits under the mount to help tilt the motor forward.
So today the MASSIVE heat exchanger arrived. And when I say massive, I mean massive. This is thicker than a heat exchanger you can buy for a Cobra or Lightning even. It's core dimensions are 26" x 7" x 3.5". And that's without the end tanks! 1" inlet and outlet. This unit functions as a dual pass design, meaning hot fluid flows in the top, and is forced through the entire core before making its way down and out the bottom to the pump, where it heads back up into the manifold and through the Laminova cooling tubes.
Friday I started on porting the exhaust side of my cylinder head as it needs it bad. I discovered I needed some new carbide bits after ripping through quite a few cartridge rolls on just one port. The tricky part about the LSJ head is that A LOT of coolant flows around the exhaust passages, so you have to be careful about where you clear material out from. The good part is there is a lot that can be removed from the short radius on the bottom of the ports and in the area right behind the valve seal. And of course the exit of the port can be opened significantly. But this was how far I got before stopping and ordering some nice carbide bits. Notice in port #4 the port closer to the outside is MUCH larger than the one closer to the inside. That was done in just about 1/2 hour with some "sand paper" bits. When the carbide bits arrive tomorrow, this head shouldn't take much time at all to finish off.
Some more progress on the head. Those carbide bits do wonnders. I haven't started to polish anything yet, just hogging it out for now. Just look at how much material I was able to remove from the short radius on the bottom. You can see clearly through the entire port of cylinder 4, but there is barely a crack of light through the port for cylinder 3. The area right behind the valve seat was able to be opened up significantly also, which is going to make the biggest difference. Also, I opened the the port exits up to match the gasket and header primaries. I can't believe GM left so much material in there. It doesn't make sense.
Got the heat exchanger mounted. If you didn't know any better, you'd look in the bumper and swear this car is turbo'd. I mounted it much higher and much more cleanly than the directions suggest. Hey, rules were meant to be broken right?
And just a teaser pic. I got the whole block reassembled and dropped back into the cradle before deciding to pull the head and port it. Luckily it's easy enough to do!!! This also shows how tight that blower fits. Many things have to be rerouted, bent, modified, etc to let this bad boy fit.
Well finished the head completely today. Got her all bolted back together and all the mating surfaces smoothed up and ready to get everything bolted together. She's so pretty and just think, I didn't even spen $150 doing this whole thing. That even includes all the parts cleaner I had to use to make her shine!
And a close up of the amount of detail I parts to parts you will never even see!!! Got the inside of the ports nice and polished to a mirror finish too.
Oh yeah. The M/T ET Streets in 26 x 10.50 x 16 with some tubes.
And the Monroe air shocks mounted, the line is ran into the trunk for easy filling. These were an MA803, I don't know what they fit but they were almost dead on the specs for my car's rear strut! They make the ride a little bouncy at lower speeds, but the work great wit the chains strapped on. Yes they are mounted upside down, they have to be. But the work just the same, so what if debris gets in there. They're cheap enough to replace.
Well here she is all done! Everything has been installed and running smooth for the past week. Got most of the tuning done and this car idles like stock, which is surprising considering the 79lb fuel injectors lol.
And dyno numbers for backing up the work.
Last edited by StreetDreamz; 06-24-2009 at 08:50 AM.


 06-22-2009, 09:23 AM
#5
Banned
Thread Starter
Join Date: 02-23-06
Location: Mo-town, WV
Posts: 1,287
Likes: 0
Received 0 Likes
on
0 Posts
06-22-2009, 09:27 AM
#6
Senior Member

Join Date: 06-03-07
Location: Pittsburgh PA
Posts: 1,265
Likes: 0
Received 0 Likes
on
0 Posts
bflaker said the car was puking alil coolant. becareful above 400wheel. from what i've seen supercharged ecotecs start to do crazy stuff up there. Mainly coolant meet combustion chamber. But still man sick setup for sure. When you going to PRP? Would love to see an 11sec pass or faster.
 06-22-2009, 09:40 AM
#8
Banned
Thread Starter
Join Date: 02-23-06
Location: Mo-town, WV
Posts: 1,287
Likes: 0
Received 0 Likes
on
0 Posts
bflaker said the car was puking alil coolant. becareful above 400wheel. from what i've seen supercharged ecotecs start to do crazy stuff up there. Mainly coolant meet combustion chamber. But still man sick setup for sure. When you going to PRP? Would love to see an 11sec pass or faster.
No pictures. It was matched to the Pacesetter primares with blue chalk and then a stock metal gasket was modified to match those openings.


 06-22-2009, 10:21 AM
#13
Banned
Thread Starter
Join Date: 02-23-06
Location: Mo-town, WV
Posts: 1,287
Likes: 0
Received 0 Likes
on
0 Posts

 06-22-2009, 01:08 PM
#18
Senior Member
Join Date: 07-08-05
Location: Niceville, FL
Posts: 6,200
Likes: 0
Received 0 Likes
on
0 Posts
Hey can you host the pics on the gallery here so I can see them? Mainly the dyno is what I want to see, but all of them would be awesome. Gov't computer is blocking them sadly. Great work though!

 06-22-2009, 02:09 PM
#22
Banned
Thread Starter
Join Date: 02-23-06
Location: Mo-town, WV
Posts: 1,287
Likes: 0
Received 0 Likes
on
0 Posts
Nope stock valve train.
That's where I work lol. I had it there to reassemble it during work one day lol.
That's where I work lol. I had it there to reassemble it during work one day lol.
Last edited by StreetDreamz; 06-22-2009 at 02:09 PM. Reason: Automerged Doublepost