
Halfcents Second Gauge Pod Idea (pics)
 04-09-2006, 03:11 PM
#1
I'm old school
Thread Starter
Halfcents Second Gauge Pod Idea (pics)
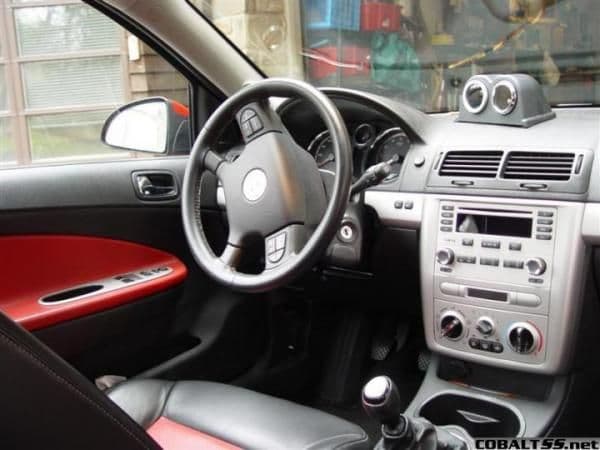
OK, so here is the new pod as promised. If you didn't get to see the first one, click here. I already like this one a lot better. I switched to a softer, more dense foam with color. That alone made shaping and molding it a lot easier. I ditched the idea of matching it up to the contour of the factory cluster, and that made things a lot easier too. I stuck a printed picture of some Autometer C2 gauges on there so you can get a good perspective.

Now I know what you are saying. "Jesus that's huge!" Well, it isn't really. The camera doesn't do it justice. Take a look at a the rest of them...

This is the driver view. I gave up a small amount of line of sight in order to get the height necessary for clearance. If you read the first thread, you saw the problem I had was there wasn't enough room for the gauge behind the panel due to the slope of the dash. That problem is now fixed.
This is probably the best picture;

And this is what it looks like from on top;

Here's the good news, I can make it smaller. The problem I had with the first one was it was too small, so I didn't want to short myself on this one. Gauges require about 2 inches of depth to fit. I can reduce the height of the pod by about a half inch easily, maybe more. And you know the smaller it gets the better it will look. I could also reduce the length, but I don't think I want to. More length off sets the height, which should give it a sleek look.
Now I know what you are saying. "Jesus that's huge!" Well, it isn't really. The camera doesn't do it justice. Take a look at a the rest of them...
This is the driver view. I gave up a small amount of line of sight in order to get the height necessary for clearance. If you read the first thread, you saw the problem I had was there wasn't enough room for the gauge behind the panel due to the slope of the dash. That problem is now fixed.
This is probably the best picture;
And this is what it looks like from on top;
Here's the good news, I can make it smaller. The problem I had with the first one was it was too small, so I didn't want to short myself on this one. Gauges require about 2 inches of depth to fit. I can reduce the height of the pod by about a half inch easily, maybe more. And you know the smaller it gets the better it will look. I could also reduce the length, but I don't think I want to. More length off sets the height, which should give it a sleek look.
 04-09-2006, 03:14 PM
#2
Senior Member
It would look better if you made it a little shorter.
That thing is HUGE.
Maybe something like this

Or possibly something like this to be similar to our main gauge cluster roof

That thing is HUGE.
Maybe something like this
Or possibly something like this to be similar to our main gauge cluster roof
 04-09-2006, 03:20 PM
#4
I'm old school
Thread Starter
Both of those designs have the pod as part of the dash design. Hence, the dash is open behind there giving the gauge the room it needs to be mounted. I don't have that luxury here unless I cut open the top of the dash, and that is exactly what I don't want to do. But yes, It will get a little smaller.
Mine looks very large because of how close to the front of the dash it is sitting. For instance, that one you are using is sitting back quite a bit. Now keep that same height, and move it closer.
Mine looks very large because of how close to the front of the dash it is sitting. For instance, that one you are using is sitting back quite a bit. Now keep that same height, and move it closer.
04-09-2006, 03:21 PM
#5
Banned

Join Date: 03-14-06
Location: soon to banned as I am from MANITOBA?
Posts: 3,660
Likes: 0
Received 1 Like
on
1 Post
Super start!! i like this approach far better. Mercury is bang on. miniturize it a bit. width is very cool the lines are there. You are makeing some great progress with this unit. I know I want this unit! Keep going, HALFCENT!!
 04-09-2006, 03:26 PM
#7
Banned
Join Date: 03-14-06
Location: soon to banned as I am from MANITOBA?
Posts: 3,660
Likes: 0
Received 1 Like
on
1 Post
Originally Posted by Halfcent
Both of those designs have the pod as part of the dash design. Hence, the dash is open behind there giving the gauge the room it needs to be mounted. I don't have that luxury here unless I cut open the top of the dash, and that is exactly what I don't want to do. But yes, It will get a little smaller.
Mine looks very large because of how close to the front of the dash it is sitting. For instance, that one you are using is sitting back quite a bit. Now keep that same height, and move it closer.
Mine looks very large because of how close to the front of the dash it is sitting. For instance, that one you are using is sitting back quite a bit. Now keep that same height, and move it closer.
You are right but if we were to take COBALT style meters and build the pod around its size you can recommend the style of guage. then its a little more simple. just build it out from the dash. it does not have to be a flat face does it. angle the part below the guages back to gain depth and angle the guages up. that could work.
04-09-2006, 03:32 PM
#8
I'm old school
Thread Starter
Hmm, I see what you're saying, and that's a good idea. Actually it made me think not only about moving it forward, but also moving it back. Let me go see what it looks like.
Okay, just did. Setting it further forward looks wrong. It projects into the car too much, and hanging out over the vents didn't look right. Setting it further aft worked, but I actually ended up losing more line of sight due to to being higher up on the dash.
I'm going to shave this one down to as thin as it can be. If that looks better, I'm going to make a third mold with a different brow line to better match the car (not so straight)
Last edited by Halfcent; 04-09-2006 at 03:55 PM.
04-09-2006, 04:06 PM
#9
Senior Member
iTrader: (1)

Join Date: 01-15-06
Location: Florence, SC
Posts: 578
Likes: 0
Received 0 Likes
on
0 Posts
Looks really good to me; it is on the tall side. What size gauges are those represented?? I don't know that my gauges would have to be that big. Perhaps a reduction in gauge size could yield a smaller unit. Maybe you could have a large version and a small version. Also a thought, maybe you can make the gauges project out of the pod unit. You could make a raised ring for them to rest against and pull them outward away from the dash by .5" or so. I hope I am conveying my idea. If you can reduce the amount of space needed behind the pod to install the gauge you could probably shorten it up a bit. You could also make project outward and toward the driver. Just some other thoughts for ya.
I gotta say though, good work!!
Scott
I gotta say though, good work!!
Scott
04-09-2006, 04:47 PM
#10
New Member

Join Date: 03-27-05
Location: NY
Posts: 88
Likes: 0
Received 0 Likes
on
0 Posts
yea if the gauge faces in the first pic are the right size i say shave the bottom till it meets the black and leave it were it is ,directly above the vents ,looks like u could lower it about an inch or more.
04-09-2006, 04:55 PM
#11
Senior Member
iTrader: (1)
Join Date: 01-15-06
Location: Florence, SC
Posts: 578
Likes: 0
Received 0 Likes
on
0 Posts
Originally Posted by T-bone
yea if the gauge faces in the first pic are the right size i say shave the bottom till it meets the black and leave it were it is ,directly above the vents ,looks like u could lower it about an inch or more.


 04-09-2006, 05:40 PM
#14
I'm old school
Thread Starter
OK, I sexied up the mold a little bit. I will have to make a new one again, but that's ok, this is fun and cheap. I took the extra clearance off the bottom, that is as low as I can make it and keep my clearance. I rounded off the corners a lot, which destroyed the original brow line, so I just rounded it off for now. It helped to visualize how to do the next one. Here are the before and afters...


 04-09-2006, 06:52 PM
#19
Senior Member
Join Date: 10-08-05
Location: AZ
Posts: 5,295
Likes: 0
Received 0 Likes
on
0 Posts
That is looking much better, but the guages seem too big. Like someone else said if you were to drop the size of the gauges by .5" or even 1" you could make the pod smaller. Assuming you haven't bought the gauges already.
04-09-2006, 08:03 PM
#23
Senior Member
iTrader: (1)
Join Date: 01-15-06
Location: Florence, SC
Posts: 578
Likes: 0
Received 0 Likes
on
0 Posts
Originally Posted by Halfcent
Those are Autometer C2 gauges in actual size (2 1/4") They don't get any smaller.
04-09-2006, 08:10 PM
#24
Senior Member

Join Date: 08-10-05
Location: Long Island, NY
Posts: 1,551
Likes: 0
Received 0 Likes
on
0 Posts
Honestly, I liked your first idea of blending in it MUCH, MUCH better. But, if you don't like that way then I suggest making it as low profile and round as you can.
