2005-2006 Cobalt Head Unit install with pics
#1
2005-2006 Cobalt Head Unit install with pics
If there are any inconsistencies please let me know so it can be addressed. I accept no responsibility for what you do to your car. Please read your stereo's manual and seek help if you are uncomfortable with this procedure.
I decided to do a comprehensive install how-to with pictures. This how to only applies to the 2005-2006 Cobalt and Cobalt SS. Please note that this procedure works WITH and without the Pioneer stereo system and retains all car functions including the DIC and factory amplifier.
I am doing this because I had a hard time finding info on how to actually go about doing the install. The part numbers from this thread work marvelously but there are some things like how to hook up the parking brake wire and finding a switched 12v source are not easy to find. Hopefully this thread will help those people without a test light or multimeter.
1. Remove the silver trim piece above the glove box. If you don't have a panel popper then just pull it off, make sure to check the metal clips afterwards and push them back onto the plastic tabs they are attached to to help prevent rattles after all is said and done.
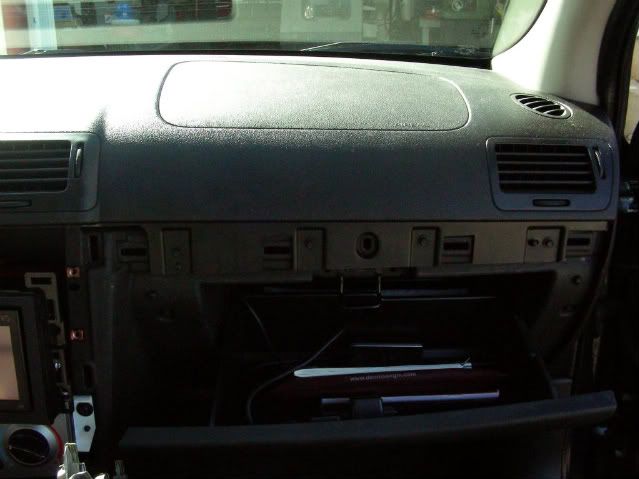
2. Pull the panel below the steering wheel off (you only need to unclip the very top right of this panel) and remove the silver trim piece to the right of the steering column (the one with the two buttons on it).
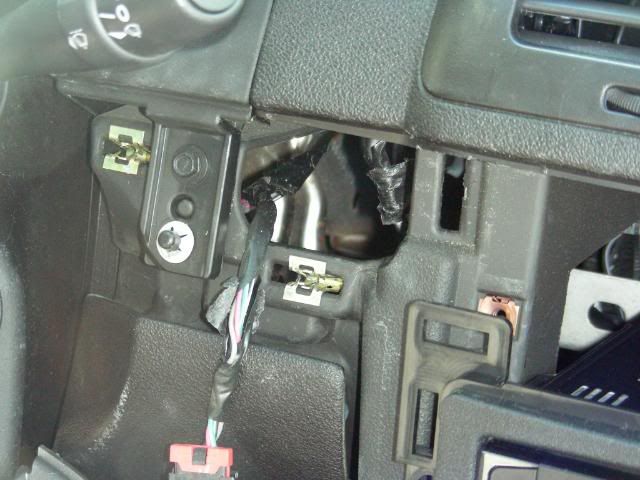
3. Working from the top down pull off the silver trim around the factory stereo. Again this one just pops off. If you are having difficulty with the top two clips you can pull the panel out as far as possible then slide a flat blade screwdriver in and push on the side of the metal clips (you will see them). I forgot to take pictures of this.
4. Unbolt the factory stereo using a 9/32 socket driver and gently remove it by unclipping the factory harness and antenna connection.
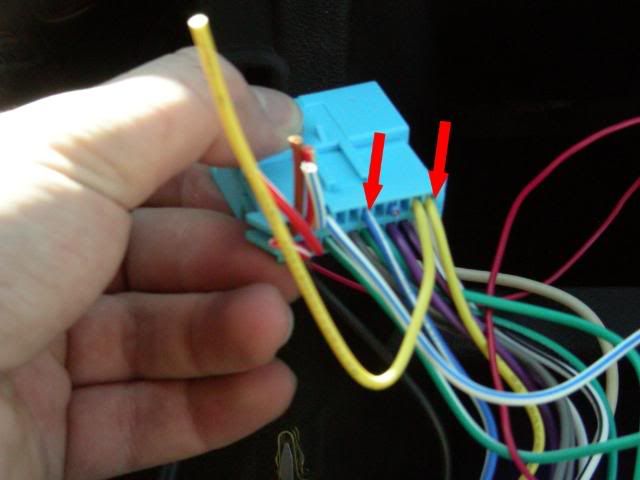
5. Now take a look at your into-car harness (metra or other equivalent). Many of the wires coming from this harness are useless. On the row with the two CONSTANT 12V wires, only the outside 12V wire and the other wire labeled with an arrow are useful, the colours and labels of these wires may change with brand. The yellow wire in this picture is the useful 12V contant supply while the blue/white wire is the remote wire to control the factory amp.
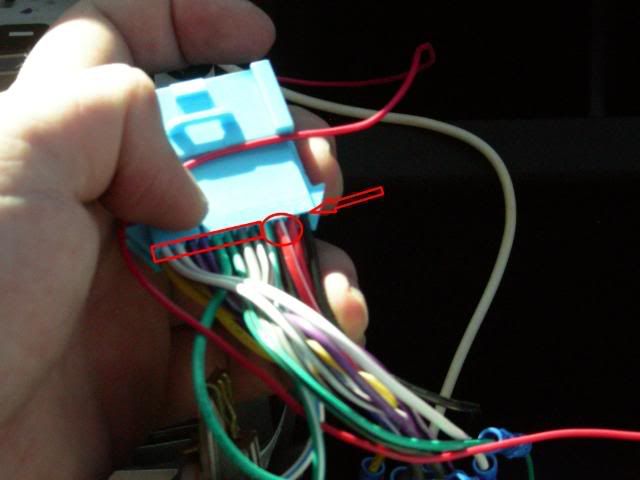
In the next image the wires labeled with a box are all the speaker wires and are all labeled correctly. The circled wires are all pinned to locations that have no corresponding factory wires. You can thus disregard their existence, the black wire is the chassis ground and is also consistent among all harnesses.
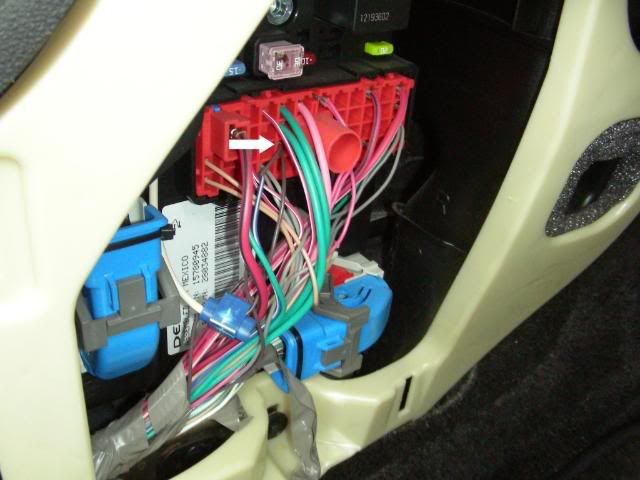
6. Because the red/white wires above are not actually connected to a switched 12V supply you need to go digging around for one. Luckily the cabin fuse box has one that is easily accessible. To get to the cabin fuse box pull off the plastic panel on the passenger-side that has the little fuse logo on it. The wires that are switched 12V supplies are labeled by an arrow.
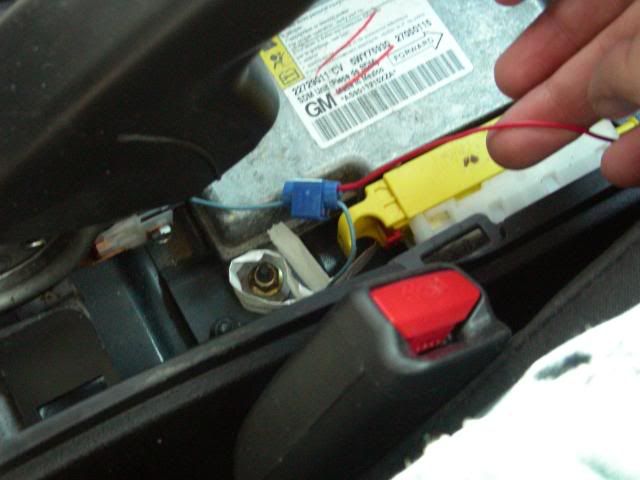
7. If your deck needs a connection to a parking brake switch just pull up the plastic panel surrounding the brake handle and tap into the blue wire going to the switch. You can run the wire easily under the center console by popping up the forward panel and running the wire into the stereo bay.
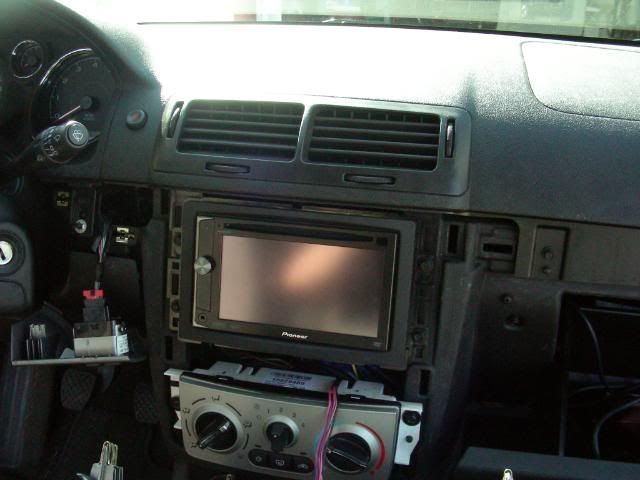
8. Connect your harnesses, bolt the stereo back in place and TEST it BEFORE you put the plastic trim back. If all is well then batten down the hatches and enjoy your new stereo.

I decided to do a comprehensive install how-to with pictures. This how to only applies to the 2005-2006 Cobalt and Cobalt SS. Please note that this procedure works WITH and without the Pioneer stereo system and retains all car functions including the DIC and factory amplifier.
I am doing this because I had a hard time finding info on how to actually go about doing the install. The part numbers from this thread work marvelously but there are some things like how to hook up the parking brake wire and finding a switched 12v source are not easy to find. Hopefully this thread will help those people without a test light or multimeter.
1. Remove the silver trim piece above the glove box. If you don't have a panel popper then just pull it off, make sure to check the metal clips afterwards and push them back onto the plastic tabs they are attached to to help prevent rattles after all is said and done.

2. Pull the panel below the steering wheel off (you only need to unclip the very top right of this panel) and remove the silver trim piece to the right of the steering column (the one with the two buttons on it).

3. Working from the top down pull off the silver trim around the factory stereo. Again this one just pops off. If you are having difficulty with the top two clips you can pull the panel out as far as possible then slide a flat blade screwdriver in and push on the side of the metal clips (you will see them). I forgot to take pictures of this.
4. Unbolt the factory stereo using a 9/32 socket driver and gently remove it by unclipping the factory harness and antenna connection.
5. Now take a look at your into-car harness (metra or other equivalent). Many of the wires coming from this harness are useless. On the row with the two CONSTANT 12V wires, only the outside 12V wire and the other wire labeled with an arrow are useful, the colours and labels of these wires may change with brand. The yellow wire in this picture is the useful 12V contant supply while the blue/white wire is the remote wire to control the factory amp.

In the next image the wires labeled with a box are all the speaker wires and are all labeled correctly. The circled wires are all pinned to locations that have no corresponding factory wires. You can thus disregard their existence, the black wire is the chassis ground and is also consistent among all harnesses.

6. Because the red/white wires above are not actually connected to a switched 12V supply you need to go digging around for one. Luckily the cabin fuse box has one that is easily accessible. To get to the cabin fuse box pull off the plastic panel on the passenger-side that has the little fuse logo on it. The wires that are switched 12V supplies are labeled by an arrow.

7. If your deck needs a connection to a parking brake switch just pull up the plastic panel surrounding the brake handle and tap into the blue wire going to the switch. You can run the wire easily under the center console by popping up the forward panel and running the wire into the stereo bay.

8. Connect your harnesses, bolt the stereo back in place and TEST it BEFORE you put the plastic trim back. If all is well then batten down the hatches and enjoy your new stereo.


#5
where do you ground the wire too, i don't even car about watchin movies while i am drivin cause that is stupid, but it would be nice to you full capabilities of the navi while drivin
#6
connect the parking wire to one side of a toggle switch and the ground wire to the other side of the switch..but make sure also your ground wire is grounded to..so you have to splice it and bolt is somewhere...then the switch will ack as if your brake is on when the switch is on
#7
For 05-06 cobalts, I am going to suggest running a secondary Ground wire for the headunit. and ground it to the Chassis somewhere else. The one in the factory harness seems to be a little less then acceptable for most nicer radios.
#8
ya i forked out the money for a good harness since that is what everyone told me too lol but i haven't had any problems so i don't mind
#9
If you wanna know how to bypass the f700 or f900 properly here it is...
#10
If you wanna know how to bypass the f700 or f900 properly here it is...
#15
I need belp
Ok ive got pretty good experience with installing head units but i have a 06 ss with the pioneer system and my stock head unit has 2 harness's plugged into it? I went and bough that 60$ connector and harness and it only plugs into one harness. And i wired my head unit to it and everything works but no sound?? Please any help?
#17
That's some nice work on finding a "switched" or accessory power feed for new HU. I came across the same wires(the 2 small brown ones) during my search for a switched power source for my aftermarket HU install. I had actually been looking for a "RAP" wire as described in so many threads here on this site, however my cobalt is the striped down version( manual windows, locks, no power anything) and does not appear to have a "RAP" wire anywhere near the interior fuse panel so I am forced to find a simple "switched" power source. The one thing that I may suggest to you is that maybe a small relay kit using your switched power source could be helpful seeing as those 2 small brown wires are very small and I'm not quite sure what they do. Plus I like to fuse my radios at no more than 10 amps. I found a nice relay kit on Amazon for 7.00 dollars that looks like it would work perfect with a fuse holder or one of those add a circuit kits. Your thoughts?
#20
Ok ive got pretty good experience with installing head units but i have a 06 ss with the pioneer system and my stock head unit has 2 harness's plugged into it? I went and bough that 60$ connector and harness and it only plugs into one harness. And i wired my head unit to it and everything works but no sound?? Please any help?
#22
No sound
Ok ive got pretty good experience with installing head units but i have a 06 ss with the pioneer system and my stock head unit has 2 harness's plugged into it? I went and bough that 60$ connector and harness and it only plugs into one harness. And i wired my head unit to it and everything works but no sound?? Please any help?
i recently installed a aftermarket head unit in my cobolt an at first I didnít have power had to run it to the fuse box but I am noticing that I have no sound when radio is on an also my theft light is being wired was wondering if you had any insight I know this post is old but just checking thanks in advance
#23
i recently installed a aftermarket head unit in my cobolt an at first I didnít have power had to run it to the fuse box but I am noticing that I have no sound when radio is on an also my theft light is being wired was wondering if you had any insight I know this post is old but just checking thanks in advance
Thread
Thread Starter
Forum
Replies
Last Post
Josh@ottp
Supporting Vendor Deals & Group Purchases
0
09-08-2015 11:18 AM


