
2.2 L61 Engine: 2.4l/2.2l CAI install with PICS!!!!! (56K at your own risk)
 04-02-2007, 08:34 PM
#1
Senior Member
Thread Starter

Join Date: 11-30-06
Location: West Memphis, AR
Posts: 3,505
Likes: 0
Received 0 Likes
on
0 Posts
2.4l/2.2l CAI install with PICS!!!!! (56K at your own risk)
This is my first how to. I borrowed heavily from CobaltCoupeCrazyin this how to thread
https://www.cobaltss.net/forums/show...ht=intake+2.4l
but was severly disappointed that noone has a how to thread about CAIs on the 2.2l and 2.4l with pictures. They woulda helped me, so here they are to help others.
1) Buy a Cold Air Intake from the company and vendor of your choice ( I went with a used AEM intake bought from MISSMATCHEDFACES for a reasonable price)
2) Turn your wheels all the way to the right, parking brake on, Remove key (or else it will get stuck in the ignition when you-->), unplug the battery.
3) Remove the plastic cover over the headers by taking off the oil cap, and pulling that bad boy straight out. Remove the housing over the intake manifold. First remove the plastic plug from the side by inserting a flathead screwdriver in between the center cap and the rest of the plug, turning it sideways to lift it up, and then it can be removed.
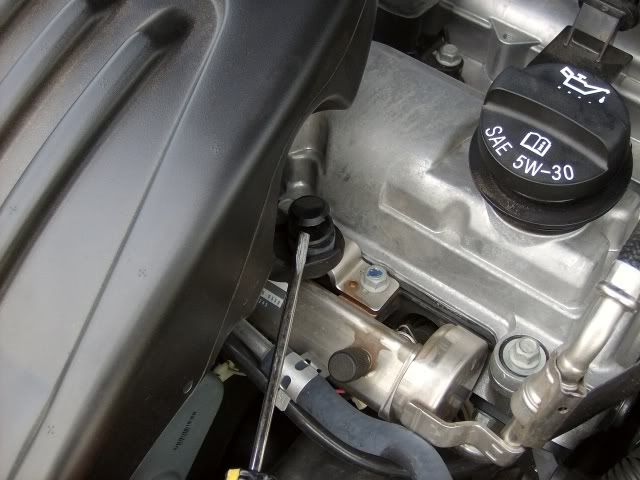
Next look underneath the housing and there is a clamp holding it to the manifold, loosen this enough to pull the housing off.
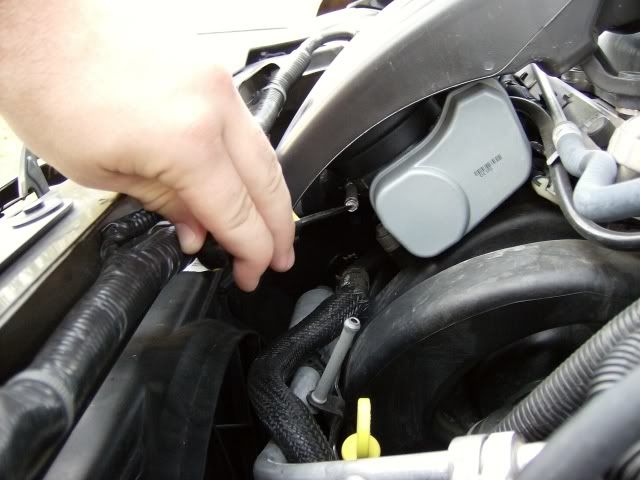
4)Next I removed the tubing from the throttle body (red screwdriver) with a pair of pliers, and the MAF wiring harness just by holding down the snap and pulling it out (Yellow Screwdriver). The clamp in the middle was loosened to free this from the filter box.
5) Remove the cover over the filter like you are changing it and carefully set it aside( We will get the MAF out of there later) Filter comes out, and you will need a Hex head wrench to remove the filter housing at this spot. (Why GM decided to use a hex head bolt here WTFKnows, but it's not any weird size that doesn't come in a set of Allen wrenches)
https://www.cobaltss.net/forums/show...ht=intake+2.4l
but was severly disappointed that noone has a how to thread about CAIs on the 2.2l and 2.4l with pictures. They woulda helped me, so here they are to help others.
1) Buy a Cold Air Intake from the company and vendor of your choice ( I went with a used AEM intake bought from MISSMATCHEDFACES for a reasonable price)
2) Turn your wheels all the way to the right, parking brake on, Remove key (or else it will get stuck in the ignition when you-->), unplug the battery.
3) Remove the plastic cover over the headers by taking off the oil cap, and pulling that bad boy straight out. Remove the housing over the intake manifold. First remove the plastic plug from the side by inserting a flathead screwdriver in between the center cap and the rest of the plug, turning it sideways to lift it up, and then it can be removed.
Next look underneath the housing and there is a clamp holding it to the manifold, loosen this enough to pull the housing off.
4)Next I removed the tubing from the throttle body (red screwdriver) with a pair of pliers, and the MAF wiring harness just by holding down the snap and pulling it out (Yellow Screwdriver). The clamp in the middle was loosened to free this from the filter box.
5) Remove the cover over the filter like you are changing it and carefully set it aside( We will get the MAF out of there later) Filter comes out, and you will need a Hex head wrench to remove the filter housing at this spot. (Why GM decided to use a hex head bolt here WTFKnows, but it's not any weird size that doesn't come in a set of Allen wrenches)
 04-09-2007, 10:22 AM
#2
Senior Member
Thread Starter
Join Date: 11-30-06
Location: West Memphis, AR
Posts: 3,505
Likes: 0
Received 0 Likes
on
0 Posts
more to come
6) Next we jack up the right front side of the vehicle. (Parking brake on ladies) So we can get at the Wheel well liner. There is an inner piece that is held in by a series of plastic plug things. Start right near the axle and work your way forward, underneath the car to the front bumper. (these plugs will actually come apart into two pieces, don't freak out like me) this should loosen that back plastic peice significantly. Next start removing the 10mm bolts on the outer peice, starting at the bottom bolt still in the wheel well, and moving forward underneath the car to the front bumper. (About four or five)

7) This should allow you to pull the front of the outer liner down. Like so
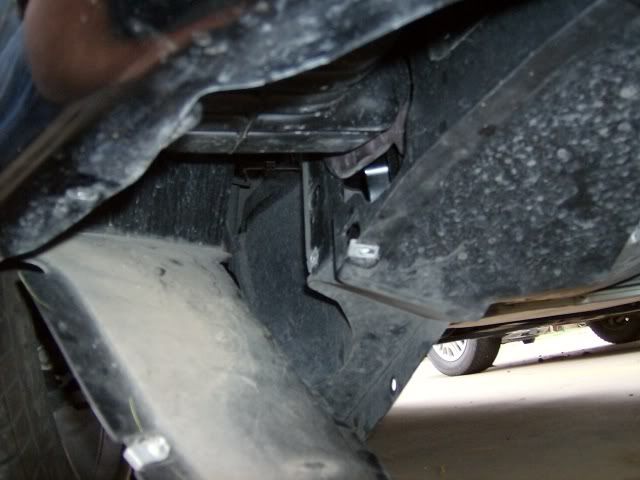
to give you access to the stock resonator/intake. don't worry about breaking this. It's thin flexible plastic and I had mine bent to the ground working up in there.
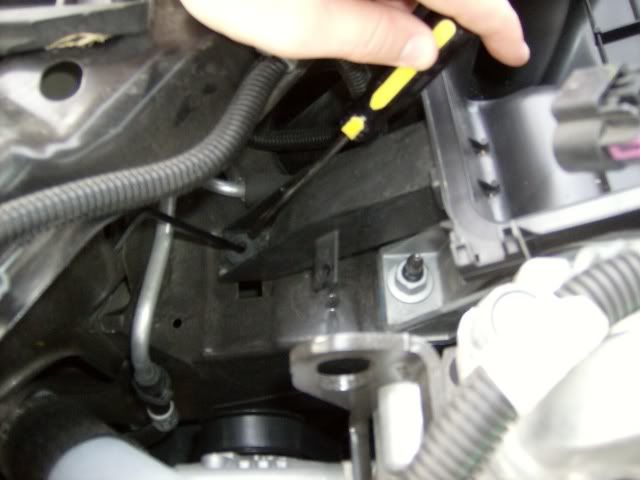
8)Look up inside the hole. I already have my 10mm socket on the bolt you need to remove.

Remove this bolt and the inner wheel well liner piece should fall right down. you can move it off to get better access, just remember how to contort it to get it back in right.
To fully remove the resonator/intake, you need to remove one final plastic plug. It is located waaaay up in the hole. Get a screwdriver in there and pop that bi$#h out. Now you can gingerly rip the resonator through the hole you've been working through, and pull it out.
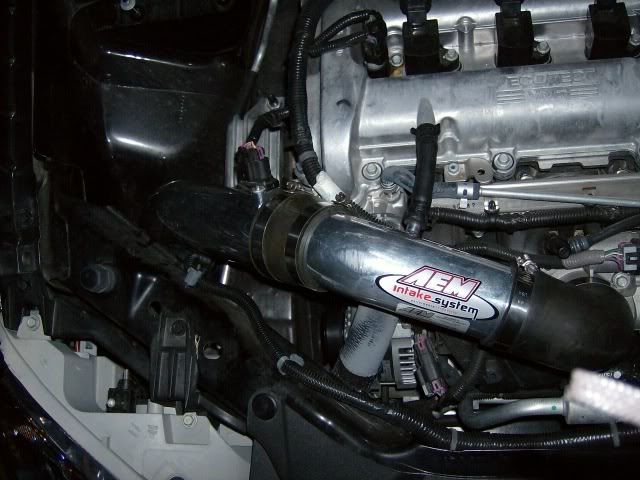
9) Now that all the crap is out of the way. fit in your new intake. I worked my way out from the intake manifold out. First fitting the 90 degree curved rubber gasket, then the smaller metal piece, attaching the breather line as I went, then the next rubber gasket, then finally the long metal peice. Once all the is fitted well, climb back underneath and attach the conical filter to the bottom of the long pipe. Re-djust as necessary.
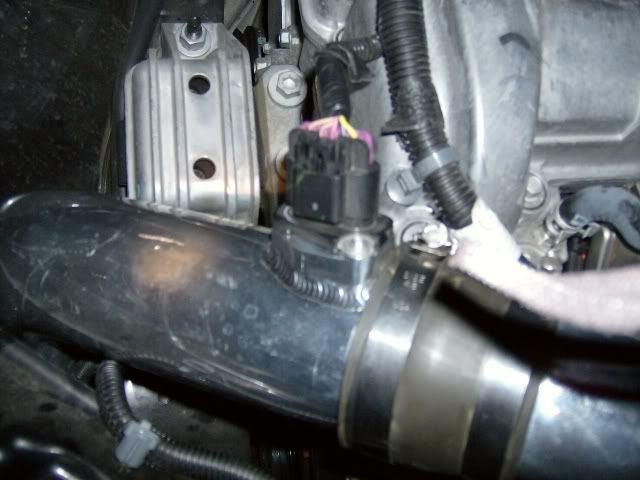
10)Finally, using a small phillips head screwdriver. CAREFULLY remove the MAF sensor from the old air filter box. SUPER DOOPER EXTRA CAREFULLY move it over to the new piping, and drop it in. tighten it down and reattach the MAF harness.
Re fit the inner wheel well liner and put all the plastic plugs back in. then put all the 10mm bolts back in securing the outer liner. Lower your vehicle, PLUG YOUR BATTERY BACK IN!.
And try her out. Mine is noticibly louder. (exhaust is on the way now)
You can choose to place the plastic engine cover back on if you want. The AEM intake does not interfere with the placement of that useless piece of plastic.
6) Next we jack up the right front side of the vehicle. (Parking brake on ladies) So we can get at the Wheel well liner. There is an inner piece that is held in by a series of plastic plug things. Start right near the axle and work your way forward, underneath the car to the front bumper. (these plugs will actually come apart into two pieces, don't freak out like me) this should loosen that back plastic peice significantly. Next start removing the 10mm bolts on the outer peice, starting at the bottom bolt still in the wheel well, and moving forward underneath the car to the front bumper. (About four or five)
7) This should allow you to pull the front of the outer liner down. Like so
to give you access to the stock resonator/intake. don't worry about breaking this. It's thin flexible plastic and I had mine bent to the ground working up in there.
8)Look up inside the hole. I already have my 10mm socket on the bolt you need to remove.
Remove this bolt and the inner wheel well liner piece should fall right down. you can move it off to get better access, just remember how to contort it to get it back in right.
To fully remove the resonator/intake, you need to remove one final plastic plug. It is located waaaay up in the hole. Get a screwdriver in there and pop that bi$#h out. Now you can gingerly rip the resonator through the hole you've been working through, and pull it out.
9) Now that all the crap is out of the way. fit in your new intake. I worked my way out from the intake manifold out. First fitting the 90 degree curved rubber gasket, then the smaller metal piece, attaching the breather line as I went, then the next rubber gasket, then finally the long metal peice. Once all the is fitted well, climb back underneath and attach the conical filter to the bottom of the long pipe. Re-djust as necessary.
10)Finally, using a small phillips head screwdriver. CAREFULLY remove the MAF sensor from the old air filter box. SUPER DOOPER EXTRA CAREFULLY move it over to the new piping, and drop it in. tighten it down and reattach the MAF harness.
Re fit the inner wheel well liner and put all the plastic plugs back in. then put all the 10mm bolts back in securing the outer liner. Lower your vehicle, PLUG YOUR BATTERY BACK IN!.
And try her out. Mine is noticibly louder. (exhaust is on the way now)
You can choose to place the plastic engine cover back on if you want. The AEM intake does not interfere with the placement of that useless piece of plastic.
Last edited by monkeiboy; 04-09-2007 at 10:22 AM. Reason: Automerged Doublepost
 07-12-2007, 12:15 AM
#6
Senior Member
Thread Starter
Join Date: 11-30-06
Location: West Memphis, AR
Posts: 3,505
Likes: 0
Received 0 Likes
on
0 Posts
You're dealing with electronic equipment (I.E. MAF Sensor) You'll have 80,000 guys come on here and say that it's not necessary, and nothing can possibly happen with the battery plugged in. But as these parts we're made by imperfect beings (people), you can bet your ass that sometimes they wont function as they are supposed to, and there's a chance you can fu$% something up by an errant electrical discharge. 
My dad is an electrical engineer. It's mostly just being **** on my part. Disconnecting the battery takes a whole thirty extra seconds out of your life.
My dad is an electrical engineer. It's mostly just being **** on my part. Disconnecting the battery takes a whole thirty extra seconds out of your life.
09-10-2007, 05:19 PM
#8
Senior Member
Thread Starter
Join Date: 11-30-06
Location: West Memphis, AR
Posts: 3,505
Likes: 0
Received 0 Likes
on
0 Posts


 really helps out alot. my injen is on its way here so i cant wait to put her in there. Great Job man!!
10-28-2007, 12:48 AM
really helps out alot. my injen is on its way here so i cant wait to put her in there. Great Job man!!
10-28-2007, 12:48 AM
#12
Senior Member

just a little side note when removing the lower intake housing where the torx bit is used - its actually just a rubber grommet that sits around the bolt that you can just pop off very easily without actually having to remove the bolt. just thought i would throw this into the loop.
edit - torx or hex which ever pattern they used.
edit - torx or hex which ever pattern they used.
Last edited by outtamymind; 10-28-2007 at 01:43 AM.
10-28-2007, 01:10 AM
#13
New Member

Join Date: 03-20-06
Location: Phoenix, AZ
Posts: 130
Likes: 0
Received 0 Likes
on
0 Posts
I was reading this month issue of GM High Tech Performance Magazine at work and they also have a great d-i-y on the gmpp intake and exhaust for 2.2L and 2.4L and dyno results compared to stock.
10-31-2007, 08:20 AM
#14
Member
Join Date: 07-20-07
Location: collingdale PA
Posts: 199
Likes: 0
Received 0 Likes
on
0 Posts
I seen that also, the funny thing is i seen it when i was buying the bolts to bolt the exhaust to the downpipe on my GMPP exhaust 2 weeks ago. And i just installed my GMPP intake yesterday and it only took about 8 minutes, How-to's always make things easier. They said that they are going to do more to the cobalt in their next issue, so im curious to see what that will be.
12-20-2007, 09:18 AM
#15
New Member

Join Date: 08-05-07
Location: shrewsbury, pennsylvania
Posts: 130
Likes: 0
Received 0 Likes
on
0 Posts
putting the intake on wont f up the computer if its not programmed for it since the car is getting more hp now? and wouldnt it be a good idea to have a heat shield around the intake filter cause wont it just be sucking in hot air coming off the engine and just making things worse and actually make you lose hp?
12-20-2007, 09:46 AM
#16
Senior Member
Thread Starter
Join Date: 11-30-06
Location: West Memphis, AR
Posts: 3,505
Likes: 0
Received 0 Likes
on
0 Posts
putting the intake on wont f up the computer if its not programmed for it since the car is getting more hp now? and wouldnt it be a good idea to have a heat shield around the intake filter cause wont it just be sucking in hot air coming off the engine and just making things worse and actually make you lose hp?
Side note...I can imagine how this might be a problem for the 2.2l..they don't have the air dam.
 04-10-2008, 10:27 PM
#19
Senior Member
Thread Starter
Join Date: 11-30-06
Location: West Memphis, AR
Posts: 3,505
Likes: 0
Received 0 Likes
on
0 Posts
 04-11-2008, 12:35 AM
#22
Member

Join Date: 03-21-08
Location: Regina, Sask.
Posts: 269
Likes: 0
Received 0 Likes
on
0 Posts
Yup and shes all installed. But its raining today and tomorrow and my car was just cleaned so going to have to wait till sunday.
Sorry to thread jack, but is there anything wrong with puttin an intake on when the engine has only got 800kms? should i wait till its broken in properly? (5-6K?)
Sorry to thread jack, but is there anything wrong with puttin an intake on when the engine has only got 800kms? should i wait till its broken in properly? (5-6K?)
04-11-2008, 12:47 AM
#24
Member
Join Date: 03-21-08
Location: Regina, Sask.
Posts: 269
Likes: 0
Received 0 Likes
on
0 Posts
alright, just wasnt sure if it was alright to bring in 'colder air' (if thats right) to an engine that hasnt been broken in yet. Also wasnt sure if it would effect the ecu any.