
Electrical: Add-on courtesy lamps--solved!!! Not 56K friendly
 07-31-2006, 10:27 PM
#1
New Member
Thread Starter

Join Date: 06-09-06
Location: PA
Posts: 140
Likes: 0
Received 0 Likes
on
0 Posts
Add-on courtesy lamps--solved!!! Not 56K friendly
It took some doing, but I was finally able to figure out the setup needed to add extra courtesy lamps to our short-changed SCs.
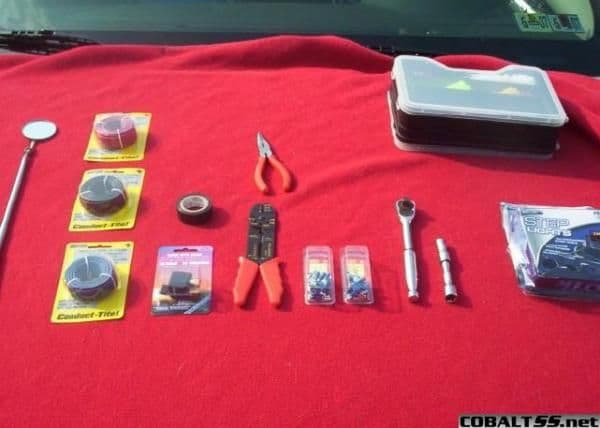
First and foremost, make sure you get all of the parts needed up front. The parts I used are as follows:
ratchet with 10mm socket
electrical tape
quick connects, male and female
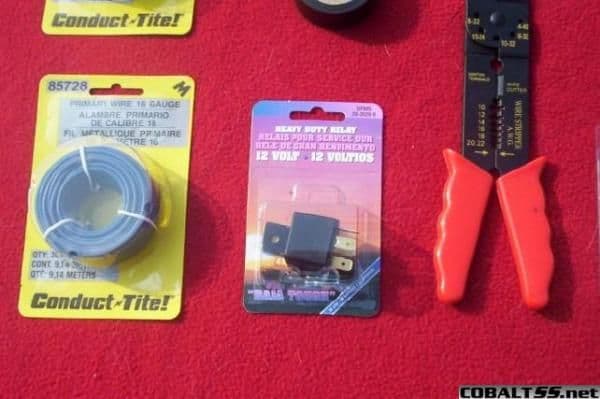
wire (I chose 16 gauge and three different colors: red, black, blue)
wire tool
12V lighting of your choice (I chose recessed LED door sill lighting)
12V relay (I got mine at AutoZone, accessory lighting relay DF002, heavy duty 30amp)
Pay particular attention to the connections on the relay. You will only be using blades 30, 85 and 86 (vertical blades) which are on the left, right and bottom of the relay (horizontal blades top center and center are not used)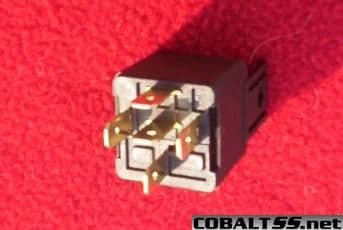
Determine how you want your lighting to work. Since mine is recessed door sill lighting, I want to tap into the plunger circuit in the door jamb...that way it only comes on when the door is open. If you want interior courtesy lighting, you will want to tap into the gray switchable wire feeding into your rearview mirror. Install your lighting appropriately and leave your wires exposed for later connections.
Make your line taps. You will need three connections for this: constant hot, ground, and switchable. My preference is splicing, however, the choice is yours.
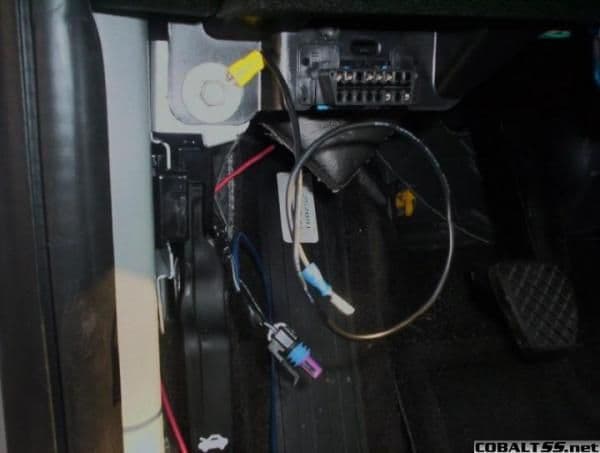
Tap into the hot line by splicing into the 12V feed to the dash accessory adapter (cigarette lighter). This is done by removing the plate on the drivers side forward. It just pops out, don't worry about breaking it...although you want to pull it out as straight as possible. Make sure you have enough wire to connect to the lighting you installed. Look for the two wires leading from the adapter and splice into the red/white line. Place a male quick connect (blade style) on the end of the remaining end of your spliced wire.

Next you will want to tap into your switchable circuit. For my application, this is the plunger. Remove the bottom interior side molding and pull back the foam on the side underneath the dash. There is a black-cased set of wires going into a rubber piece. Remove the rubber piece by pulling it straight out. Reach into the hole behind the rubber and remove the plunger connector (lift the latch on top and pull straight away from plunger). On the driver's side, there are two wires...black and gray. You want to tap into the gray wire. I cut about an 8" piece of the blue wire and spliced it to the gray wire. I then added a female quick connect (blade receiver) on the remaining end. Reconnect the plunger connector to the plunger, then place the rubber and foam back into position.

The final connection is the ground. I took an 8" piece of black wire and put an open end connector on one side and a female quick connect (blade receiver) on the other. Using the socket/ratchet, I loosened the bolt immediately beneath the dash and connected the open end between the washer and the bolt before tightening.
To connect your 12V lighting (two wire: 1 pos red, 1 black neg), add female quick connects (blade receivers) to both lines. Connect the 12V tap male quick connect (blade) to the pos red female connect (blade receiver) on your lighting. Run enough line from your neg black lighting wire to reach the relay. Ensure that there is a female quick connect on the end of this wire.
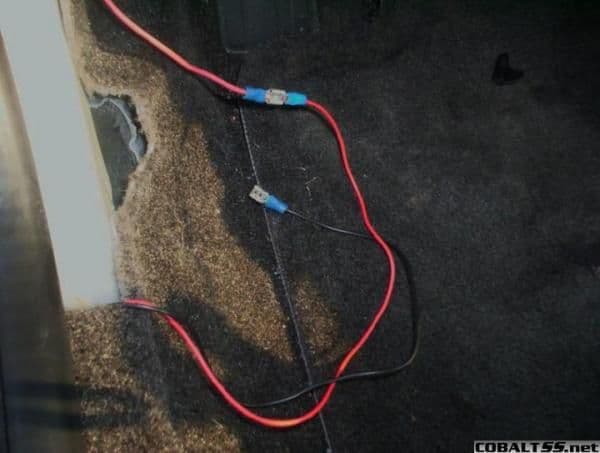
To connect to the relay, connect the black wire from your lighting to the right vertical blade (connection 85). Connect your switchable tap to the left vertical blade (connection 86). Connect your ground to the bottom vertical blade (connection 30).

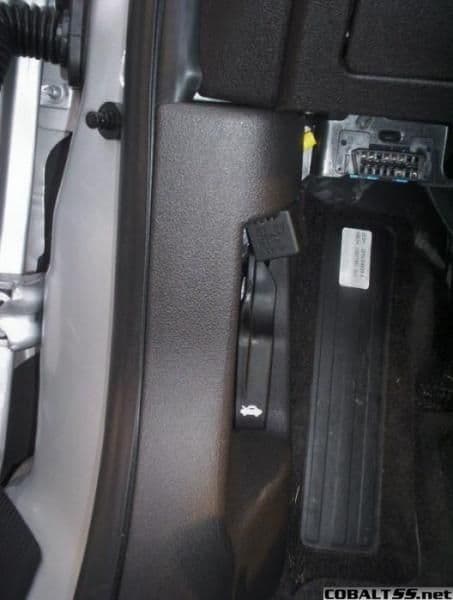
Hide your wires, install any interior trim pieces removed and mount the relay in an out of the way place (preferably on a plastic piece).
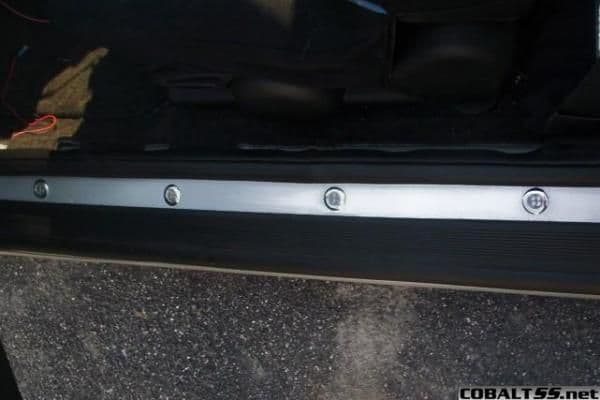
My completed circuit works great. I tested it by pushing the plunger in to make sure the lights went off, and released the plunger to ensure that the lights came on. This is what my door sill lights look like now.
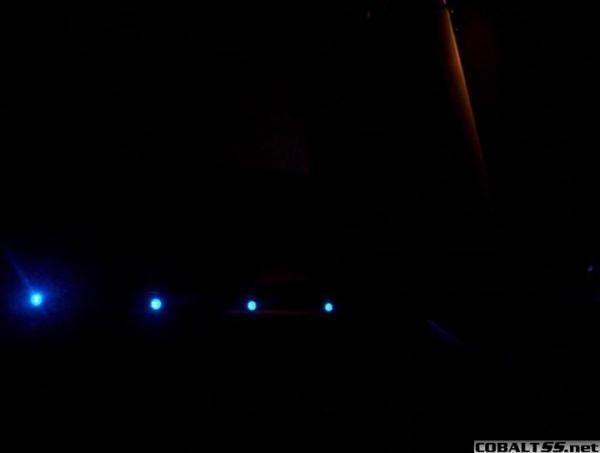
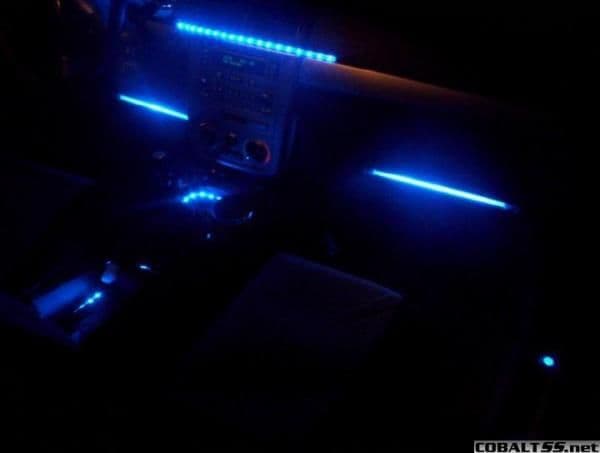
Coupled with the rest of my interior lighting, here's the norm for me at night.
I hope this helps someone out there. Let me know if you need any help.
My next project is to install neons in the back and tie them in to the normal courtesy lighting (stay on and go out like the rearview mirror lights). I'm even considering making them switchable so that they can come on like the normal lights, or I can turn them on with a dash switch.
First and foremost, make sure you get all of the parts needed up front. The parts I used are as follows:
ratchet with 10mm socket
electrical tape
quick connects, male and female
wire (I chose 16 gauge and three different colors: red, black, blue)
wire tool
12V lighting of your choice (I chose recessed LED door sill lighting)
12V relay (I got mine at AutoZone, accessory lighting relay DF002, heavy duty 30amp)
Pay particular attention to the connections on the relay. You will only be using blades 30, 85 and 86 (vertical blades) which are on the left, right and bottom of the relay (horizontal blades top center and center are not used)
Determine how you want your lighting to work. Since mine is recessed door sill lighting, I want to tap into the plunger circuit in the door jamb...that way it only comes on when the door is open. If you want interior courtesy lighting, you will want to tap into the gray switchable wire feeding into your rearview mirror. Install your lighting appropriately and leave your wires exposed for later connections.
Make your line taps. You will need three connections for this: constant hot, ground, and switchable. My preference is splicing, however, the choice is yours.
Tap into the hot line by splicing into the 12V feed to the dash accessory adapter (cigarette lighter). This is done by removing the plate on the drivers side forward. It just pops out, don't worry about breaking it...although you want to pull it out as straight as possible. Make sure you have enough wire to connect to the lighting you installed. Look for the two wires leading from the adapter and splice into the red/white line. Place a male quick connect (blade style) on the end of the remaining end of your spliced wire.
Next you will want to tap into your switchable circuit. For my application, this is the plunger. Remove the bottom interior side molding and pull back the foam on the side underneath the dash. There is a black-cased set of wires going into a rubber piece. Remove the rubber piece by pulling it straight out. Reach into the hole behind the rubber and remove the plunger connector (lift the latch on top and pull straight away from plunger). On the driver's side, there are two wires...black and gray. You want to tap into the gray wire. I cut about an 8" piece of the blue wire and spliced it to the gray wire. I then added a female quick connect (blade receiver) on the remaining end. Reconnect the plunger connector to the plunger, then place the rubber and foam back into position.
The final connection is the ground. I took an 8" piece of black wire and put an open end connector on one side and a female quick connect (blade receiver) on the other. Using the socket/ratchet, I loosened the bolt immediately beneath the dash and connected the open end between the washer and the bolt before tightening.
To connect your 12V lighting (two wire: 1 pos red, 1 black neg), add female quick connects (blade receivers) to both lines. Connect the 12V tap male quick connect (blade) to the pos red female connect (blade receiver) on your lighting. Run enough line from your neg black lighting wire to reach the relay. Ensure that there is a female quick connect on the end of this wire.
To connect to the relay, connect the black wire from your lighting to the right vertical blade (connection 85). Connect your switchable tap to the left vertical blade (connection 86). Connect your ground to the bottom vertical blade (connection 30).
Hide your wires, install any interior trim pieces removed and mount the relay in an out of the way place (preferably on a plastic piece).
My completed circuit works great. I tested it by pushing the plunger in to make sure the lights went off, and released the plunger to ensure that the lights came on. This is what my door sill lights look like now.
Coupled with the rest of my interior lighting, here's the norm for me at night.
I hope this helps someone out there. Let me know if you need any help.
My next project is to install neons in the back and tie them in to the normal courtesy lighting (stay on and go out like the rearview mirror lights). I'm even considering making them switchable so that they can come on like the normal lights, or I can turn them on with a dash switch.
Last edited by TommyP; 05-17-2012 at 09:26 PM.
 07-31-2006, 10:44 PM
#3
New Member
Thread Starter
Join Date: 06-09-06
Location: PA
Posts: 140
Likes: 0
Received 0 Likes
on
0 Posts
Originally Posted by biohazard
where did you get the door sill lights? have them in green?
 07-31-2006, 10:59 PM
#6
New Member
Thread Starter
Join Date: 06-09-06
Location: PA
Posts: 140
Likes: 0
Received 0 Likes
on
0 Posts
Originally Posted by DJNateGnau
That's got to be distracting as all hell at night...
07-31-2006, 11:00 PM
#7
New Member
Thread Starter
Join Date: 06-09-06
Location: PA
Posts: 140
Likes: 0
Received 0 Likes
on
0 Posts
Originally Posted by HackAbuse
Good job! Does the lighting work for all of the doors, or just yours??
 08-05-2006, 06:05 PM
#9
New Member
Thread Starter
Join Date: 06-09-06
Location: PA
Posts: 140
Likes: 0
Received 0 Likes
on
0 Posts
I'd have hoped you would have taken more from the how to other than whether or not you liked my lighting. For me, since I do a lot of late night driving (103 miles one way to work), it helps to keep me awake since they pulsate to the bass...that's WHY I kept them exposed. The fact that they "serve a purpose" is the difference between RICE and necessity. But then, being a SENIOR member, I can accept that you might not be able to distinguish the difference.
Regardless, to each their own.
Update for the circuitry for those of you that want to have the ability to switch your lights on in addition to coming on with the regular courtesy lighting.
All you have to do is to rig a standard on/off switch between the hot line into the relay and the negative leading from the relay. When the switch is off, the circuit will follow the normal relay pattern and only be on when there is power to the switchable line. When the switch is on, it will bypass the relay regardless of the switchable line status and provide a closed circuit as long as the switch is on.
I was planning on adding neon for the back, but instead opted for LED lighting. I'll post a pic of the new additions once I'm finished installing. I am also including separate switches for left and right passengers so each can turn them on as needed. These will be mounted in the trim around the rear side windows.
 08-06-2006, 03:13 PM
#12
New Member
Thread Starter
Join Date: 06-09-06
Location: PA
Posts: 140
Likes: 0
Received 0 Likes
on
0 Posts
I set my sill lighting to activate with the door opening. My new backseat lighting will come on with the regular courtesy lighting and/or you can activate it separately with a switch to turn them on when needed.
As for the cost, the recessed sill lighting was either $20 or $30...I honestly don't remember which since I have different types of LED lighting throughout the car. But that's the ballpark figure.
The units themselves are sealed, but if you would want to change the LEDs, I'm sure it can be done. Just a trip to RadioShack and a little time/effort.
08-06-2006, 07:27 PM
#13
New Member

Join Date: 03-28-05
Location: newnan GA
Posts: 194
Likes: 0
Received 0 Likes
on
0 Posts
103 miles each way to work................. I hope it pays exceptionally well. That is a long ass way to drive one way.
Like the lights by the way, espicially the door siles.
Like the lights by the way, espicially the door siles.
08-06-2006, 09:13 PM
#15
New Member
Thread Starter
Join Date: 06-09-06
Location: PA
Posts: 140
Likes: 0
Received 0 Likes
on
0 Posts
Yeah...it pays ok. The mileage is a pain, but definitely more manageable with the 'balt. Fortunately, the mileage reimbursements make up for initial costs.
I was going to put in an overhead light, but found a better option...directional LED lighting. There are four lights with each set (one set per side). Each one has a single LED enclosed in a "bubble", with half of the bubble covered by a reflective shield. They are going to be installed in the molding around the back side windows, probably along the top edge so that they are out of the way, yet still provide adequate lighting down to the passenger. I'll post pics of them once they are installed.
I was going to put in an overhead light, but found a better option...directional LED lighting. There are four lights with each set (one set per side). Each one has a single LED enclosed in a "bubble", with half of the bubble covered by a reflective shield. They are going to be installed in the molding around the back side windows, probably along the top edge so that they are out of the way, yet still provide adequate lighting down to the passenger. I'll post pics of them once they are installed.
05-02-2007, 03:14 PM
#19
Senior Member
I like your work. well done.
but i strongly discourage you from driving with all those lights on.
"used to it" or not....that kind of lighting on your interior is dangerous.
and any cop who sees you lit up all blue like that goin down the road will pull you over pretty quick.
but i strongly discourage you from driving with all those lights on.
"used to it" or not....that kind of lighting on your interior is dangerous.
and any cop who sees you lit up all blue like that goin down the road will pull you over pretty quick.
08-29-2008, 04:28 AM
#21
Member

Join Date: 08-26-08
Location: Hebron, IN
Posts: 220
Likes: 0
Received 0 Likes
on
0 Posts
Nice write-up....I've been wanting to do that....not necessarily LED's but I've always liked the footwell lighting up with the dome lights. I have a sunroof so we all know how useless the rearview mirror lights are for the most part....its like trying to climb into a steven king movie....dark as hell...haha
03-11-2009, 05:11 PM
#22
Senior Member

Join Date: 08-09-08
Location: Hartland, ME
Posts: 511
Likes: 0
Received 0 Likes
on
0 Posts
and any cop who sees you lit up all blue like that goin down the road will pull you over pretty quick.
My wife got pulled over for doing 100 in a 65. By a different cop than the one that supposedly follwed her to gauge her speed. six miles down the Highway from where the infraction supposedly took place.
Basically, the blood red candy paint job and silver dragon decals must make the car look so fast that it appears to be going 28 MPH faster than it actually is. I told her to avoid parking the car in 25MPH zones, just in case, lol
See, it's not just ricers that think decals make cars faster!
06-13-2009, 10:34 AM
#23
Member
Join Date: 07-23-07
Location: Glendale, AZ
Posts: 220
Likes: 0
Received 0 Likes
on
0 Posts
gosh i wish i had the confidence to cut THAT many holes in my car. I've been wanting to installneons in the feet area like you put- only hide mine.
question: what did you use to mount the LEDs? and how long does it take to set the relays up to each seperate door?
question: what did you use to mount the LEDs? and how long does it take to set the relays up to each seperate door?
06-14-2009, 11:47 PM
#24
Senior Member
iTrader: (2)

Join Date: 10-12-08
Location: Manchester, NH
Posts: 1,617
Likes: 0
Received 0 Likes
on
0 Posts
What does the relay actually do?
Tried to do this on my own, I hadn't seen this how to, and my courtesy lights just stay on all the time. I ran a wire to ground and a hot wire to the interior light fuse, thinking they would work, dim, and turn off along with my other lights. Didn't work, they are just always on, even with car off and locked.
Then we found this thread and tried to wire to the plunger as described here, but didn't have the relay. They worked with the door closed but shut off when the door is opened, the exact opposite of what we want.
Can anybody shed some light?
06-15-2009, 03:21 AM
#25
Member
Join Date: 07-23-07
Location: Glendale, AZ
Posts: 220
Likes: 0
Received 0 Likes
on
0 Posts
What does the relay actually do?
Tried to do this on my own, I hadn't seen this how to, and my courtesy lights just stay on all the time. I ran a wire to ground and a hot wire to the interior light fuse, thinking they would work, dim, and turn off along with my other lights. Didn't work, they are just always on, even with car off and locked.
Then we found this thread and tried to wire to the plunger as described here, but didn't have the relay. They worked with the door closed but shut off when the door is opened, the exact opposite of what we want.
Can anybody shed some light?
Tried to do this on my own, I hadn't seen this how to, and my courtesy lights just stay on all the time. I ran a wire to ground and a hot wire to the interior light fuse, thinking they would work, dim, and turn off along with my other lights. Didn't work, they are just always on, even with car off and locked.
Then we found this thread and tried to wire to the plunger as described here, but didn't have the relay. They worked with the door closed but shut off when the door is opened, the exact opposite of what we want.
Can anybody shed some light?