Interior: Disassemble Dashboard - Radio and related panels
#1
Disassemble Dashboard - Radio and related panels
Heres my how-to on disassembling the dashboard to gain access to the radio, interior fuse panel or the 12v accessory wiring ...
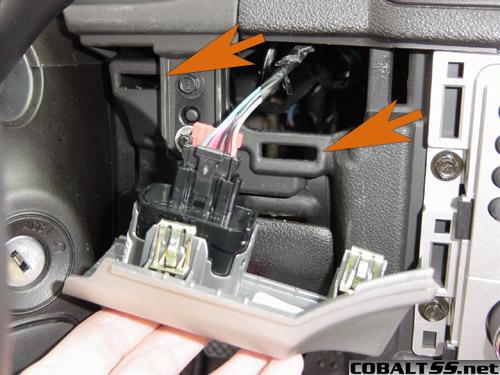
First you need to pull out one clip on the panel that is under the steering wheel (above your knees). This will help you get a grip on the silver info panel. It is the upper most right side clip.

Next you need to pull out 2 clips to remove the silver info panel. Be careful as the wiring harness is short. This is a difficult one to remove, try to pull it straight out as odd angles might destroy a clip.

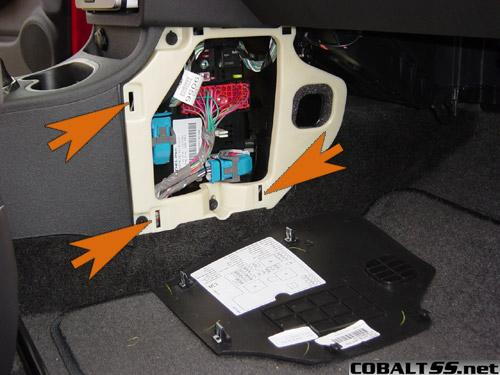
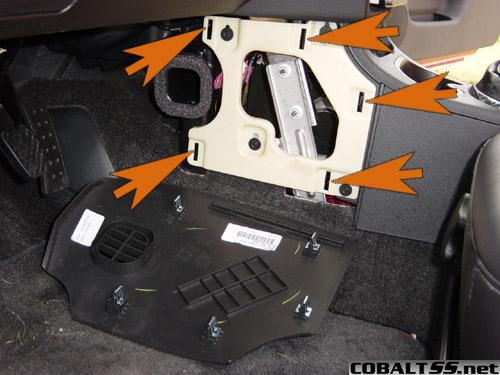
Now remove the passenger side panel, 4 clips. This one is easier, again pull it out carefully due to its length.

Now for the radio bezel. Since you have removed the overlaying panels along the top right and left edges you can use a screwdriver (flat blade) to help pry the upper 2 clips out. Still be careful as you can still mark up the silver panel. Heres the clip locations (6) and how it looks once its removed.

If you've been wondering what the seat heater delete section looks like, here you go ...

and with the insert out ...

Lastly here are the clip locations for the console side panels.


First you need to pull out one clip on the panel that is under the steering wheel (above your knees). This will help you get a grip on the silver info panel. It is the upper most right side clip.

Next you need to pull out 2 clips to remove the silver info panel. Be careful as the wiring harness is short. This is a difficult one to remove, try to pull it straight out as odd angles might destroy a clip.

Now remove the passenger side panel, 4 clips. This one is easier, again pull it out carefully due to its length.

Now for the radio bezel. Since you have removed the overlaying panels along the top right and left edges you can use a screwdriver (flat blade) to help pry the upper 2 clips out. Still be careful as you can still mark up the silver panel. Heres the clip locations (6) and how it looks once its removed.

If you've been wondering what the seat heater delete section looks like, here you go ...

and with the insert out ...

Lastly here are the clip locations for the console side panels.


Last edited by TommyP; 05-17-2012 at 10:07 PM.
#4
Originally Posted by PatDamanCobalt
If i was to hook up interior neons where would i wire them up at? can u take a pic of the fuse box and location for me?

#5
Originally Posted by philco_3
good pics man, I'm glad to see someone finally the time to get pics of it.

#8
for some reason it was so extremely hard for me to remove the info bar panel, that i stopped there. i pulled straight and couldnt do it without thinking im going to break the silver panel. my clips ended up staying in the dash and i had to use pliars to remove them. i was afraid to take the long right panel off, thought ide break that one. any tips? anyhting im doing wrong? or are some clips just harder than others
any info would be appreciated
thnx
the only reason i want to open it is because ide like to check the inputs in the back. i wanted to see if there are ANY free plugs bc i want to add my mp3 player but no company makes an aux input. i was thinking of finding any input jacks behind and trying to match something up bc my guess would be since the companies didnt test their product on the cobalt, they just say it doesnt work with it YET!!! any help someone please lead me in the right direction.
thanks again
jay
#9
Theres only two connectors in the back of the Pioneer radio and of course the antenna jack. No inputs what so ever. I would recommend using some type of fm modulation.
You could get a 12v power outlet and hide it under the a/c controls so you would not have a unsightly fm modulator stuck in your 12v accessory port.
Personally I think the clips are overkill, you have to use a great deal of force to pull the clips past the holes. That small info panel was the most difficult IMO due to its small size and hard to grab hold of. You could try to rock it gently and slightly up and down. The clips have to compress to get free which makes you have to pull so hard.
Worst thing I did was break a little clip, then I just pulled one off the glove box side and used it. I'm sure the dealer parts department has these on hand.
#12
A helpful tool you may want to use is a door panel tool. It works well for those kinds of clips. I use one everyday when I take off door panels, cowels, and pretty much anything else associated with autoglass...Be careful though, it makes the job easier, but if you're reckless it'll break the hell out of those clips or worse yet, the panels themselves.
#17
Originally Posted by Kritter
A helpful tool you may want to use is a door panel tool. It works well for those kinds of clips. I use one everyday when I take off door panels, cowels, and pretty much anything else associated with autoglass...Be careful though, it makes the job easier, but if you're reckless it'll break the hell out of those clips or worse yet, the panels themselves.
#18
To further remove the cup holders section of the e-brake and section containing the shifter. All these pieces just pop off, just pull them. The shift boot is attached to a ring that you can snap off after you get the main piece off.
#19
Originally Posted by plastiqmanb
What is the depth of the stereo compartment? i got a sony i want to put in, donno about the depth... thanks guys! great post!
#22
dont think you can bazel higth is 1" 10/16th on the bazel center.
and inside its 1" and 5/16th from radio to a/c and theres a slant on the radio so it reduces alittle so i would say no about the radio in the space your talking about. unless u get aftermarket radio in the stock place then i dont see why not
and inside its 1" and 5/16th from radio to a/c and theres a slant on the radio so it reduces alittle so i would say no about the radio in the space your talking about. unless u get aftermarket radio in the stock place then i dont see why not
#23
Originally Posted by Iroc
Heres my how-to on disassembling the dashboard to gain access to the radio, interior fuse panel or the 12v accessory wiring ...
Thanks again!

#25
i was not able to get whole dash off seems like something being held on at the airbag and i was not able to remove the airbag cover totally i dont have a rattle but i was trying to figure out where to mount some stuff in dash


