2.0 LSJ Engine: How To Change Timing Chain Tensioner
#1
Hey Guys,
Here is my probably overly documented write up of how to change a timing chain tensioner.
I got tired of the occasional diesel sound so finally i decided to change my tensioner.
After looking through the forum i found there were two general ways this was done.
One with removing the valve cover the other without removing the valve cover. After doing some research and seeing that some people have damaged their motors swapping their tensioners I decided I would take that little bit of extra time to ensure mine gets done properly.
This whole process took me and my brother about 3 hours including a trip to the hardware store to find a tensioner setting device and taking pictures. I'm sure if your more comfortable around your car and prepared it will take about half of that.
What you will need:
New style tensioner
1/2 & 3/8 drive torque wrench
Allen wrench's
1-1/4 socket same size as needed for oil filter cap
Metric socket set
A long plastic stick for setting tensioner(i used a chimney sweeper pole $5 at Lowes)
New style tensioner
Snap ring remover tool
Needle nose pliers
Zip ties
Useful references:
www.crateenginedepot.com/pdfs/12608580INS.pdf
FIRST STEP:
Make sure you have the correct tensioner. Autozone will sell you the wrong one. I had to pick up a new style one from my local dealer for about $60 USD. You can also get a new style one off of crate engine depot:
Ecotec Timing Chain Tensioner 12608580
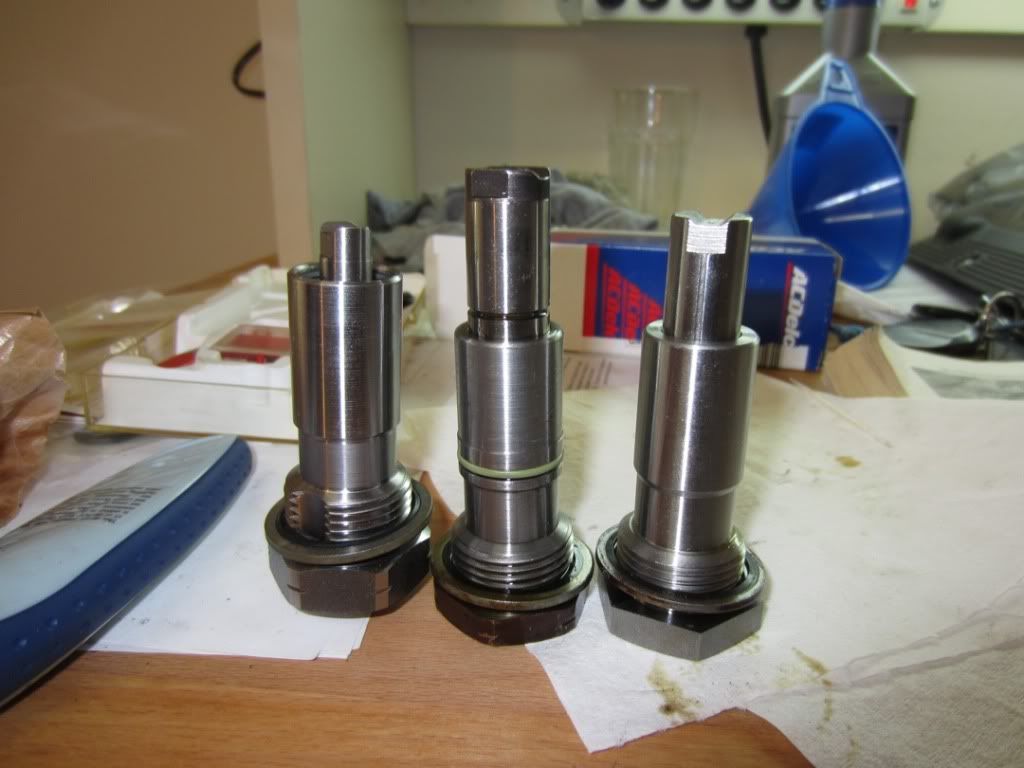
The Correct New style tensioner is on the far left. The Old Style tensioner out of my motor is in the middle, and the Advance autoparts old style is on the Right.
1) Start by disconnecting the negative terminal of your battery. I believe its a 10mm.
2)Remove cover over the coil packs and "ECOTEC SUPERCHARGED" fuel rail cover.
3)
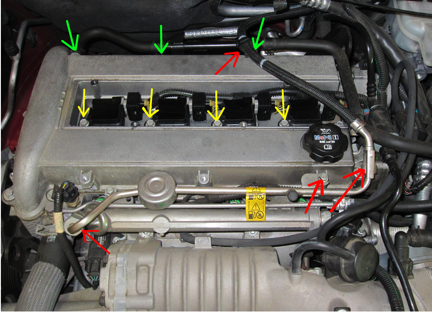
Next remove the PCV hose and two mounting bolts on the back of the head both 13mm (indicated by the green arrows).
These can be left connected to the intake and push out of the way.
Then remove the Coil packs using a 10mm socket (indicated by the yellow arrows) the spark plugs can stay.
Also Remember to remove the ground strap it will be next to the most drivers side coil pack
The harnesses can be pushed out of the way as well.
Then remove the fuel line (indicated by the red arrows).
The mounting for the line at the back of the head.
The line connecting to the regulator(i think?) using a fuel line disconnect tool.
And the regulator connected to the fuel rail using and adjustable wrench
Watch out if you just ran the car it will likely spray a little fuel!!! Also have some rags set up under the lines before disconnecting because they will leak.
4)
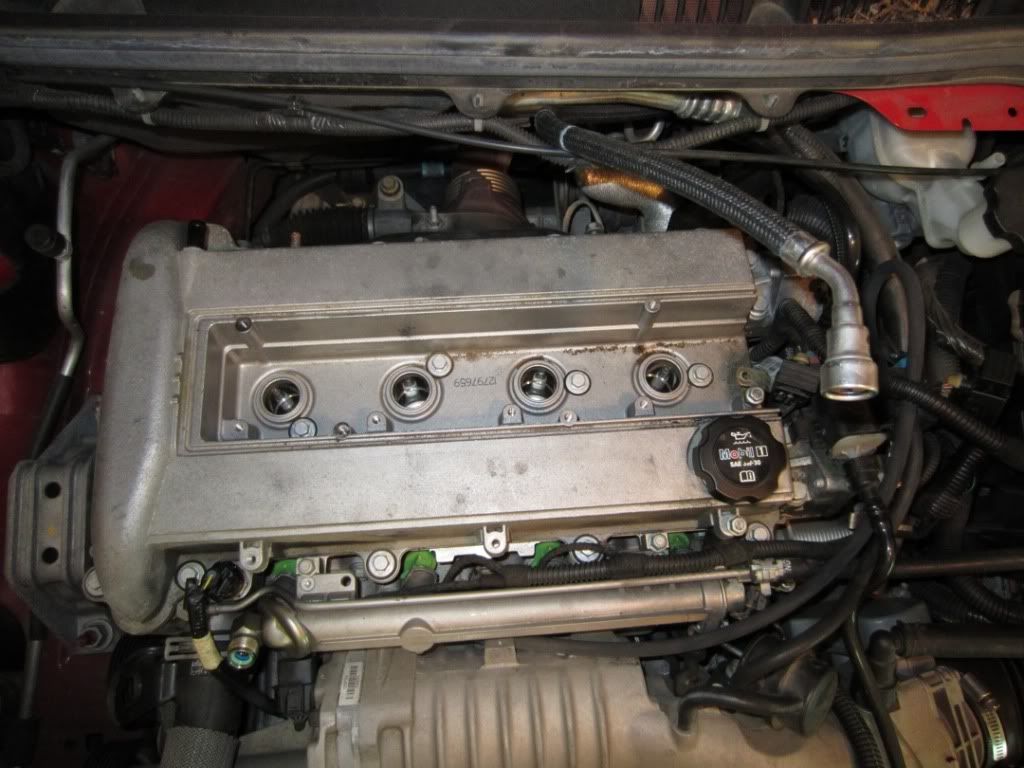
Your motor should now look like this. Sorry for the fuel line sticking up in the way i tucked it under my wiper fluid lines to keep it out of the way.
5)
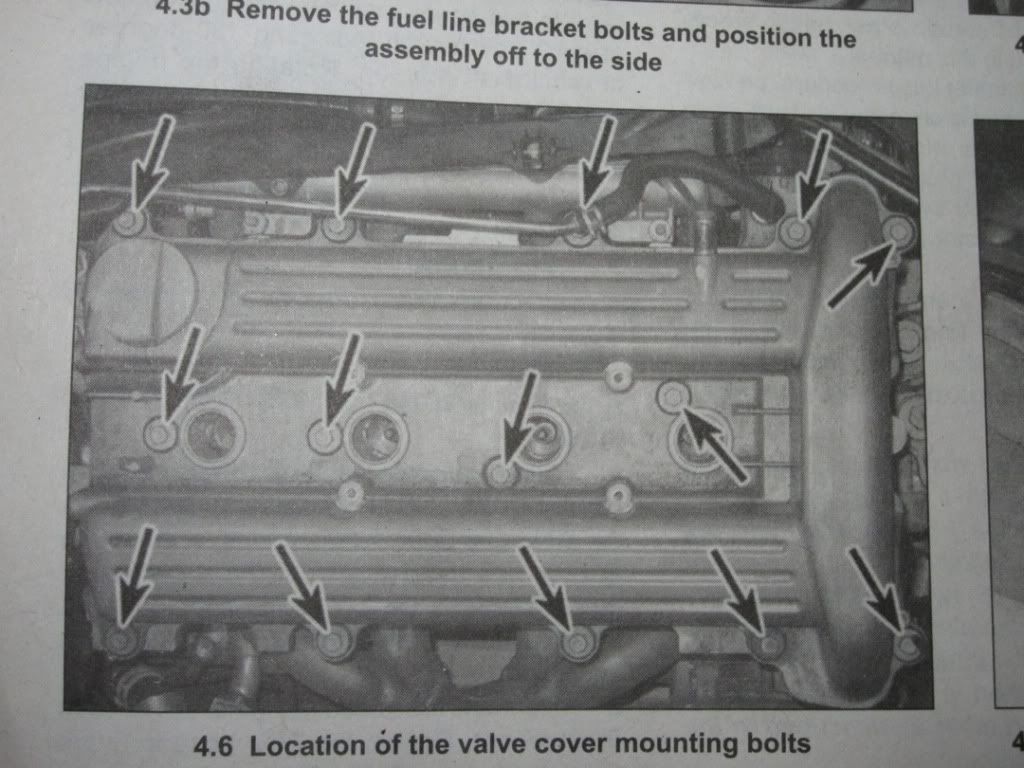
Now its time to start removing valve cover bolts. All the bolts are of the same length so don't worry about mixing them up.
Here is a very useful picture i found the the Haynes repair manual showing where all the bolts are.
6)
After removing all the bolts its time to remove the valve cover
i used a screw driver to pry at the outer most screw holes around the cover where there is no gasket. By gently prying on the two screw holes on the passengers side of the valve cover the cover should come loose enough for you to do the rest by hand.
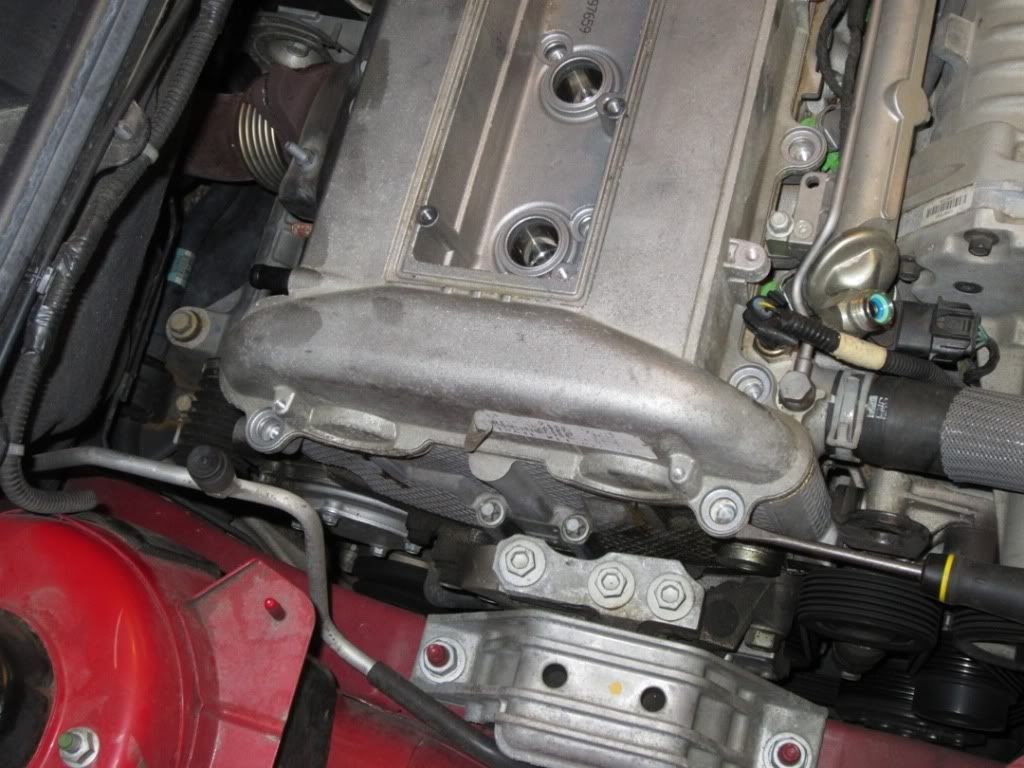
The cams, cam gears and chain should now be visible
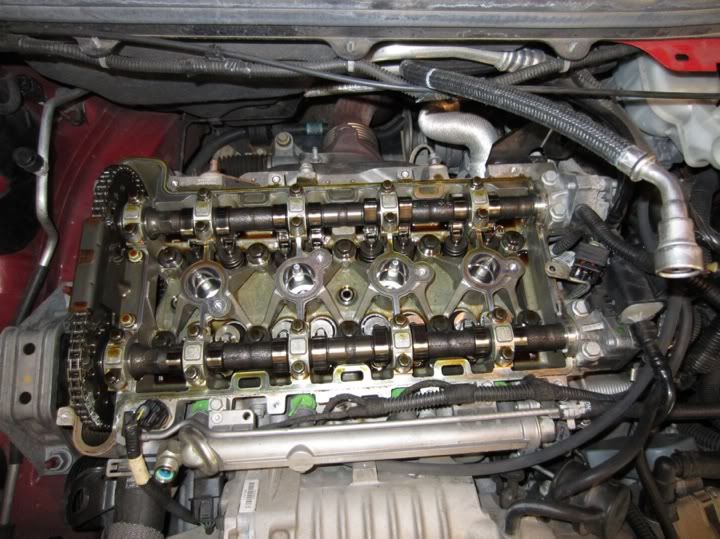
I recommend cover covering the cams and springs with a rag to prevent dirt from getting in the heads.
7)
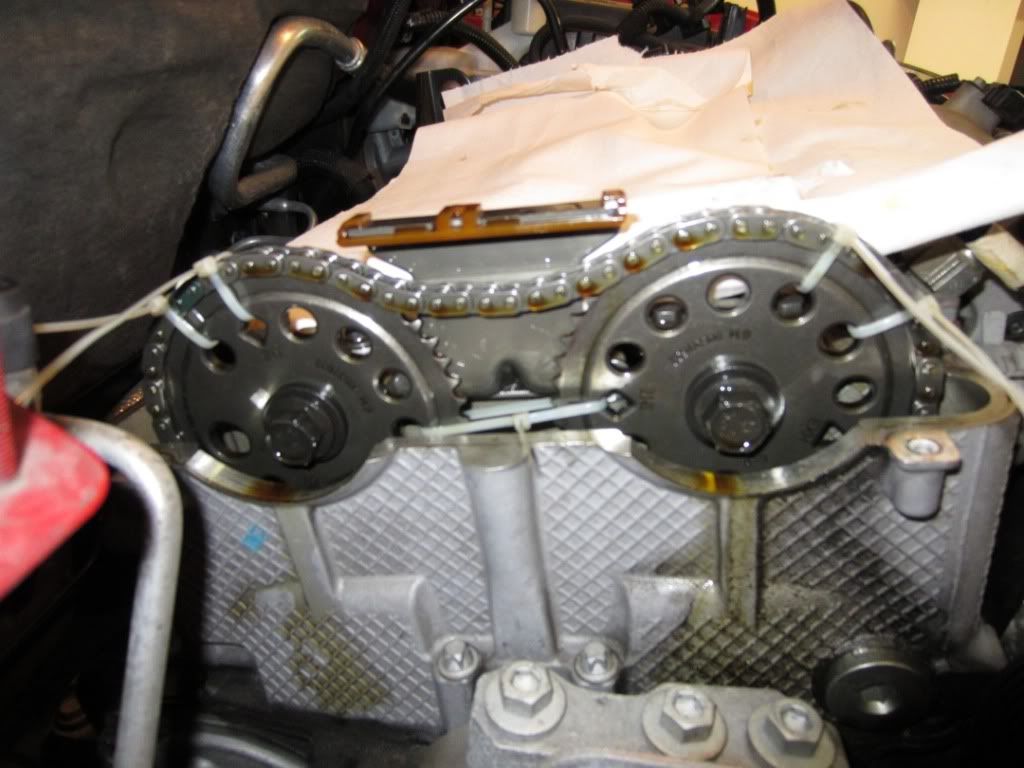
After the valve cover is removed its time to hold the chain in place so that it doesnt slip when the tensioner is removed. I decided to use zip ties to hold mine in place.
I placed two zip ties on each cam gear holding the chain to the teeth and one zip tie between the two cam gears to prevent too much movement.
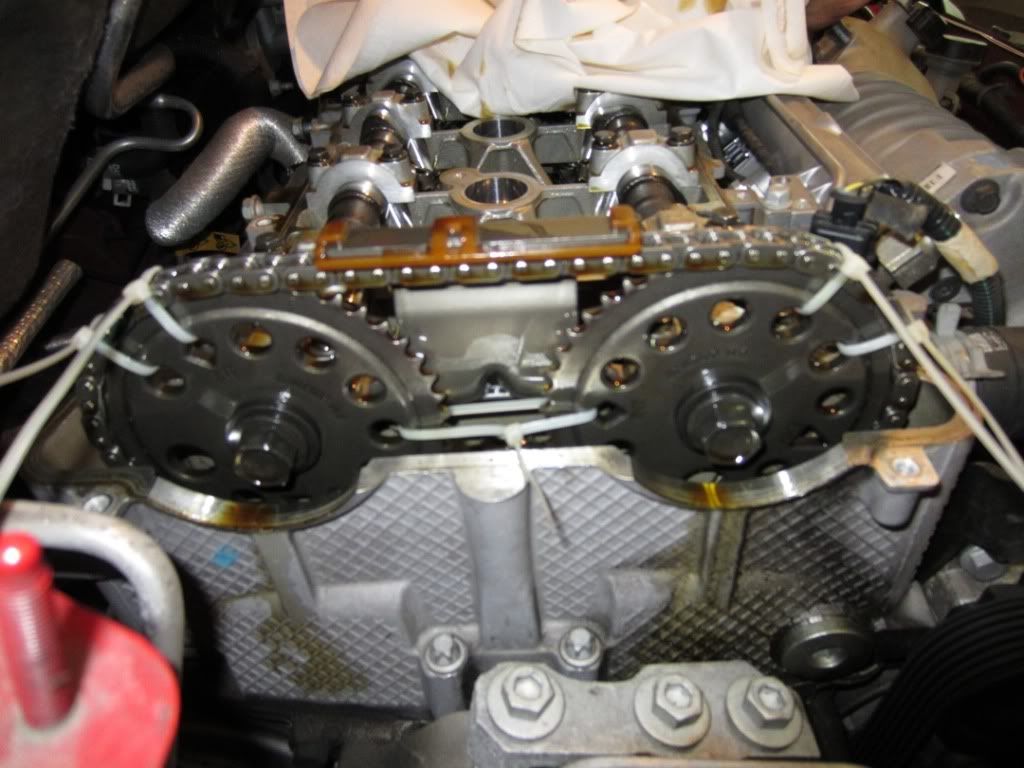
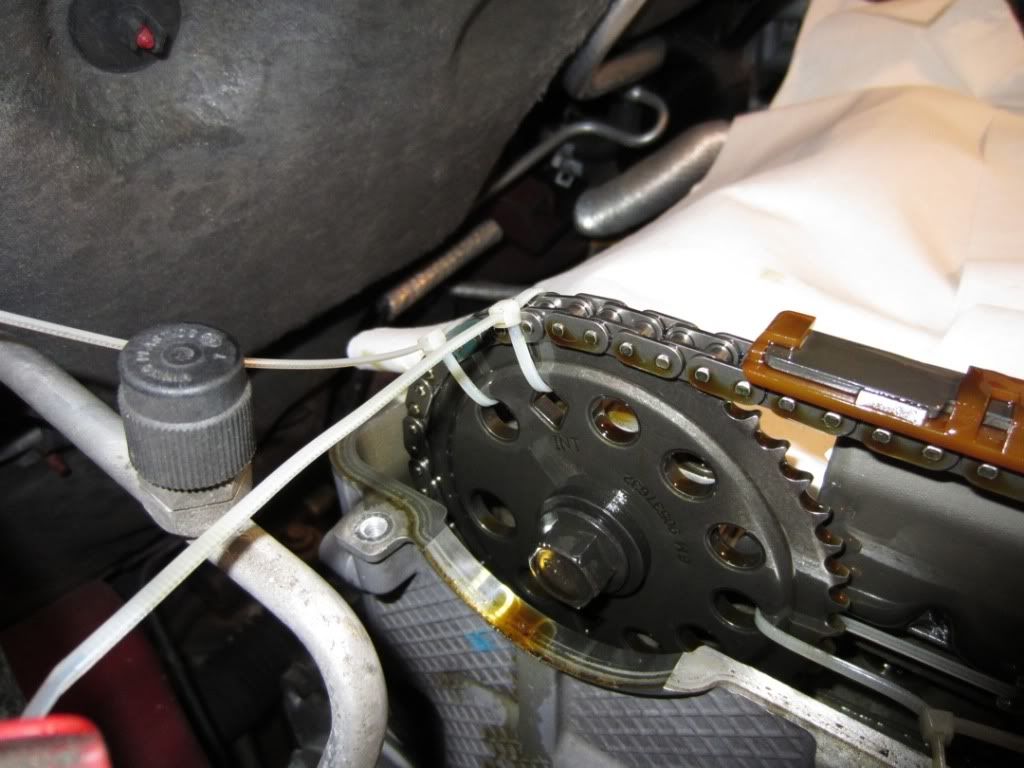
8)
Next remove the old tensioner. Some people needed a breaker bar i didnt have too much of a problem getting mine loose with a normal 1/2 ratchet.
Unfortunately i couldn't get a good picture of the tensioner with a good reference point.
The tensioner is 1-1/4 nut on the back of the head on the drivers side.
Hey look the zip ties do work!
Next make sure the new tensioner is set properly.
Start by removing the snap ring and removing the internal spring assembly.
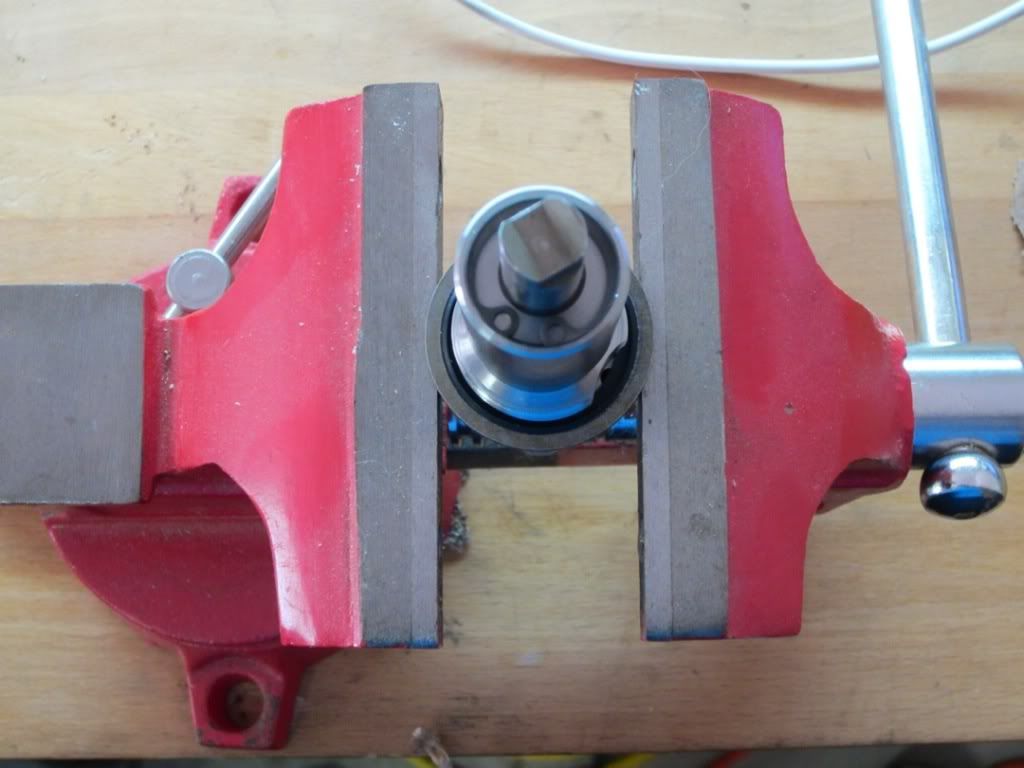
This is a picture of the assembly when it is released.
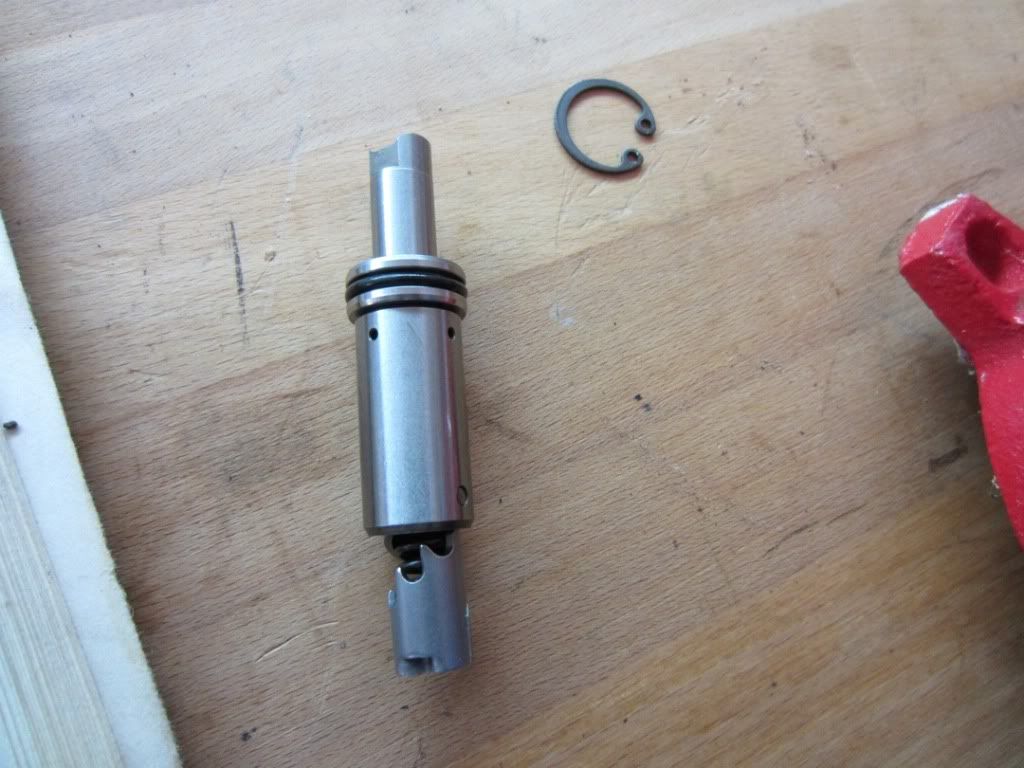
Then use a pair of pliers needle nose to set spring assembly by twisting the base of the spring till it locks at the most compress position. This may take some work and a decently long twisting motion to get it to set.
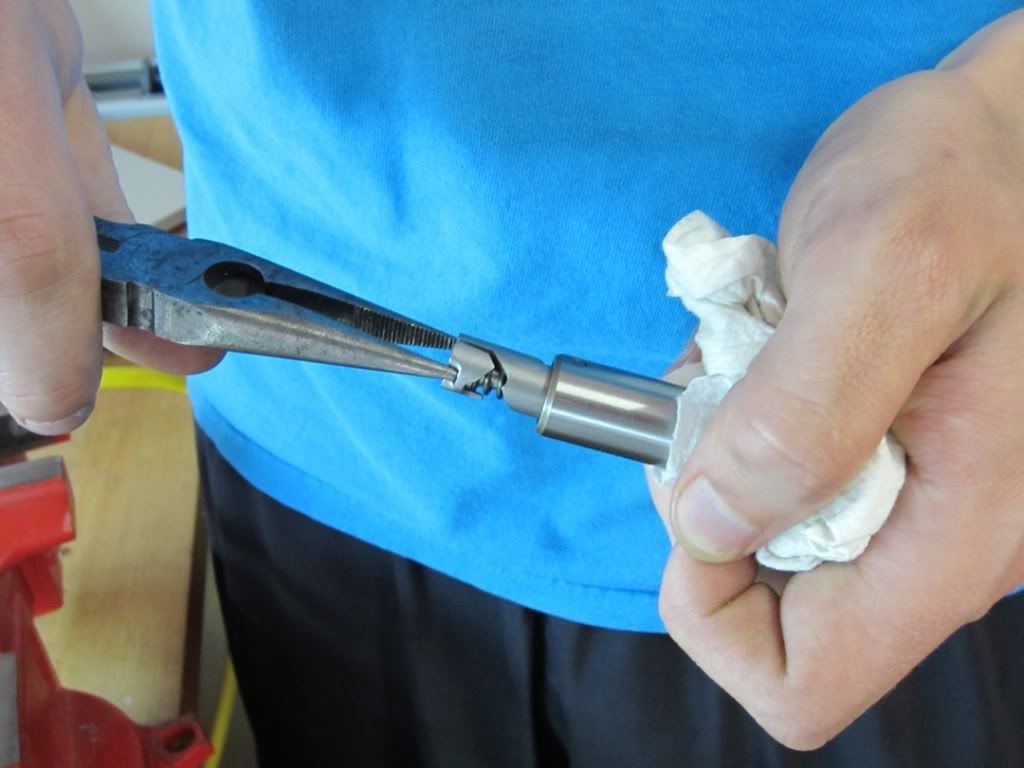
Here is a picture of what the assembly looks like when it is fully set.
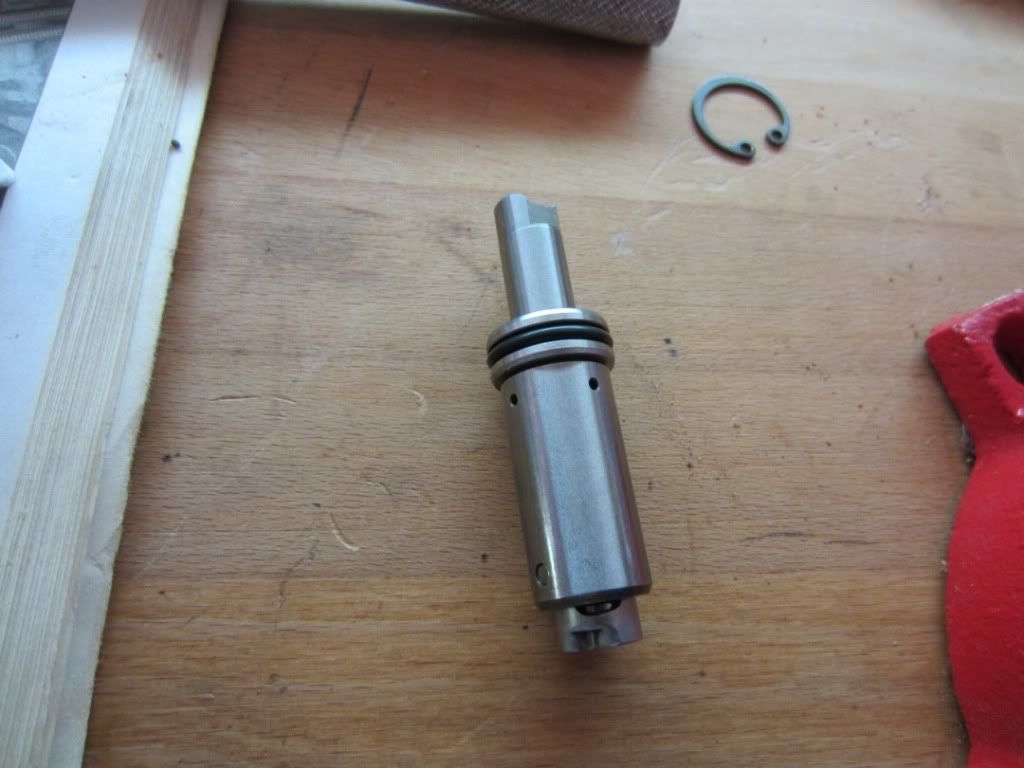
Then put the spring assembly back into the tensioner bolt and lock it in with the snap ring.
10)
Insert the tensioner back into the block. This may take a little pushing while threading to get it started. If the tensioner springs while trying to reinsert it back into the block it needs to be reset. Otherwise once threaded torque it down to 75(n*m) or 55(ft-lb).
11)
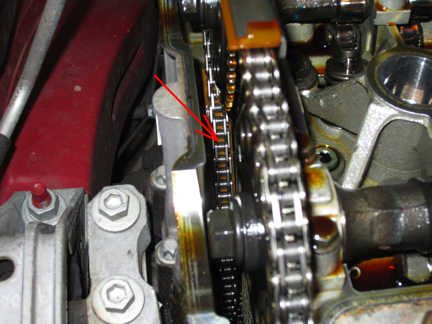
This part is difficult to tell if it is done correctly. In order to set the tensioner the chain laying over it must be struck, preferably with something that wont damage the chain. The only way i could find to do this is to use chimney sweeping rod that i cut with a hack saw.
A plastic chop stick would work as well, i don't recommend wood it leaves a few splinters on the chain
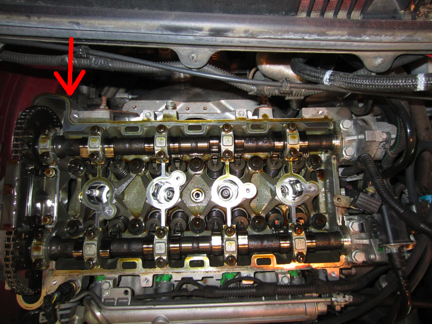
The arrow shows where i hit the chain to to set the tensioner. The movement of the chain when the tensioner sets will be barely noticeable. The easiest way to tell is there will be almost no movement at the point of the tensioner when it is struck after it has been set. If your unsure if it set then remove the tensioner to see if what you have been doing is working, just remember to reset the tensioner before reinserting.
Be careful not to hit to hard to avoid damaging the chain and guides.
12)
Now the easy part
Remove the zip ties!!!!!!
Wipe down the gasket and the surface on the head
Replace the valve cover and hand thread all the bolts
Tighten bolts to 74(in-lbs) for the valve cover starting in the center working your way outward.
Replace PCV mounting bracket and reconnect hose
Reconnect coil packs and harness to spark plugs and bolt back in place
Reconnect fuel line to rail and reconnect to mounting bracket
Replace coil pack cover and fuel rail cover.
Reconnect battery!
13)
Get ready to start
Turn key to on position and allow fuel pump to rebuild fuel pressure in lines but dont start yet.
Turn the engine over a few times without starting by holding the gas pedal to the floor and turning the key to start for as short as your can.
Now your ready to start the car!
14)
Hope for no codes
I hope this guide helped, sorry for being a bit too detailed.
Here is my probably overly documented write up of how to change a timing chain tensioner.
I got tired of the occasional diesel sound so finally i decided to change my tensioner.
After looking through the forum i found there were two general ways this was done.
One with removing the valve cover the other without removing the valve cover. After doing some research and seeing that some people have damaged their motors swapping their tensioners I decided I would take that little bit of extra time to ensure mine gets done properly.
This whole process took me and my brother about 3 hours including a trip to the hardware store to find a tensioner setting device and taking pictures. I'm sure if your more comfortable around your car and prepared it will take about half of that.
What you will need:
New style tensioner
1/2 & 3/8 drive torque wrench
Allen wrench's
1-1/4 socket same size as needed for oil filter cap
Metric socket set
A long plastic stick for setting tensioner(i used a chimney sweeper pole $5 at Lowes)
New style tensioner
Snap ring remover tool
Needle nose pliers
Zip ties
Useful references:
www.crateenginedepot.com/pdfs/12608580INS.pdf
FIRST STEP:
Make sure you have the correct tensioner. Autozone will sell you the wrong one. I had to pick up a new style one from my local dealer for about $60 USD. You can also get a new style one off of crate engine depot:
Ecotec Timing Chain Tensioner 12608580
The Correct New style tensioner is on the far left. The Old Style tensioner out of my motor is in the middle, and the Advance autoparts old style is on the Right.

1) Start by disconnecting the negative terminal of your battery. I believe its a 10mm.
2)Remove cover over the coil packs and "ECOTEC SUPERCHARGED" fuel rail cover.
3)

Next remove the PCV hose and two mounting bolts on the back of the head both 13mm (indicated by the green arrows).
These can be left connected to the intake and push out of the way.
Then remove the Coil packs using a 10mm socket (indicated by the yellow arrows) the spark plugs can stay.
Also Remember to remove the ground strap it will be next to the most drivers side coil pack
The harnesses can be pushed out of the way as well.
Then remove the fuel line (indicated by the red arrows).
The mounting for the line at the back of the head.
The line connecting to the regulator(i think?) using a fuel line disconnect tool.
And the regulator connected to the fuel rail using and adjustable wrench
Watch out if you just ran the car it will likely spray a little fuel!!! Also have some rags set up under the lines before disconnecting because they will leak.
4)
Your motor should now look like this. Sorry for the fuel line sticking up in the way i tucked it under my wiper fluid lines to keep it out of the way.

5)
Now its time to start removing valve cover bolts. All the bolts are of the same length so don't worry about mixing them up.
Here is a very useful picture i found the the Haynes repair manual showing where all the bolts are.

6)
After removing all the bolts its time to remove the valve cover
i used a screw driver to pry at the outer most screw holes around the cover where there is no gasket. By gently prying on the two screw holes on the passengers side of the valve cover the cover should come loose enough for you to do the rest by hand.

The cams, cam gears and chain should now be visible

I recommend cover covering the cams and springs with a rag to prevent dirt from getting in the heads.
7)
After the valve cover is removed its time to hold the chain in place so that it doesnt slip when the tensioner is removed. I decided to use zip ties to hold mine in place.
I placed two zip ties on each cam gear holding the chain to the teeth and one zip tie between the two cam gears to prevent too much movement.


8)
Next remove the old tensioner. Some people needed a breaker bar i didnt have too much of a problem getting mine loose with a normal 1/2 ratchet.
Unfortunately i couldn't get a good picture of the tensioner with a good reference point.
The tensioner is 1-1/4 nut on the back of the head on the drivers side.

Hey look the zip ties do work!


Next make sure the new tensioner is set properly.
Start by removing the snap ring and removing the internal spring assembly.

This is a picture of the assembly when it is released.

Then use a pair of pliers needle nose to set spring assembly by twisting the base of the spring till it locks at the most compress position. This may take some work and a decently long twisting motion to get it to set.

Here is a picture of what the assembly looks like when it is fully set.

Then put the spring assembly back into the tensioner bolt and lock it in with the snap ring.
10)
Insert the tensioner back into the block. This may take a little pushing while threading to get it started. If the tensioner springs while trying to reinsert it back into the block it needs to be reset. Otherwise once threaded torque it down to 75(n*m) or 55(ft-lb).
11)
This part is difficult to tell if it is done correctly. In order to set the tensioner the chain laying over it must be struck, preferably with something that wont damage the chain. The only way i could find to do this is to use chimney sweeping rod that i cut with a hack saw.
A plastic chop stick would work as well, i don't recommend wood it leaves a few splinters on the chain

The arrow shows where i hit the chain to to set the tensioner. The movement of the chain when the tensioner sets will be barely noticeable. The easiest way to tell is there will be almost no movement at the point of the tensioner when it is struck after it has been set. If your unsure if it set then remove the tensioner to see if what you have been doing is working, just remember to reset the tensioner before reinserting.
Be careful not to hit to hard to avoid damaging the chain and guides.

12)
Now the easy part
Remove the zip ties!!!!!!
Wipe down the gasket and the surface on the head
Replace the valve cover and hand thread all the bolts
Tighten bolts to 74(in-lbs) for the valve cover starting in the center working your way outward.
Replace PCV mounting bracket and reconnect hose
Reconnect coil packs and harness to spark plugs and bolt back in place
Reconnect fuel line to rail and reconnect to mounting bracket
Replace coil pack cover and fuel rail cover.
Reconnect battery!
13)
Get ready to start
Turn key to on position and allow fuel pump to rebuild fuel pressure in lines but dont start yet.
Turn the engine over a few times without starting by holding the gas pedal to the floor and turning the key to start for as short as your can.
Now your ready to start the car!
14)
Hope for no codes
I hope this guide helped, sorry for being a bit too detailed.

Last edited by NCSU_Slobalt; 04-09-2012 at 05:21 PM.
#3
I believe the new style tensioner comes preset in other words compressed already so no need to do any of the above as far as setting it. I just replaced mine and didn't have to do any of the above.
#4
I had to reset mine because my brother (who was helping me) was messing around with it and it released in his hand. They do come preset out of the box unless they release during shipping. No adjustment is necessary, the only thing you need to make sure of is that the tensioner is locked in the set position before installing it then make sure it releases after install and a few wacks.
#14
I just baught mine today. It came in the set position, however, can you get it to upset with it not being in the car? Mine doesnt seem to want to unset and Id hate to have a defective one and find out the hard way.
#18
How the hell do i know if the tensioner has set. I am not pulling it out of the again to find that it has exploded. There has to be an easier way. I just replaced mine and i hit the chain where the OP says quite hard and i also smacked the back of the tensioner with a small dead blow hammer a couple times pretty hard. I reallyyyy dont wanna finish only to find that the tensioner hasnt set.
Not for nothing. Wat happens if the tensioner isnt set and i start the car
Not for nothing. Wat happens if the tensioner isnt set and i start the car
#19
How the hell do i know if the tensioner has set. I am not pulling it out of the again to find that it has exploded. There has to be an easier way. I just replaced mine and i hit the chain where the OP says quite hard and i also smacked the back of the tensioner with a small dead blow hammer a couple times pretty hard. I reallyyyy dont wanna finish only to find that the tensioner hasnt set.
Not for nothing. Wat happens if the tensioner isnt set and i start the car
Not for nothing. Wat happens if the tensioner isnt set and i start the car
When I had removed my tensioner my chain went slack as the exhaust cam advanced putting slack between the two cam gears. Useing a wrench on the wrench flats on the exhaust cam shaft, I carefully and slowly while the zip ties were still installed, rotated my exhaust cam backwards moving the slack towards the tensioer. As I did this, I watched and saw that the tensioer/guide was takeing up the slack until the chain was once again tight between my cam gears. Only then did I remove the zip ties.
Hope this helps.
Not sure about the awnser to your next question, but I would imagine you could skip time.
#20
I pulled mine out and it was released so I reset it (Second time was eayser then the first) and reinstalled it, and then smacked the chain again.
When I had removed my tensioner my chain went slack as the exhaust cam advanced putting slack between the two cam gears. Useing a wrench on the wrench flats on the exhaust cam shaft, I carefully and slowly while the zip ties were still installed, rotated my exhaust cam backwards moving the slack towards the tensioer. As I did this, I watched and saw that the tensioer/guide was takeing up the slack until the chain was once again tight between my cam gears. Only then did I remove the zip ties.
Hope this helps.
Not sure about the awnser to your next question, but I would imagine you could skip time.
#22
Thanks for ur help man. I just took the chance and started it and the runs great so its all good
#24
Good write up, Although i worked around the fuel line instead of moving it. And, it seems that the more popular approach to set the tensioner is tapping it on the head of the bolt. Probably less chance to scar the chain and break the guide.


 :
: