
Drivetrain: "How to" fill your motor/tranny mounts with polyurethane
 01-22-2007, 10:11 PM
#1
Senior Member
Thread Starter
Hey guys, a few guys thought I should make this a "how to" and since people keep asking me, I thought I would just make one. This will be the step by step on how to fill you motor mounts with polyurethane. Why spend lots of money on expensive mounts when you can do it yourself for $5-10?? Most of us have very bad "wheel hoping" problems, why not fix it today?
Step 1.
Go to your local hardware store and buy the following if you don�t already have:
you will need...
-jack (I used a 2ton trolley jack)
-polyurethane adhesive (I used PL Premium)
-cocking gun
-basic hand tools (I can't remember what size there all were, but a basic 3/8 or 1/2 drive socket set and wrench�s is pretty much all you need.)
Step 2.
-you might want to either, drive the car onto some ramps or jack it up and put wood blocks under the front wheels
-place the jack under the engine, I put a small piece of wood on top of the jack to distribute the weight.
-jack it up just enough to take the load of the engine
Step 3.
-unbolt the upper engine mount, and remove from car.
-clean the mount from dirt and make sure its dry
Step 4.
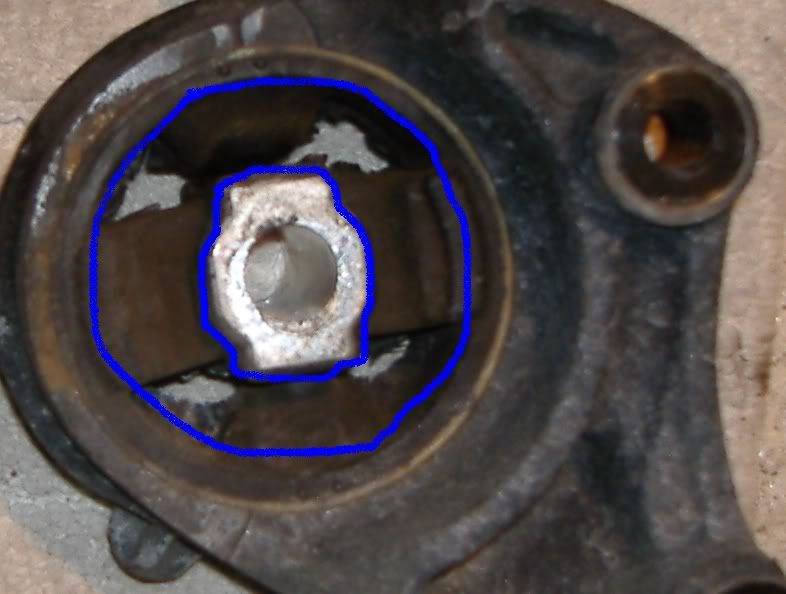
-if you notice, there is gaps in between the rubber and the metal on the mount, fill them in with polyurethane
-once you are finished, you must let it dry, I believe it says it only takes a few hours to dry but can take up to a week to cure
-try to limit your driving for the next little while, so it can cure
Step 4a.
- You may also want to paint the motor mount, now is a good time since it is removed already, I painted mine black.
Step 5.
-reinstall the mount and repeat steps to the tranny mounts
Step 6.
-you should be done, over the next week, try to drive easy to let it cure, you should already notice a huge difference well driving.
-after a few days, try launching the car from a dig, notice a difference???
I hope this helps you guys, I am very sorry I have no pictures, I didn�t have a cam when I did this. This is also my first �how to�, so if you notice something wrong, please let me know. Thanks!
***EDITED***
Here is a link to another thread where somebody changed there tranny mounts with Intense inserts. This might help you along because it is a good write up with lots of pictures. You can notice how crappy the tranny mounts are too. All you have to do is fill in the two big gaps with Polyurethane.
Intense TransAxle Mount HoW-to (56k get a beer) - Cobalt SS Network
Also, this might not be for everyone, if you want true performance, I would go with "real" mounts, but if you want to save some money but still make your car WAY better than stock, these "filled" mounts will work out great for you!
***Mini Update***
I am not sure if everyone knows, but there is a 4th mount on are cars, I just recently found out about it. It is an upper tranny mount located under the fuse box. Their are 4 bolts going to the car and 3 to the tranny, This mount is very hard to get at and I had a very hard time myself with tring to get the fusebox out of the way, Does anyone have a link to a "how to" remove the fusebox, or something that could help? To remove it, there is 2 bolts holding it to the car under the PCM, you will need to remove the power wires going to the fuse box(unhook the battery in the trunk so it doesnt ground out on anything, ie. the PCM....) I also had to disconnect the breather hose going to the intake piping(ss/sc only) and the coolant hose going to the coolank tank. To gain more space, I also removed the intake pipe. I still did not have enough room to fully remove this mount but had enough room under the fusebox to fill the mount there and then let it dry and reinstalled it. Unless you can find a better way to move the fusebox out of the way, you will need a pack of smokes and a 12 pack
I never notice any real differance comparing this to the 3 I have already done, I think if you did the other 3, it will be fine but if you want to do this one, it will require abit of work.
....there is also a good pic on post 17. Also, just a little tip, it looks kinda shitty at first and its very sticky but not to bad, I usally wait about 3-5hrs to let it hardern abit more, then I use plastic wrap on the mount and use my fingers to kinda smooth it out. I left the wrap on the mount when I installed it to kinda keep the texture and peeled it off about a week later and the mount was rock hard.
Again, if anyone knows a better way of removing the fuse box or atleast getting it out of the way better, please PM me or just leave a comment....I think the other mounts should be easy to do but this one will require some abit of work and knowlegde, but like I said, it isnt needed, 3 out 4 is plenty but if you want , you can try it out.....
Good luck, and just so everyone knows, these mounts are probally just temp for me, I do plan on having over 400whp in the future, and dont think these will work as good as the expensive mounts would..... these will be fine for stock or maybe some of the stage kits but once you pass the 275-300whp mark, you will probally want to invest in better mounts.
Step 1.
Go to your local hardware store and buy the following if you don�t already have:
you will need...
-jack (I used a 2ton trolley jack)
-polyurethane adhesive (I used PL Premium)
-cocking gun
-basic hand tools (I can't remember what size there all were, but a basic 3/8 or 1/2 drive socket set and wrench�s is pretty much all you need.)
Step 2.
-you might want to either, drive the car onto some ramps or jack it up and put wood blocks under the front wheels
-place the jack under the engine, I put a small piece of wood on top of the jack to distribute the weight.
-jack it up just enough to take the load of the engine
Step 3.
-unbolt the upper engine mount, and remove from car.
-clean the mount from dirt and make sure its dry
Step 4.
-if you notice, there is gaps in between the rubber and the metal on the mount, fill them in with polyurethane
-once you are finished, you must let it dry, I believe it says it only takes a few hours to dry but can take up to a week to cure
-try to limit your driving for the next little while, so it can cure
Step 4a.
- You may also want to paint the motor mount, now is a good time since it is removed already, I painted mine black.
Step 5.
-reinstall the mount and repeat steps to the tranny mounts
Step 6.
-you should be done, over the next week, try to drive easy to let it cure, you should already notice a huge difference well driving.
-after a few days, try launching the car from a dig, notice a difference???
I hope this helps you guys, I am very sorry I have no pictures, I didn�t have a cam when I did this. This is also my first �how to�, so if you notice something wrong, please let me know. Thanks!
***EDITED***
Here is a link to another thread where somebody changed there tranny mounts with Intense inserts. This might help you along because it is a good write up with lots of pictures. You can notice how crappy the tranny mounts are too. All you have to do is fill in the two big gaps with Polyurethane.
Intense TransAxle Mount HoW-to (56k get a beer) - Cobalt SS Network
Also, this might not be for everyone, if you want true performance, I would go with "real" mounts, but if you want to save some money but still make your car WAY better than stock, these "filled" mounts will work out great for you!
***Mini Update***
I am not sure if everyone knows, but there is a 4th mount on are cars, I just recently found out about it. It is an upper tranny mount located under the fuse box. Their are 4 bolts going to the car and 3 to the tranny, This mount is very hard to get at and I had a very hard time myself with tring to get the fusebox out of the way, Does anyone have a link to a "how to" remove the fusebox, or something that could help? To remove it, there is 2 bolts holding it to the car under the PCM, you will need to remove the power wires going to the fuse box(unhook the battery in the trunk so it doesnt ground out on anything, ie. the PCM....) I also had to disconnect the breather hose going to the intake piping(ss/sc only) and the coolant hose going to the coolank tank. To gain more space, I also removed the intake pipe. I still did not have enough room to fully remove this mount but had enough room under the fusebox to fill the mount there and then let it dry and reinstalled it. Unless you can find a better way to move the fusebox out of the way, you will need a pack of smokes and a 12 pack
I never notice any real differance comparing this to the 3 I have already done, I think if you did the other 3, it will be fine but if you want to do this one, it will require abit of work.
....there is also a good pic on post 17. Also, just a little tip, it looks kinda shitty at first and its very sticky but not to bad, I usally wait about 3-5hrs to let it hardern abit more, then I use plastic wrap on the mount and use my fingers to kinda smooth it out. I left the wrap on the mount when I installed it to kinda keep the texture and peeled it off about a week later and the mount was rock hard.
Again, if anyone knows a better way of removing the fuse box or atleast getting it out of the way better, please PM me or just leave a comment....I think the other mounts should be easy to do but this one will require some abit of work and knowlegde, but like I said, it isnt needed, 3 out 4 is plenty but if you want , you can try it out.....
Good luck, and just so everyone knows, these mounts are probally just temp for me, I do plan on having over 400whp in the future, and dont think these will work as good as the expensive mounts would..... these will be fine for stock or maybe some of the stage kits but once you pass the 275-300whp mark, you will probally want to invest in better mounts.
Last edited by TommyP; 10-03-2012 at 10:12 AM. Reason: Added some more info.
 01-29-2007, 01:44 AM
#5
Senior Member
Thread Starter
 yeah I didnt have a cam at the time....I really wish I had pictures....
Yes, I dont even really notice viberations at all....and huge differance, rarely any wheel hop.....usally only hops on a hard launch on wet pavement.
Last edited by rick1217; 01-29-2007 at 01:44 AM. Reason: Automerged Doublepost
02-03-2007, 10:58 PM
#6
Senior Member
iTrader: (1)
Join Date: 11-01-05
Location: San Antonio,TX
Posts: 5,446
Likes: 0
Received 0 Likes
on
0 Posts
will I've started the process unfortunately my friend forgot her camera at home so I have no pics of us taking the mounts off. I'm gonna start filling them tonight and I'll see what happens
02-04-2007, 01:03 PM
#7
Senior Member
Thread Starter
02-04-2007, 01:22 PM
#8
Senior Member
iTrader: (1)
Join Date: 11-01-05
Location: San Antonio,TX
Posts: 5,446
Likes: 0
Received 0 Likes
on
0 Posts
well today I woke up and I inspected the mounts and from where I tried to wiggle them around all I gotta say is wow I could feel the difference. Now I'm gonna wait a little while longer and re-install the two I've done and remove the other two and fill those in.
02-05-2007, 09:16 PM
#9
Senior Member
iTrader: (1)
Join Date: 11-01-05
Location: San Antonio,TX
Posts: 5,446
Likes: 0
Received 0 Likes
on
0 Posts
so far with some help from my friends, I've installed two completed mounts, and with one mount not on we went ahead and turned the car on to see if there was any vibrations or whatever, there was little vibration but not really bad, then we revved the motor and she barely moved. Now this is with one mount not on.
 02-06-2007, 10:03 AM
#11
Senior Member
Thread Starter
 02-06-2007, 12:20 PM
#13
Senior Member
Thread Starter
 02-07-2007, 11:24 AM
#20
Senior Member
iTrader: (1)
Join Date: 11-01-05
Location: San Antonio,TX
Posts: 5,446
Likes: 0
Received 0 Likes
on
0 Posts
Now on the project I have filled the last two mounts today and I will be re-installing them. Either tomorrow or Friday I will tell yall the results
02-07-2007, 06:59 PM
#21
Senior Member
iTrader: (1)
Join Date: 11-01-05
Location: San Antonio,TX
Posts: 5,446
Likes: 0
Received 0 Likes
on
0 Posts
Alright well I finished, I revved the car and the motor doesn't even move like it use to. Also I went for a little drive and the vibration just increased a tad bit. I guess on Friday I will find out how good this mod is. I'll keep yall informed!!!
02-09-2007, 01:12 PM
#22
Senior Member
iTrader: (1)
Join Date: 11-01-05
Location: San Antonio,TX
Posts: 5,446
Likes: 0
Received 0 Likes
on
0 Posts
well I couldn't wait for today to come around so I had a little fun last night. My friend said my car feels a tad bit faster off the line. I feel a heal of a difference when the car shifts also. Like I said before idle is not as bad as I thought it would be. Ummm anyone have any questions go ahead and ask and I'll answer to the best of my knowledge
02-09-2007, 07:29 PM
#24
Senior Member
Thread Starter
^^Yeah, I never realized that before, I will probally do that mount on my next day off and try to get some pics, maybe if I can, I will crawl under the car and get some more pics too.....Thanks again Dragonsfire!
02-09-2007, 07:48 PM
#25
Senior Member
iTrader: (1)
Join Date: 11-01-05
Location: San Antonio,TX
Posts: 5,446
Likes: 0
Received 0 Likes
on
0 Posts
also make sure you disconnect the battery for the tranny mount under the fuse box cuz if the power cables going to the fuse box hits the computer, well you can kiss computer goodbye if the battery is still connected.