How-To Upload & Post Images
#1
Thread Starter
Original Hayden Fanatic
Platinum Member
Joined: 05-06-06
Posts: 33,169
Likes: 1
From: Dayton, O HI O
How-To Upload & Post Images
Posting Images
Now, you’ve finally got that shiny new cobalt and want to share some pictures with your fellow enthusiast. But when you paste: C:\Documents and Settings\REIGNSS\My Documents\My Pictures\my_new_car.jpg into your thread no one can see your image but you?!?! What you have to do is use an image hosting site on the internet.
Some examples include:
www.imageshack.us
www.photobucket.com
Another option is to host them right here on Cobaltss.net. (we will visit this option in a moment)
First, let talk about using imageshack.us or photobucket.com. The advantage to www.imageshack.us in that you do not have to sign up you just browse to your folder & upload it. Photobucket allows you to create albums & makes in easier for you to keep track of your images. With any photo-hosting site you need to know what code to put into your thread.
After you upload to imageshack.us you should see “Direct Link to Image” this is the code you want. Highlight the code and copy it(Ctrl+C), then click the “Insert Image” button and Paste(Ctrl+V) the image code into the box and click OK. The code should appear in your “Post new thread” in the thread editor looking something like this: [img]https://www.cobaltss.net/forums/images/editor/insertimage.gif[/img]
After signing up for photobucket.com, unload your image. It should appear in your gallery. There are 4 options for code under your image, you want to use the last one “IMG Code”, click the code and copy it. Then simply paste it into your thread editor window.
Now, uploading to Cobaltss.net’s gallery has its advatages. The biggest one is that everyone will be able to see it. Some users cannot view imageshack, photobucket images on there computer due to work/government blocking. Using the gallery ensures what everyone can see the images.
To access the gallery scroll to the very top of the page & click the “Gallery” link, this will take you to the Gallery itself. To upload images to the gallery you must click “Upload” from the options bar, this will bring you to a screen similar to this:

First thing you will want to do is “Browse” to the image(s) you want to upload. After selecting the images be sure and fill out the “Image title”, “Description”, under the “Category” option choose “Member’s Cobalt Gallery”, and finally include some keywords to describe your image. Finally click the “submit” button.
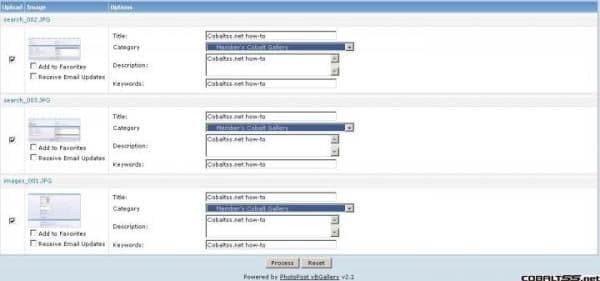
This will bring you to this screen:

This is where you can edit the Title, Category, Description, Keywords for each individual image.
After making your changes click: Process
Now after your images are processed it brings you to a funky screen, to find your images click the “home” option on the gallery bar, you should see your images near the top. Click your first image.
Once you find your image in the gallary just copy the Direct Link Code and use the “Insert Image” button and Paste(Ctrl+V) the image code into the box and click OK. The code should appear in your “Post new thread” in the thread editor looking something like this: [img]https://www.cobaltss.net/forums/images/editor/insertimage.gif[/img]
You can access the images in your gallery, or anyone elses, by clicking the icon under there users info in any of there posts
Now, you’ve finally got that shiny new cobalt and want to share some pictures with your fellow enthusiast. But when you paste: C:\Documents and Settings\REIGNSS\My Documents\My Pictures\my_new_car.jpg into your thread no one can see your image but you?!?! What you have to do is use an image hosting site on the internet.
Some examples include:
www.imageshack.us
www.photobucket.com
Another option is to host them right here on Cobaltss.net. (we will visit this option in a moment)
First, let talk about using imageshack.us or photobucket.com. The advantage to www.imageshack.us in that you do not have to sign up you just browse to your folder & upload it. Photobucket allows you to create albums & makes in easier for you to keep track of your images. With any photo-hosting site you need to know what code to put into your thread.
After you upload to imageshack.us you should see “Direct Link to Image” this is the code you want. Highlight the code and copy it(Ctrl+C), then click the “Insert Image” button
 and Paste(Ctrl+V) the image code into the box and click OK. The code should appear in your “Post new thread” in the thread editor looking something like this: [img]https://www.cobaltss.net/forums/images/editor/insertimage.gif[/img]
After signing up for photobucket.com, unload your image. It should appear in your gallery. There are 4 options for code under your image, you want to use the last one “IMG Code”, click the code and copy it. Then simply paste it into your thread editor window.
Now, uploading to Cobaltss.net’s gallery has its advatages. The biggest one is that everyone will be able to see it. Some users cannot view imageshack, photobucket images on there computer due to work/government blocking. Using the gallery ensures what everyone can see the images.
To access the gallery scroll to the very top of the page & click the “Gallery” link, this will take you to the Gallery itself. To upload images to the gallery you must click “Upload” from the options bar, this will bring you to a screen similar to this:
First thing you will want to do is “Browse” to the image(s) you want to upload. After selecting the images be sure and fill out the “Image title”, “Description”, under the “Category” option choose “Member’s Cobalt Gallery”, and finally include some keywords to describe your image. Finally click the “submit” button.
This will bring you to this screen:
This is where you can edit the Title, Category, Description, Keywords for each individual image.
After making your changes click: Process
Now after your images are processed it brings you to a funky screen, to find your images click the “home” option on the gallery bar, you should see your images near the top. Click your first image.
Once you find your image in the gallary just copy the Direct Link Code and use the “Insert Image” button
 and Paste(Ctrl+V) the image code into the box and click OK. The code should appear in your “Post new thread” in the thread editor looking something like this: [img]https://www.cobaltss.net/forums/images/editor/insertimage.gif[/img]
You can access the images in your gallery, or anyone elses, by clicking the icon
Last edited by REIGN SS; 05-01-2008 at 05:27 AM. Reason: Automerged Doublepost
#6
You can now upload photos to your blog(s) using Blogger Images; just click the image icon in the post editor's toolbar.

When you click this icon, you'll get a window that allows you to select an image or multiple images from your computer. Click the Browse button to locate the ones you want. Alternatively, you can enter the URL of an image that's already online and insert it into your post.

If you click the link to choose a layout, you can customize the way your images will appear in your post:

The left, center and right options determine how the text of your post flows around the pictures. The size option lets you scale the pictures to different sizes within this posting area. Note that the picture will still be uploaded in its full size; this option just determines how it's scaled within the content of your post.
Alternatively, you can post images to your blog using Mail-to-Blogger. This feature allows you to email posts with image attachments directly to your blog. For more information about Mail-to-Blogger, please see this article.

When you click this icon, you'll get a window that allows you to select an image or multiple images from your computer. Click the Browse button to locate the ones you want. Alternatively, you can enter the URL of an image that's already online and insert it into your post.

If you click the link to choose a layout, you can customize the way your images will appear in your post:

The left, center and right options determine how the text of your post flows around the pictures. The size option lets you scale the pictures to different sizes within this posting area. Note that the picture will still be uploaded in its full size; this option just determines how it's scaled within the content of your post.
Alternatively, you can post images to your blog using Mail-to-Blogger. This feature allows you to email posts with image attachments directly to your blog. For more information about Mail-to-Blogger, please see this article.
#11
Plasti Dip
<a href="http://s795.photobucket.com/albums/yy238/kellenbarner/?action=view&current=aa1.jpg" target="_blank"><img src="http://i795.photobucket.com/albums/yy238/kellenbarner/aa1.jpg" border="0" alt="Photobucket"></a>
Thread
Thread Starter
Forum
Replies
Last Post


