
Photography Information Thread (work in progress)
 11-29-2007, 12:32 AM
#1
Original Hayden Fanatic
Platinum Member
Thread Starter
Photography Information Thread (work in progress)
Camera Settings
Most cameras have a variety of shooting modes; generally Auto, Portrait, Landscape, Sport/Action, Night Shooting are the common options. Then there are “Creative shooting modes”. P(program), Tv(Shutter Priority), Av(Aperture Priority), M(Manual)
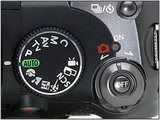
Auto: Uses sensors to determine optimal combination of aperture, shutter speed, and ISO.
- Good for general, everyday pictures.
Portrait: Uses a smaller aperture, faster shutter speed, & fires the flash.
- Good for zoomed in pictures of 1-3 people.
Landscape: Chooses a wider aperture for greater depth of field.
- Good for wide angle scenic photos.
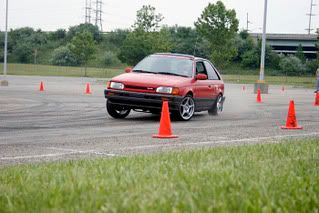
Sports/Action: Uses a faster shutter speed, & higher ISO to freeze action.
- Good for sporting events & fast moving subjects
Night Shooting: Uses a combination of slower shutter speed and firing the flash. This freezes the objects in the foreground with the flash, but the slower shutter speed allows for exposure in the background.
- Good for shooting in dark settings where you do not want to lose the objects in the background.
Now the fun stuff, Creative shooting modes…
(Note, ISO is adjustable in all creative modes)
P(Program): Functions similar to the Auto setting by determining the optimal combination of aperture, shutter speed, and ISO.
- Good for general, everyday pictures.
Tv(Shutter Priority): This setting allows you to select the shutter speed & the camera determines the best aperture for proper exposure.
- Often used to create special effects such as blurred water on a river/waterfall or to freeze action in action scenes.
Av(Aperture Priority): This setting allows you to select the aperture & the camera determines the best shutter speed for proper exposure.
- This is important if you want to control depth of field or for special effects.
M(Manual Mode): This setting allows you to select both the aperture and the shutter speed.
- This gives you ultimate control over the exposure, when in full manual exposure mode, the camera will display a simulated exposure meter which will indicate how far over- or underexposed the image is compared to the exposure value calculated by the camera's metering system.
Exposure
Exposure: The amount of light received by the sensor (or film). This is determined by the Aperture & Shutter speed. The affect exposure has depends on the sensitivity of the sensor, this is referred to as ISO.
Aperture: This refers to the size of the opening in the lens that determines the amount of light that strikes the sensor. The size of the opening is controlled by an adjustable diaphragm of overlapping blades, working similar to the pupil of the eye. Aperture affects 2 things: Exposure & Depth of Field.
Aperture scale:
Note: Your cameras scale may not include all the numbers listed.
f/1.4 – f/2 – f/2.8 – f/4 – f/5.6 – f/8 – (f/11) – f/16 – f/22 – f/32 – (f/45) – f/64 – f/90
The scale doubles every other number, with the exception of f/11 & f/45.
For every 1 stop increase in aperture the amount of light that strikes the sensor is halved.
Example: f/4 allows twice as much light to strike the sensor as f/5.6 does.
With every increase in aperture the depth of field is also increased.
Example:
f/4
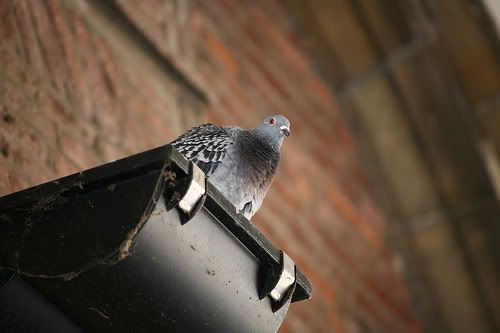
Image Copywrite: Flickr: _Pixelmaniac_
f/32
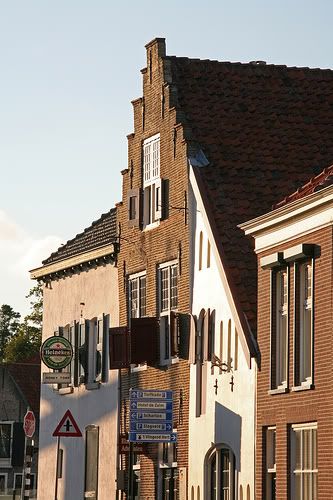
Image Copywrite: Flickr: _Pixelmaniac_
An Aperture setting of f/8 is generally the "sweet spot" for most lenses.
Shutter speed: This determines how long the sensor will be exposed to light. On most D-SLR’s and some point & shoot cameras this is a mechanical device between the lens and the sensor which opens & closes in the time determined by the shutter speed. On some D-SLR & most digital point & shoot cameras this function is achieved by switching on & off the sensor in the time determined by the shutter speed.
Shutter Speed scale:
Note: Your cameras scale may not include all the numbers listed.
30” – 15” – (8”) – 4” – 2” – 1” – 1/2 – 1/4 – 1/8 – (1/15) – 1/30 – 1/60 – (1/125) – 1/250 – 1/500 – 1/1000 – 1/2000 – 1/4000 – 1/8000
For every 1 stop increase in shutter speed the length of time light strikes the sensor is halved.
Example: 1/250 is twice as fast as 1/125, which allows half the time for light to strike the CCD.
1/750 – Fast shutter speed, freezes action.
1/125 – Slower shutter speed, blurs action.
ISO: The scale used to indicate a digital cameras sensitivity to light. When increasing sensitivity the output of the sensor is amplified, so less light is needed; with an increase in ISO the noise (digital equivalent of film grain) in an image is also amplified.
Digital Cameras generally have an ISO scale ranging from 50 to 3200, depending on the camera model.
ISO Scale:
Note: Your cameras scale may not include all the numbers listed.
6 12 25 50 100 200 400 800 1600 3200
8 16 32 64 125 250 500 1000 2000 4000
10 20 40 80 160 320 640 1250 2500
*The scale you will see on most digital cameras: 50, 100, 200, 400, 800, 1600, 3200.
For every 1 stop increase in ISO the sensitivity of camera’s sensor is doubled.
Example: 400 is twice as sensitive as 200, which allows for a faster shutter speed in less light.
Noise Examples:
(Canon 40D[left] vs Nikon D200[right])
Images courtesy of dpreview.com
ISO 200:


ISO 400:


ISO 800:


ISO 1600:


ISO 3200:


Most cameras have a variety of shooting modes; generally Auto, Portrait, Landscape, Sport/Action, Night Shooting are the common options. Then there are “Creative shooting modes”. P(program), Tv(Shutter Priority), Av(Aperture Priority), M(Manual)
Auto: Uses sensors to determine optimal combination of aperture, shutter speed, and ISO.
- Good for general, everyday pictures.
Portrait: Uses a smaller aperture, faster shutter speed, & fires the flash.
- Good for zoomed in pictures of 1-3 people.
Landscape: Chooses a wider aperture for greater depth of field.
- Good for wide angle scenic photos.
Sports/Action: Uses a faster shutter speed, & higher ISO to freeze action.
- Good for sporting events & fast moving subjects
Night Shooting: Uses a combination of slower shutter speed and firing the flash. This freezes the objects in the foreground with the flash, but the slower shutter speed allows for exposure in the background.
- Good for shooting in dark settings where you do not want to lose the objects in the background.
Now the fun stuff, Creative shooting modes…
(Note, ISO is adjustable in all creative modes)
P(Program): Functions similar to the Auto setting by determining the optimal combination of aperture, shutter speed, and ISO.
- Good for general, everyday pictures.
Tv(Shutter Priority): This setting allows you to select the shutter speed & the camera determines the best aperture for proper exposure.
- Often used to create special effects such as blurred water on a river/waterfall or to freeze action in action scenes.
Av(Aperture Priority): This setting allows you to select the aperture & the camera determines the best shutter speed for proper exposure.
- This is important if you want to control depth of field or for special effects.
M(Manual Mode): This setting allows you to select both the aperture and the shutter speed.
- This gives you ultimate control over the exposure, when in full manual exposure mode, the camera will display a simulated exposure meter which will indicate how far over- or underexposed the image is compared to the exposure value calculated by the camera's metering system.
Exposure
Exposure: The amount of light received by the sensor (or film). This is determined by the Aperture & Shutter speed. The affect exposure has depends on the sensitivity of the sensor, this is referred to as ISO.
Aperture: This refers to the size of the opening in the lens that determines the amount of light that strikes the sensor. The size of the opening is controlled by an adjustable diaphragm of overlapping blades, working similar to the pupil of the eye. Aperture affects 2 things: Exposure & Depth of Field.
Aperture scale:
Note: Your cameras scale may not include all the numbers listed.
f/1.4 – f/2 – f/2.8 – f/4 – f/5.6 – f/8 – (f/11) – f/16 – f/22 – f/32 – (f/45) – f/64 – f/90
The scale doubles every other number, with the exception of f/11 & f/45.
For every 1 stop increase in aperture the amount of light that strikes the sensor is halved.
Example: f/4 allows twice as much light to strike the sensor as f/5.6 does.
With every increase in aperture the depth of field is also increased.
Example:
f/4
Image Copywrite: Flickr: _Pixelmaniac_
f/32
Image Copywrite: Flickr: _Pixelmaniac_
An Aperture setting of f/8 is generally the "sweet spot" for most lenses.
Shutter speed: This determines how long the sensor will be exposed to light. On most D-SLR’s and some point & shoot cameras this is a mechanical device between the lens and the sensor which opens & closes in the time determined by the shutter speed. On some D-SLR & most digital point & shoot cameras this function is achieved by switching on & off the sensor in the time determined by the shutter speed.
Shutter Speed scale:
Note: Your cameras scale may not include all the numbers listed.
30” – 15” – (8”) – 4” – 2” – 1” – 1/2 – 1/4 – 1/8 – (1/15) – 1/30 – 1/60 – (1/125) – 1/250 – 1/500 – 1/1000 – 1/2000 – 1/4000 – 1/8000
For every 1 stop increase in shutter speed the length of time light strikes the sensor is halved.
Example: 1/250 is twice as fast as 1/125, which allows half the time for light to strike the CCD.
1/750 – Fast shutter speed, freezes action.
1/125 – Slower shutter speed, blurs action.
ISO: The scale used to indicate a digital cameras sensitivity to light. When increasing sensitivity the output of the sensor is amplified, so less light is needed; with an increase in ISO the noise (digital equivalent of film grain) in an image is also amplified.
Digital Cameras generally have an ISO scale ranging from 50 to 3200, depending on the camera model.
ISO Scale:
Note: Your cameras scale may not include all the numbers listed.
6 12 25 50 100 200 400 800 1600 3200
8 16 32 64 125 250 500 1000 2000 4000
10 20 40 80 160 320 640 1250 2500
*The scale you will see on most digital cameras: 50, 100, 200, 400, 800, 1600, 3200.
For every 1 stop increase in ISO the sensitivity of camera’s sensor is doubled.
Example: 400 is twice as sensitive as 200, which allows for a faster shutter speed in less light.
Noise Examples:
(Canon 40D[left] vs Nikon D200[right])
Images courtesy of dpreview.com
ISO 200:
ISO 400:
ISO 800:
ISO 1600:
ISO 3200:
Last edited by REIGN SS; 12-05-2007 at 03:34 AM.
 11-29-2007, 12:32 AM
#2
Original Hayden Fanatic
Platinum Member
Thread Starter
Metering Images
The way the meter works is it evaluates the scene and calculates the best average exposure value based on your metering mode. It does it's best to make the scene 18% gray.
There are 2 types of light meters:
1.) Reflective: Evaluates the light reflecting from the scene, this is the meter built into most cameras.
- Reflective meters can cause under exposure (to dark) in scenes where there is a lot of whites/light colors, and over exposure (to light) in scenes with a lot of blacks/dark colors.
2.) Incident: Evaluates the light falling on a subject, these meters are usually handheld units.
- Incident meters do not take into account the colors in the scene, and will generally give you a more accurate exposure.
Your camera has a built in light meter that it uses to determine proper exposure for an image. It will also assist you in exposing your images once you start using Manual Mode. Most SLR camera's display this in the view finder, while most point & shoots display this on the image screen.
The meter should look similar to this:

-2 . . 1 . . 0 . . 1 . . +2
-2 . . 1 . . ^ . . 1 . . +2
Exposure is affected by 3 things; ISO, Shutter Speed, and Aperture.
Generally, your goal is to adjust these 3 settings to achieve a 0 reading on the scale, this is where your cameras meters finds you will achieve proper exposure for the image.
The numbers on the scale express under/over exposure. Example: -2 is 2 stops under exposed (too dark), and +2 is 2 stops over exposed(to bright).
This is where you will adjust the settings to get the arrow to read 0.
Example of adjustments:
(Camera meter reads -1 on the exposure scale with the following settings:
ISO: 400 - Shutter speed: 1/250 - Aperture - f/8)
This means that the image is 1 stop under exposed. There are 3 ways to correct this, each adjusts 1 setting.
1 stop faster ISO (more light sensitive):
ISO: 800- Shutter speed: 1/250 - Aperture - f/8
1 stop slower Shutter (longer light exposure):
ISO: 400 - Shutter speed: 1/125 - Aperture - f/8
1 stop wider Aperture (wider lens opening)
ISO: 400 - Shutter speed: 1/250 - Aperture - f/5.6
ISO is the last thing you want to adjust for more exposure, because the higher the ISO the more noise will appear on your image.
Bracketing
Bracketing is a method where the photographer takes multiple exposures of the same image. You intentionally take frames metered under and over exposed to ensure that you have a properly exposed image. This is helpful when first learning exposure, or shooting under difficult lighting situations. Example would be to take the same image at -1, 0, +1 or -1, -1/2, 0, +1/2, +1.
Most SLR's have a function that you can automatically set to bracket an image. (See your cameras manual to find out how to use this feature.)
This is still a work in progress, so much more info to come.... I just wanted to get the tech. info up to start with.
This thread is an original work, and copywrited by myself Ryan McManus, please don't copy/reuse this information/thread without my consent. Thank you
(You can contact me via email at ryan.mcmanus.05@gmail.com or PM)
The way the meter works is it evaluates the scene and calculates the best average exposure value based on your metering mode. It does it's best to make the scene 18% gray.
There are 2 types of light meters:
1.) Reflective: Evaluates the light reflecting from the scene, this is the meter built into most cameras.
- Reflective meters can cause under exposure (to dark) in scenes where there is a lot of whites/light colors, and over exposure (to light) in scenes with a lot of blacks/dark colors.
2.) Incident: Evaluates the light falling on a subject, these meters are usually handheld units.
- Incident meters do not take into account the colors in the scene, and will generally give you a more accurate exposure.
Your camera has a built in light meter that it uses to determine proper exposure for an image. It will also assist you in exposing your images once you start using Manual Mode. Most SLR camera's display this in the view finder, while most point & shoots display this on the image screen.
The meter should look similar to this:
-2 . . 1 . . 0 . . 1 . . +2
-2 . . 1 . . ^ . . 1 . . +2
Exposure is affected by 3 things; ISO, Shutter Speed, and Aperture.
Generally, your goal is to adjust these 3 settings to achieve a 0 reading on the scale, this is where your cameras meters finds you will achieve proper exposure for the image.
The numbers on the scale express under/over exposure. Example: -2 is 2 stops under exposed (too dark), and +2 is 2 stops over exposed(to bright).
This is where you will adjust the settings to get the arrow to read 0.
Example of adjustments:
(Camera meter reads -1 on the exposure scale with the following settings:
ISO: 400 - Shutter speed: 1/250 - Aperture - f/8)
This means that the image is 1 stop under exposed. There are 3 ways to correct this, each adjusts 1 setting.
1 stop faster ISO (more light sensitive):
ISO: 800- Shutter speed: 1/250 - Aperture - f/8
1 stop slower Shutter (longer light exposure):
ISO: 400 - Shutter speed: 1/125 - Aperture - f/8
1 stop wider Aperture (wider lens opening)
ISO: 400 - Shutter speed: 1/250 - Aperture - f/5.6
ISO is the last thing you want to adjust for more exposure, because the higher the ISO the more noise will appear on your image.
Bracketing
Bracketing is a method where the photographer takes multiple exposures of the same image. You intentionally take frames metered under and over exposed to ensure that you have a properly exposed image. This is helpful when first learning exposure, or shooting under difficult lighting situations. Example would be to take the same image at -1, 0, +1 or -1, -1/2, 0, +1/2, +1.
Most SLR's have a function that you can automatically set to bracket an image. (See your cameras manual to find out how to use this feature.)
This is still a work in progress, so much more info to come.... I just wanted to get the tech. info up to start with.
This thread is an original work, and copywrited by myself Ryan McManus, please don't copy/reuse this information/thread without my consent. Thank you
(You can contact me via email at ryan.mcmanus.05@gmail.com or PM)
Last edited by REIGN SS; 12-05-2007 at 03:40 AM.

 and a million imaginary rep points for you!
  11-29-2007, 07:47 AM
#6
Senior Member
I have several old cameras without built-in light meters, and the way I use them is with an old-fashioned hand-held light meter. If I know my full sunny daylight exposure is 1/500 at f5.6 (normal for Kodachrome 64), and the meter tells me the actual light value is 3 stops less (because its cloudy out), I just set the camera at 3 stops down from full sunlight; ie, to 1/250 at f2.8 or maybe 1/125 at f4.
11-29-2007, 08:34 AM
#7
Original Hayden Fanatic
Platinum Member
Thread Starter
You hint at it, but I'll mention it anyway for emphasis. The way the ISO, aperture and shutter speeds all operate on the principle of "doubling" can be used to your advantage. Say, if your correct exposure is 1/500 at f5.6, you can change the settings considerably and still come up with the same exposure as long as you are aware of the relationship. Double your shutter speed by four stops, for example, to 1/30, and "halve" your aperture by four stops to f22 will give you the exact same exposure as the original 1/500 at 5.6.
I have several old cameras without built-in light meters, and the way I use them is with an old-fashioned hand-held light meter. If I know my full sunny daylight exposure is 1/500 at f5.6 (normal for Kodachrome 64), and the meter tells me the actual light value is 3 stops less (because its cloudy out), I just set the camera at 3 stops down from full sunlight; ie, to 1/250 at f2.8 or maybe 1/125 at f4.
I have several old cameras without built-in light meters, and the way I use them is with an old-fashioned hand-held light meter. If I know my full sunny daylight exposure is 1/500 at f5.6 (normal for Kodachrome 64), and the meter tells me the actual light value is 3 stops less (because its cloudy out), I just set the camera at 3 stops down from full sunlight; ie, to 1/250 at f2.8 or maybe 1/125 at f4.
11-29-2007, 10:55 AM
#9
Original Hayden Fanatic
Platinum Member
Thread Starter
11-29-2007, 12:17 PM
#10
Senior Member
Join Date: 05-20-06
Location: Jacksonville, Florida
Posts: 5,450
Likes: 0
Received 0 Likes
on
0 Posts
 11-29-2007, 12:20 PM
#11
Original Hayden Fanatic
Platinum Member
Thread Starter
Yes, the 30D stopped when the 40D came out...
You could probably find a decent used one...
You could probably find a decent used one...
Last edited by REIGN SS; 11-29-2007 at 12:20 PM. Reason: Automerged Doublepost
11-29-2007, 03:18 PM
#13
Senior Member
Platinum Member
thanks for the thread reign. i was wondering how long until you moved the thread to the site. hopefully this will inspire some members to go and take some good quality pictures.
the 40d replaced the 30d so there are some killer deals on 30d's on ebay and amazon. i picked up my 3 month old 30d on ebay w/ everything included w/ 28-135mm glass for $650 shipped. this was about 2 months ago so i'm sure there are better deals out now. i used to have an xt and the difference is night and day between the two.
the 40d replaced the 30d so there are some killer deals on 30d's on ebay and amazon. i picked up my 3 month old 30d on ebay w/ everything included w/ 28-135mm glass for $650 shipped. this was about 2 months ago so i'm sure there are better deals out now. i used to have an xt and the difference is night and day between the two.

 11-29-2007, 05:21 PM
#17
Senior Member

Join Date: 10-30-06
Location: Federal Way, Washington
Posts: 11,850
Likes: 0
Received 0 Likes
on
0 Posts
Reign like i said in my post about the baby thing.....this camera is pretty much the last fun thing i get for myself...this better teach me how to use it so i can use the hell out of it haha.
11-29-2007, 05:51 PM
#19
Senior Member
Join Date: 10-30-06
Location: Federal Way, Washington
Posts: 11,850
Likes: 0
Received 0 Likes
on
0 Posts
 11-30-2007, 09:37 AM
#22
Senior Member
Platinum Member
have you felt the 30d in your hands? if you did, and still prefer how the xti feels then go w/ the xti but you can pick up a used, great conditioned 30d for the same price as a new xti.
11-30-2007, 09:38 AM
#23
Senior Member
Join Date: 05-20-06
Location: Jacksonville, Florida
Posts: 5,450
Likes: 0
Received 0 Likes
on
0 Posts
Thats the thing though, I cant actually hold the 30D in my hands b/c nobody carries it anymore. Is the 40D the same? Maybe I should hold that and see?
11-30-2007, 09:48 AM
#24
Senior Member
Platinum Member
the 30d and 40d are almost identical. dimension wise, they are exactly the same size. the 40d weighs about .08lbs more.
11-30-2007, 10:20 AM
#25
Senior Member
Join Date: 05-20-06
Location: Jacksonville, Florida
Posts: 5,450
Likes: 0
Received 0 Likes
on
0 Posts